I’ve run plenty of cycles where the plants looked perfect, the canopy was even, and the resin was stacking… but the smell made me nervous long before harvest. Skunk-heavy cannabis can push through tiny gaps in a room the same way light leaks find their way into a tent. I’ve seen the same thing with marijuana runs that looked clean on paper but still overwhelmed a small apartment. The first time it happened to me, I blamed the carbon filter. It wasn’t the filter. It was my whole system: airflow, pressure, ducting, and what I was doing during dry and cure.
This post is my hands-on approach to Skunk Odor and Removal for home growers. I’m not talking about masking smell with perfume or hoping the neighbors won’t notice. I mean containment: building a predictable path for air, scrubbing it efficiently, and handling the stinkiest days of the run with a plan you can repeat.
Along the way, I’ll also cover seed shopping choices that can influence aroma intensity, how I compare feminized and auto-flowering options, and how I keep the process practical when you’re working in a tent, closet, or small room where weed odor can travel fast. Local regulations vary widely, so treat this as cultivation technique only and follow the rules where you live.
Why skunk aroma behaves differently than most grow-room smells
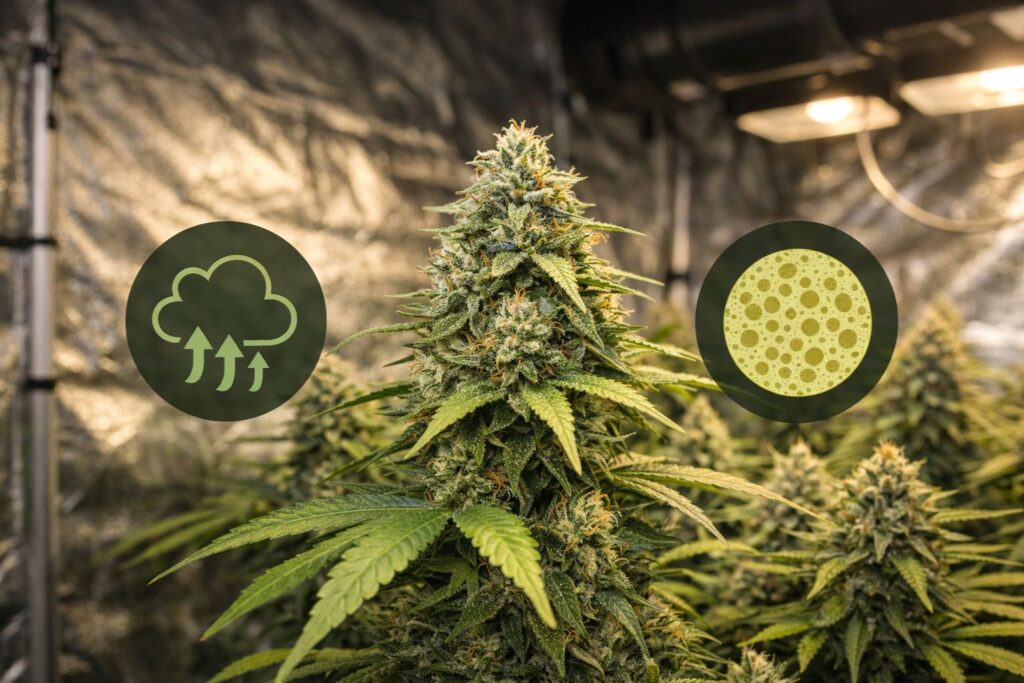
When people say a plant “reeks,” they usually mean the blend of volatile aromatic compounds the plant produces as it matures. In cannabis, a big portion of that odor rides on terpenes and related compounds that evaporate readily. In skunk-leaning phenotypes, the profile can feel sharp, sulfurous, and persistent, and it tends to cling to fabric, hair, and anything porous nearby.
Two practical takeaways matter for Skunk Odor and Removal:
- Odor travels with air. If air leaves your space unfiltered, the smell goes with it.
- Odor also sticks to surfaces. If you don’t manage drying and trimming, you can scrub your exhaust perfectly and still stink up the house.
I learned this the hard way when my exhaust was clean but my drying closet wasn’t. My “fix” became a complete grow room odor containment mindset, not a single gadget.
My baseline: build containment before you chase removal
If you only remember one thing from this guide, make it this: odor control is mostly engineering. Plants produce smell. Your job is to control where air enters, where it exits, and what happens to it on the way out.
Here’s the order I follow:
- Seal obvious leak points.
- Establish a sealed tent intake strategy.
- Dial a negative pressure ventilation setup.
- Optimize carbon scrubber performance.
- Verify with a ducting leak test.
- Only then consider supplemental tools like gels or (rarely) ozone.
That sequence is boring compared with buying a new “odor killer,” but it’s the only sequence that has stayed consistent for me across cannabis, marijuana, and weed grows with wildly different genetics.
Leak points I check every cycle
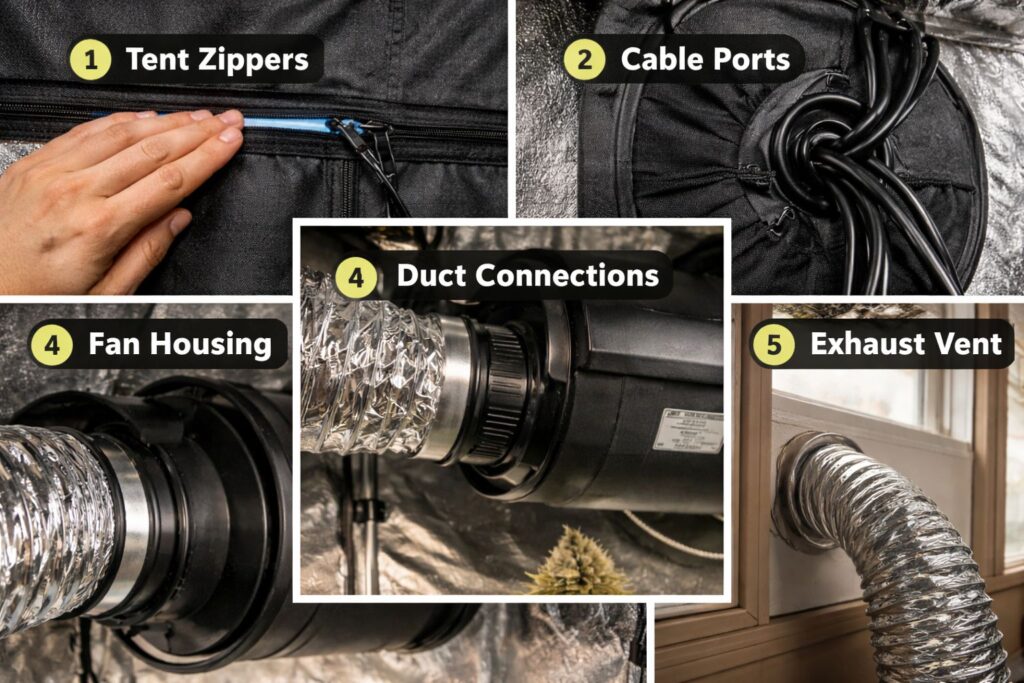
Odor leaks are usually simple. The annoying part is that small leaks can smell huge when the room outside your tent is still.
My checklist for grow room odor containment:
- Tent zipper seams: I run a finger along the zipper line while the fan is on. If I feel air puffing out, the pressure is wrong or the zipper is warped.
- Cable ports: I cinch them and avoid running thick bundles that prevent closure.
- Duct connections: any joint without a clamp will eventually leak.
- Fan housing: some inline fans leak at the seams if the pressure is high.
- Exhaust window or vent: the exit point is often the smelliest “leak” because it’s where people stand.
If a leak is hard to locate, I do a ducting leak test by turning off all oscillating fans, setting the exhaust to a steady speed, and using a small strip of tissue near suspected gaps. The tissue flutter tells you where air is escaping.
The negative pressure ventilation setup that actually works
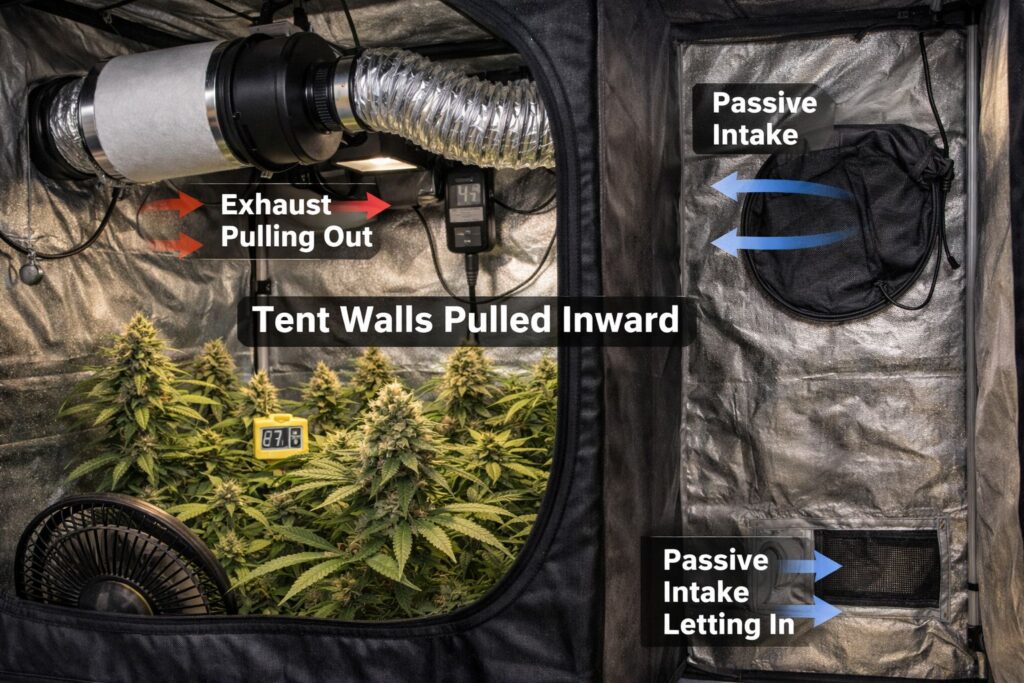
Negative pressure means the grow space is slightly “sucked in.” Air prefers entering through your intake rather than leaving through cracks.
In practice, my negative pressure ventilation setup looks like this:
- Exhaust fan pulling air out through the scrubber, not pushing into it.
- Passive intake (open vents) or a small powered intake that is always weaker than exhaust.
- Tent walls pulled inward slightly when everything is running.
When I’m troubleshooting Skunk Odor and Removal, I’m watching the tent shape. If it balloons outward, smell will leak.
Dialing fan speed without guessing
This is where inline fan static pressure matters. Ducting, bends, and a loaded carbon scrubber all create resistance. A fan that looks strong on the box may underperform once installed, or it may be too strong and force air through weak seals.
What I do:
- Start with the exhaust fan at a medium setting.
- Watch for tent “suck-in.”
- If the tent collapses aggressively, I open more intake area first, then adjust speed.
- If there’s no suck-in, I either reduce intake or increase exhaust.
Static pressure rises when filters clog or when duct runs are long. If odor control degrades near late flower, I often find the scrubber is simply loaded with dust and the fan can’t maintain the same pull.
A note on inline fan static pressure in real installs
Inline fan static pressure is the reason two identical fans can behave completely differently once you add a scrubber and ducting. When I’m evaluating inline fan static pressure, I look at how many bends I’m running and whether the fan can hold negative pressure without screaming at full speed. If inline fan static pressure is too high for your setup, the fix is often shorter ducting, fewer elbows, or a fan rated for higher resistance—not just cranking the dial.
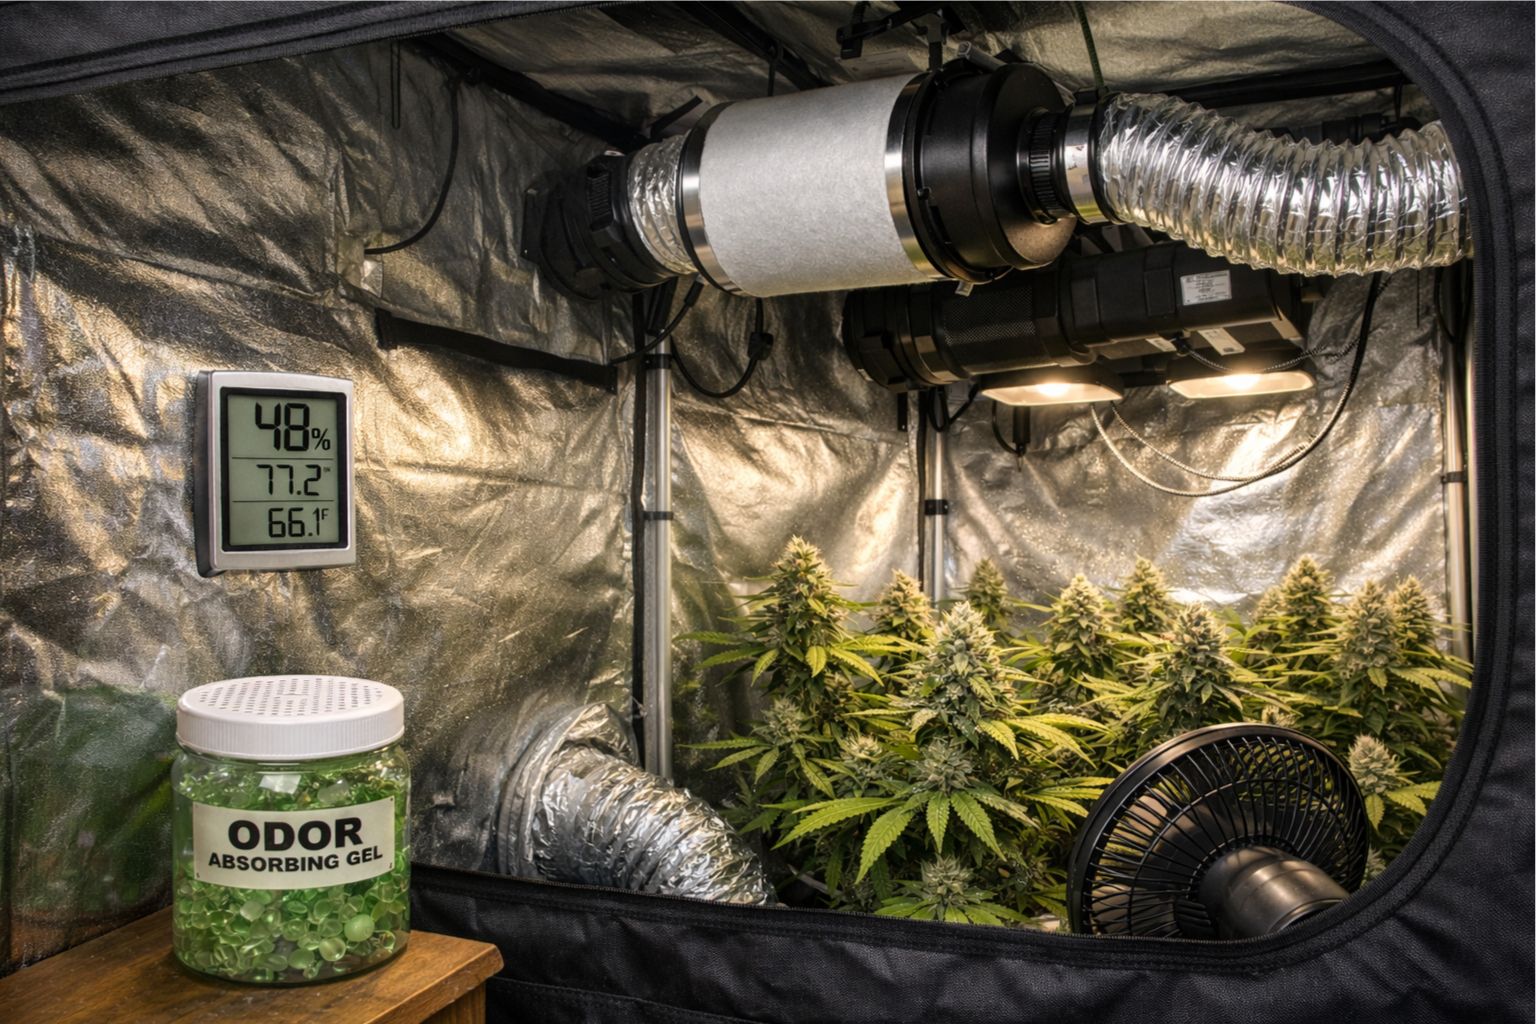
Carbon scrubber performance: sizing, placement, and realistic expectations
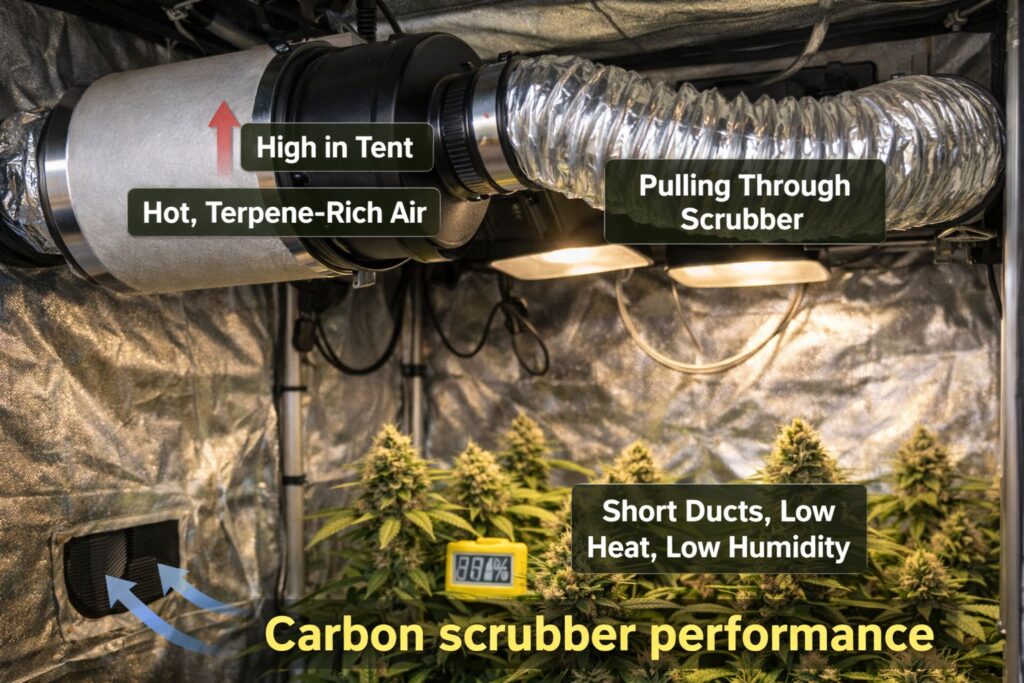
A carbon scrubber is not magic. It’s activated carbon with a finite adsorption capacity. If air moves too fast through it, contact time drops. If humidity is too high, performance drops. If you pull dusty air through it for months, it clogs and your fan can’t keep up.
For carbon scrubber performance, my habits are:
- Place the scrubber high in the tent where the warm, terpene-rich air accumulates.
- Pull through the scrubber into the fan (scrubber -> fan -> duct).
- Keep duct runs short and avoid sharp bends.
- Maintain moderate humidity during late flower and during dry.
I also treat the pre-filter sleeve like a real maintenance item. If the sleeve is visibly dirty, airflow is compromised, negative pressure weakens, and Skunk Odor and Removal becomes harder even if the carbon is still good.
Humidity targets that protect both plants and odor control
Odor peaks when buds are resinous and the room is warm. I aim for:
- Late flower: 24–27°C lights on, 19–22°C lights off.
- Relative humidity: 45–55% late flower.
- VPD: roughly 1.2–1.5 kPa depending on cultivar response.
If humidity creeps above 60% in late flower, I see two problems: higher risk of bud rot and weaker carbon scrubber performance. That’s one of the trade-offs I like to say out loud: odor control and plant health are connected, but you can’t “fix smell” by trapping humidity.
Lighting and feeding choices that influence odor intensity

Odor isn’t just genetics; it’s also how you drive the plant.
On lighting, I’ve noticed that higher PPFD in late flower can intensify aroma, especially in skunk-leaning cannabis. I commonly run:
- Vegetative growth: 400–600 PPFD.
- Flower: 700–900 PPFD, depending on canopy health and leaf posture.
On nutrients, overfeeding can create stress that changes the smell in a way I don’t like, and it can also increase transpiration, which pushes more odor into the air. In hydroponics I watch EC/PPM closely and keep solution temperature stable; in soil I’m careful about salt buildup and water-to-runoff habits.
None of this replaces grow room odor containment, but it explains why two tents with the same filter can smell different.
Training and defoliation: odor control without hurting quality
I’ve found that aggressive defoliation right before late flower can spike odor because it increases airflow through the buds and can stress plants temporarily.
My preference is:
- Do major training in veg and early flower.
- Use light defoliation to improve airflow, not to “open the plant up” dramatically in one day.
- Keep an oscillating fan moving air across, not directly blasting, the buds.
This matters for Skunk Odor and Removal because any time you handle plants, rub stems, or trim leaves, you release a burst of smell. If your negative pressure ventilation setup is dialed, those bursts stay contained.
The drying stage is where most people lose the smell battle
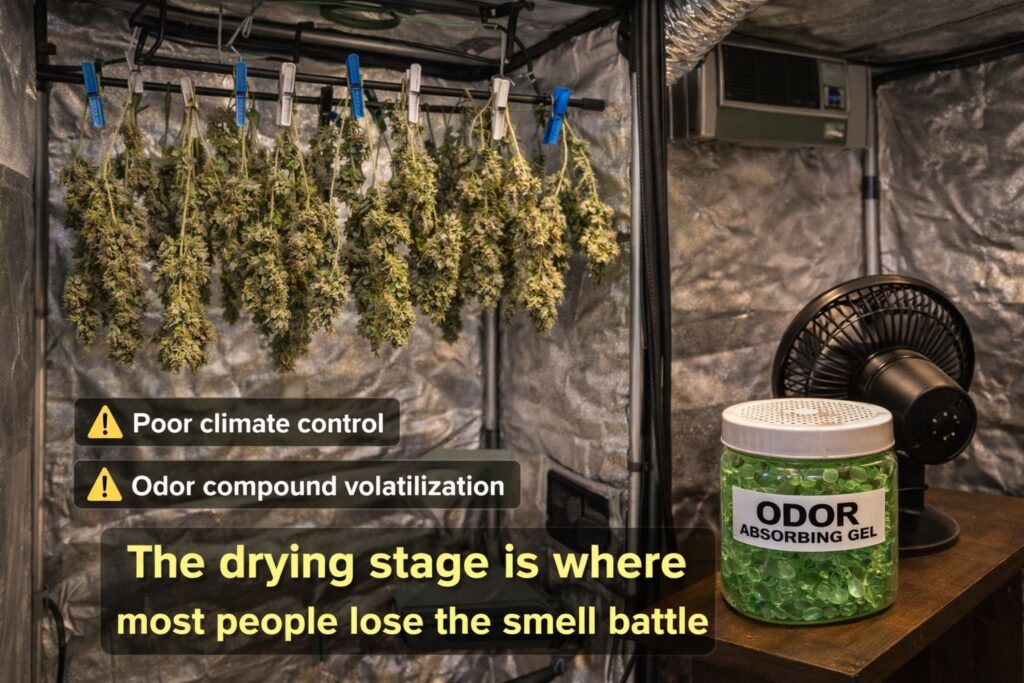
If you only control odor during flower, you’re missing the loudest week of the whole process. Drying converts a grow-room smell problem into a whole-home smell problem, because you often move biomass into a different space.
My terpene-safe drying method is built around slow, steady airflow and conservative conditions. I treat a terpene-safe drying method as part of odor control because it keeps the room from swinging between overly wet and overly hot:
- Temperature: 18–20°C.
- Relative humidity: 55–60% for the first few days, then 50–55%.
- Darkness and gentle air exchange.
- No fan directly on hanging branches; instead I circulate air in the room.
The goal is to keep terpenes in the flower while still preventing mold. A too-hot, too-fast dry can smell strong for a short time but reduce aroma quality later. A too-humid dry can smell “wet and funky” and create real problems. This is another honest trade-off in Skunk Odor and Removal: the safest dry is not always the least smelly in the moment, but it protects the end result.
Turning a spare closet into a contained drying zone
When I don’t have a dedicated drying tent, I build a contained setup like this:
- A small exhaust fan connected to a carbon scrubber.
- A slightly cracked intake at the bottom of the closet door.
- A simple hygrometer at bud level.
- A quick ducting leak test before I hang anything.
If you can create negative pressure in the drying space, the smell stays manageable even when you trim.
Trimming days: practical routines that keep odor from spreading
Trimming is unavoidable contact with sticky plant material, and it’s one of the easiest times for weed smell to hitchhike into the rest of the building.
Here’s how I keep it under control:
- I trim in the same contained space I dry in, with the scrubber running.
- I bag waste immediately and remove it from the building.
- I wipe surfaces with a mild soap solution afterward.
- I change clothes and wash hands, because odor sticks.
For extra support, gel odor neutralizer placement can help, but I treat gels as a room-perimeter tool, not something that goes inside the tent where it might off-gas onto flowers. Done right, gel odor neutralizer placement is about catching stray odor in hallways and near doors, not contaminating your crop. I place gels outside the grow space, near the door or near the exhaust exit area, and I keep them away from direct airflow into the tent.
Curing is odor management and quality management at the same time
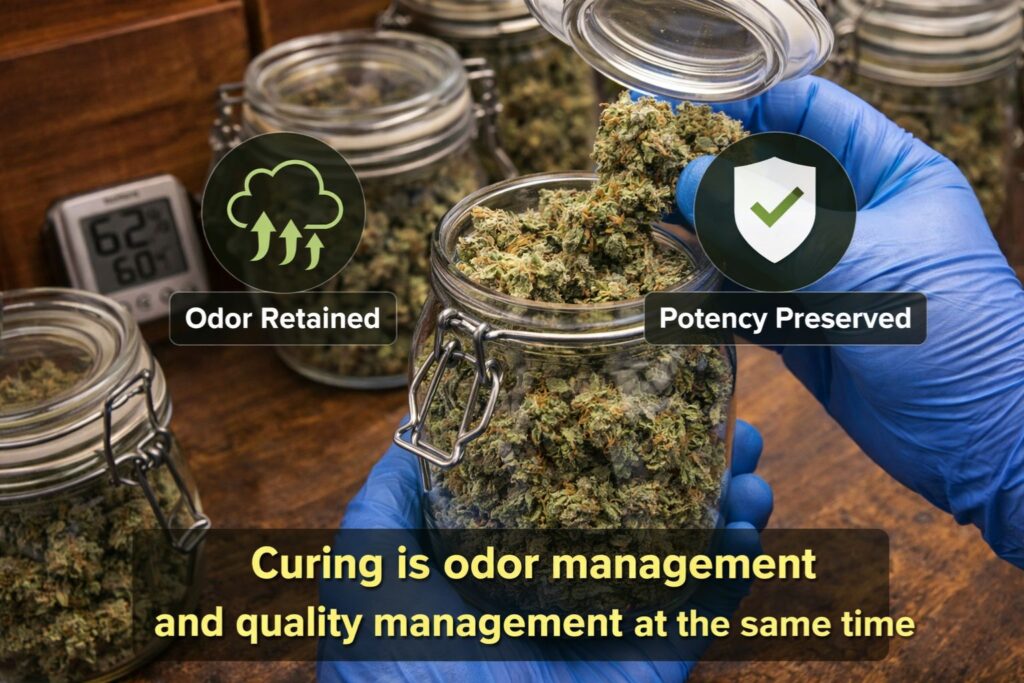
After drying, the smell shifts. It becomes less “green” and more true to the final profile. That’s good for quality, but it can still stink up a room when jars are opened.
My curing jar burp schedule is simple and consistent. A curing jar burp schedule that’s predictable also makes smell easier to manage because you’re not opening jars constantly:
- Days 1–7: open jars 1–2 times per day for 5–10 minutes.
- Days 8–21: open jars every other day.
- After 3 weeks: open weekly or as needed.
If buds feel too moist, I extend the open time. If they feel crisp on the outside, I reduce burping and let moisture equalize. This schedule supports Skunk Odor and Removal because short, planned openings prevent a constant background stink, and it also reduces the risk of trapping humidity that could lead to spoilage.
Supplemental tools: what I use, what I avoid, and why
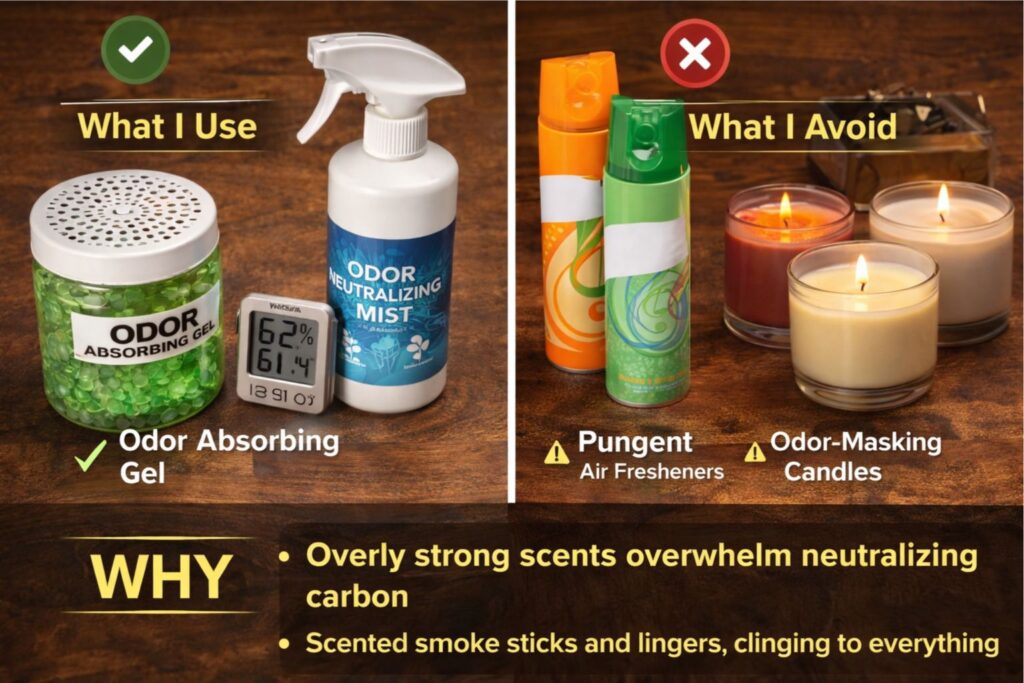
Once containment is solid, a few extras can help. But some tools are overused.
What I actually use
- Gel products as a buffer in surrounding rooms (gel odor neutralizer placement matters).
- HEPA pre-filters in the larger room to reduce dust loading the carbon.
- Extra duct clamps and foil tape to eliminate small leaks.
- A simple smoke pen or incense stick for airflow testing (used briefly and carefully).
What I use rarely: ozone
Ozone can oxidize odor compounds, but it can also be harsh on lungs, plants, and materials. Ozone generator safety is non-negotiable. I also keep ozone generator safety in mind for materials: ozone can degrade rubber, elastics, and some plastics over time, which can create new leak points. I do not run ozone where people are present, and I never run it in a way that sends ozone through the grow tent during cultivation.
If I ever use ozone at all, it’s for an empty room after harvest, with strict ventilation afterward and no exposure to plants or stored flower. For most home growers, solid grow room odor containment plus carbon scrubber performance is enough without taking this risk.
Genetics and seed shopping: how I avoid surprises

Odor intensity is partly a genetics game. When I’m shopping seeds, I assume that any skunk-leaning line can get loud, especially if it expresses a pungent phenotype.
Here’s what I look at when choosing seeds:
When I’m choosing where to buy, I treat seed banks like any other supplier: I want clear provenance, consistent customer support, and realistic shipping policies. I avoid sellers that promise impossible delivery times or make legal claims. For discreet shipping, I look for plain packaging and straightforward tracking updates, and I always plan ahead so I’m not rushing a run because a shipment is late.
- Breeder notes on aroma and plant structure.
- Whether the line is feminized or regular and how much variation I’m willing to hunt.
- Whether the cultivar is photo-dependent or auto-flowering, since the timeline changes how quickly smell becomes a problem.
- My space: a small tent has less buffer for mistakes than a sealed room.
If you’re comparing indica, sativa, and hybrid types, remember those labels don’t predict odor by themselves. What matters more is the actual aroma description and how the cultivar behaves in your environment.
Soil vs. hydro and how odor control changes
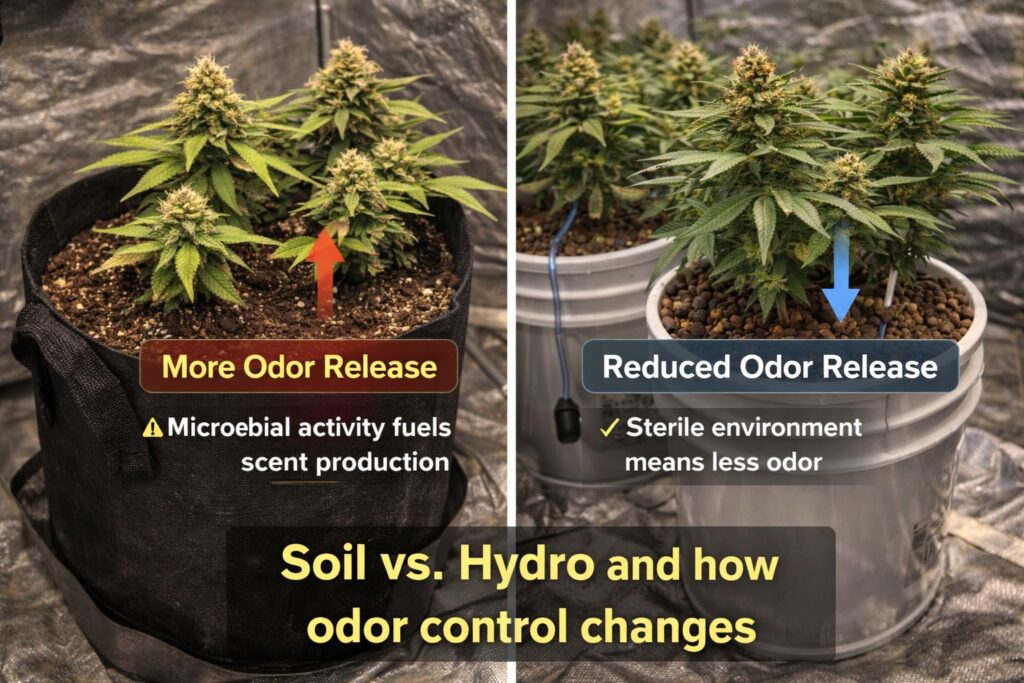
In soil, the room smell often includes the medium itself: moist organic material has its own scent that can mix with marijuana odor. In hydro, I notice the weed smell is more “pure plant” and less earthy, which can make leaks easier to notice. In hydroponics, the smell is usually cleaner but the plants can transpire heavily if the environment is warm, which can push more odor into the air.
Either way, the engineering is the same: negative pressure ventilation setup, carbon scrubber performance, and a ducting leak test whenever you change the system.
Quick troubleshooting: when the room suddenly smells worse
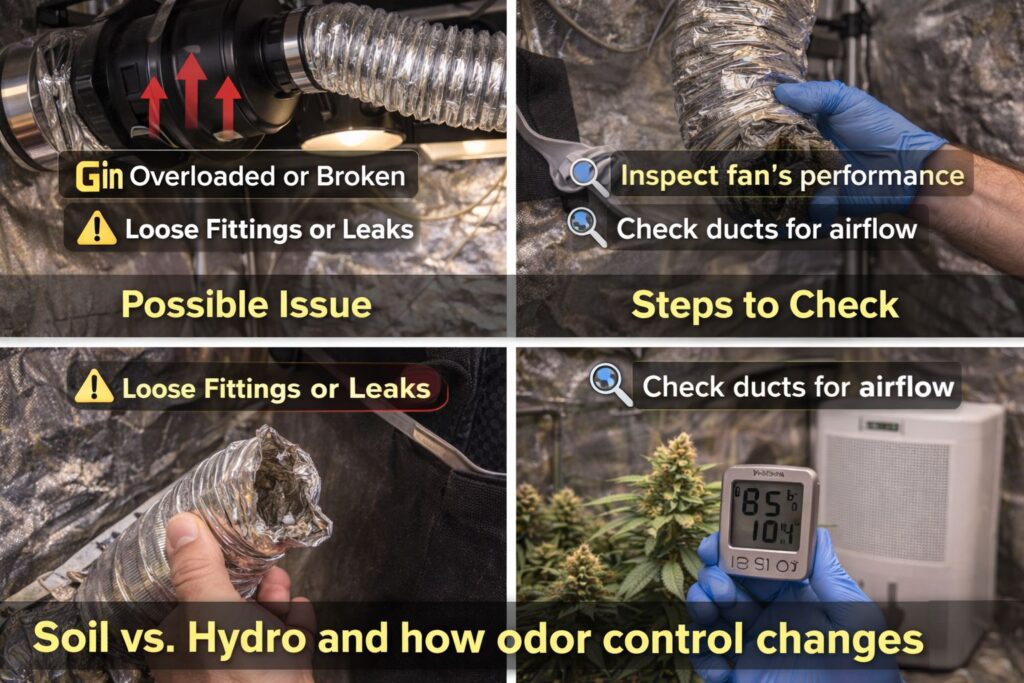
If odor spikes overnight, I run through this decision tree:
- Is the exhaust fan still running at the same speed?
- Did humidity rise (dehumidifier full, weather change, lights-off spike)?
- Did I recently defoliate, train, or water heavily?
- Are duct joints still tight, or did a clamp loosen?
- Is the pre-filter sleeve clogged?
- Did I change the sealed tent intake strategy (opened a vent, moved the tent, blocked an intake)?
Most “mystery” odor problems are one of those six things. This is why I treat Skunk Odor and Removal as a system, not a product.
My checklist for reliable Skunk Odor and Removal in small spaces
Before late flower:
- Confirm tent pulls inward slightly.
- Run a ducting leak test on every joint.
- Clean or replace the pre-filter sleeve.
- Shorten ducting and remove unnecessary bends.
During late flower:
- Keep humidity stable in the 45–55% range.
- Don’t spike heat; warm air carries smell farther.
- Keep canopy healthy; stressed plants can smell off.
During dry and cure:
- Re-check gel odor neutralizer placement in nearby rooms so it isn’t blowing into your drying area.
- If you ever used ozone in the past, revisit ozone generator safety and ventilate thoroughly before storing dried flower.
During dry and cure:
- Follow a terpene-safe drying method with steady air exchange, and stick with the same terpene-safe drying method for the full dry instead of changing conditions midstream.
- Trim inside a contained space with scrubbing running.
- Stick to a curing jar burp schedule instead of random jar opening, and adjust that curing jar burp schedule based on how the buds feel.
FAQ
Does a grow tent stop weed smell by itself?
A tent helps, but it’s not airtight. In cannabis cultivation, the tent is only as good as the pressure and filtration you build around it. For Skunk Odor and Removal, the tent is just the container. You still need a negative pressure ventilation setup and consistent carbon scrubber performance, plus a ducting leak test to catch small gaps.
Where should I place a carbon scrubber for the best results?
Inside the tent, high up, pulling warm air through the scrubber into the fan. That placement supports grow room odor containment and helps maintain negative pressure without forcing air through weak seals.
Is it safe to use an ozone device to remove odor?
Ozone generator safety is critical. Ozone can be harmful to people, pets, and plants. I avoid using it during cultivation. If someone chooses to use it at all, it should be in an empty space with proper ventilation afterward.
Why does odor get worse right after I water or trim?
Handling plants releases odor, and heavy watering can increase transpiration. If your sealed tent intake strategy or negative pressure ventilation setup is slightly off, those bursts will leak. Tighten the system first; don’t just add more masking products.
Are auto-flowering plants less smelly than photo-dependent plants?
Not reliably. Auto-flowering lines can be extremely pungent, and they can reach the loud stage quickly. Treat any cultivar as potentially strong-smelling and plan grow room odor containment from day one.