Table of Contents
How to start marijuana seeds
Starting marijuana seeds is a fundamental step in growing cannabis, whether for medical or recreational use. The success of your entire cultivation process depends heavily on how well you start your seeds. This comprehensive guide provides detailed, scientifically backed, and practical steps to start marijuana seeds, covering seed selection, germination methods, environmental conditions, transplanting, and early care.
1. Seed Selection: Choosing Quality Genetics
Before germinating seeds, selecting high-quality genetics is essential. The characteristics of the seeds will determine not only the strain’s potency, flavor, and medical effects but also plant resilience and yield.
Key factors to consider:
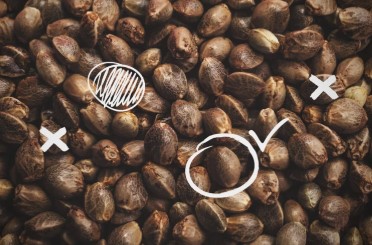
- Seed Appearance: Healthy cannabis seeds are generally dark brown, gray, or black with a mottled pattern. They should be hard, dry, and not easily crushed.
- Viability Test: Place the seeds in water for 12–24 hours. Generally speaking, non-viable seeds float while viable ones sink.
- Genetic Origin: Buy from reputable seed banks. Choose strains suitable for your environment (indoor vs. outdoor) and purpose (e.g., high-THC, high-CBD, autoflowering, feminized).
- Feminized vs. Regular: Feminized seeds produce female plants, which are the cannabinoid-rich producers. Regular seeds give a mix of male and female plants, requiring early sexing.
2. Seed Storage Before Germination
Generally speaking, non-viable seeds float while viable ones sink.
- Temperature: Keep between 5–10°C (41–50°F).
- Humidity: Ideal RH is 20–30%. Mold or early germination can be brought on by moisture.
- Light: Store seeds in complete darkness.
- Storage Container: Use airtight glass containers or mylar bags in a refrigerator for long-term storage.
3. Germination: Starting the Life Cycle
The process by which a seed starts to sprout is called germination. Several methods are used, but all aim to provide warmth, moisture, and darkness.
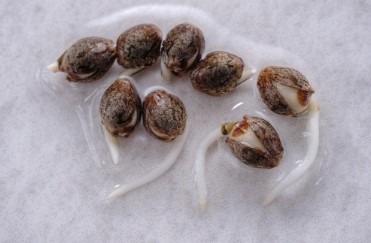
a. Paper Towel Method (most popular)
Materials:
- 2 plates
- Paper towels
- Distilled water
- Plastic bag (optional)
Steps:
- Moisten two paper towels with distilled water (not soaked).
- Place the seeds between the folded towels.
- Put the towels between two plates to keep it dark and humid.
- Maintain a temperature of 21–26°C (70–78°F).
- Check daily. Seeds usually sprout within 1–5 days. The taproot (white root) will emerge.
Pros:
- Easy to monitor.
- High success rate.
Cons:
- Risk of damaging the taproot when transferring.
b. Direct Soil Germination
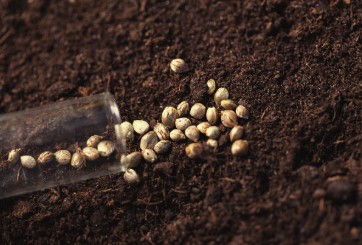
Steps:
- Moisten a small potting container with seedling mix.
- Plant the seed about 1/2 inch deep.
- Lightly cover with soil and gently water.
- Keep in a warm, dark place.
Pros:
- No transplant shock.
Cons:
- Germination is slower and less visible.
- Risk of overwatering.
c. Starter Plugs & Jiffy Pellets
Pre-formed growing mediums like Rapid Rooters, Rockwool cubes, or peat pellets are excellent for beginners.
Steps:
- Soak plug or pellet as per package instructions.
- Insert seed about 1/2 inch deep.
- Keep moist and warm.
Pros:
- Convenient for hydroponic or soil transitions.
- Better root aeration.
Cons:
- Slightly more expensive.
4. Environmental Conditions for Germination
Light:
- Not required until sprout emerges. Darkness speeds germination.
Temperature:
- Ideal range: 21–26°C (70–78°F).
- Too cold slows germination, too hot damages seeds.
Humidity:
- High humidity (65–80%) around the seed speeds germination.
Moisture:
- Keep medium moist, not soaked.
- Use distilled or filtered water to avoid chlorine or mineral build-up.
5. Transplanting Sprouted Seeds
Once the taproot reaches 0.5–1 inch, it’s time to transplant carefully.
Steps:
- Fill a small container (solo cup, seedling pot) with light, airy soil like coco coir or a seed starter mix.
- Create a small hole 1/2 inch deep.
- Gently pick up the sprouted seed by the shell or use tweezers.
- Place taproot facing downward into the hole.
- Lightly cover with soil and mist with water.
Tips:
- Don’t touch the root.
- Label each plant if starting multiple strains.
6. Seedling Stage: Early Care and Monitoring
This stage lasts 2–3 weeks and requires gentle conditions for optimal growth.
Light:
- After emergence, use 18 hours of fluorescent, LED, or T5 grow lights.
- Keep lights 2–4 inches above the seedlings to avoid stretching.
Temperature:
- Maintain 20–25°C (68–77°F).
Humidity:
- 60–70% RH is ideal for early seedling development.
- Use a humidity dome if necessary.
Watering:
- Mist the soil lightly.
- Avoid overwatering, which causes damping-off (fungal death of seedlings).
Nutrients:
- Don’t feed nutrients for the first 1–2 weeks.
- If using inert media (e.g., coco or Rockwool), start a weak (¼ strength) nutrient solution after the first true leaves appear.
7. Common Germination Problems & Solutions
| Problem | Cause | Solution |
|---|---|---|
| Seed not sprouting | Old or non-viable seed | Test viability in water, start over |
| Damping-off disease | Fungal infection from excess moisture | Improve air circulation, avoid overwatering |
| Stretchy seedlings | Low light intensity or placement | Lower lights, increase intensity |
| Yellow seedling leaves | Overwatering or poor drainage | Allow media to dry out slightly |
| Mold on paper towels | Excess moisture, stagnant air | Use less water, change towels daily |
8. Advanced Tips for Success
- Use Mycorrhizae: Beneficial fungi like Rhizophagus irregularis can improve early root development when added during transplant.
- Pre-soak Seeds in Kelp Extract or H₂O₂: Helps soften the seed shell and enhance germination rates.
- Scarification: Gently rubbing the seed shell with sandpaper can assist old or hard seeds to germinate.
- Heat Mats: Provide consistent bottom heat to maintain root zone temperature.
9. When to Move to Vegetative Growth
The transition from seedling to vegetative stage occurs when:
- The plant has 3–4 sets of true leaves.
- Roots have filled the starter container.
- The seedling is strong and upright.
At this point, you can transplant to a larger pot and begin full vegetative growth lighting (e.g., 18–24 hours light daily), with an adjusted nutrient schedule suitable for developing plants.
Final Thoughts
Starting marijuana seeds successfully is a blend of precision, patience, and the right environment. Understanding the biological needs of the seed and providing optimal conditions from the beginning lays a strong foundation for healthy vegetative and flowering stages. Each step choosing viable seeds, germinating them correctly, and nurturing the seedlings contributes to the eventual success of your cannabis grow. Whether you’re cultivating for medical relief or recreational use, beginning with strong, well-started plants is key to achieving potent, high-yielding results.