Table of Contents
I’m writing this on December 22, 2025, after another season of sorting jars, comparing notes, and popping older seeds to see what still has life in it. If you’ve ever ordered a pack, ran only a few plants, and ended up with “extras” you don’t want to waste, you already know the problem: a seed is small, but your investment in that genetics line is not. When I first started, I assumed seeds were basically shelf-stable. I was wrong.
The first time I learned that lesson was unglamorous: a half-used pack, tossed into a drawer in a warm room, opened and closed a dozen times, then forgotten through a humid summer. When I finally tried to sprout them, I got slow, uneven results and a couple that never cracked at all. That experience pushed me to take preservation seriously and to develop a repeatable routine that protects long-term cannabis seed viability without turning my home into a laboratory.
This article is my practical, grower-to-grower guide on How to Preserve Cannabis Seeds. It’s written from hands-on experience, but I’ll also include the “why” behind each step so you can adjust the method for your own climate, budget, and storage space. I’ll cover the humidity range for seed preservation, container choices, fridge versus freezer trade-offs, and what I do when I’m warming seeds before germination—because even perfect storage doesn’t stop time completely.
Before we start, two important notes:
- I’m discussing preservation and cultivation best practices, not legal advice. Grow laws vary by region—check your local rules before you germinate anything.
- Seed performance varies. Even seeds from the same batch can differ by phenotype and vigor, especially if they were produced under different conditions.
What actually damages cannabis seeds in storage
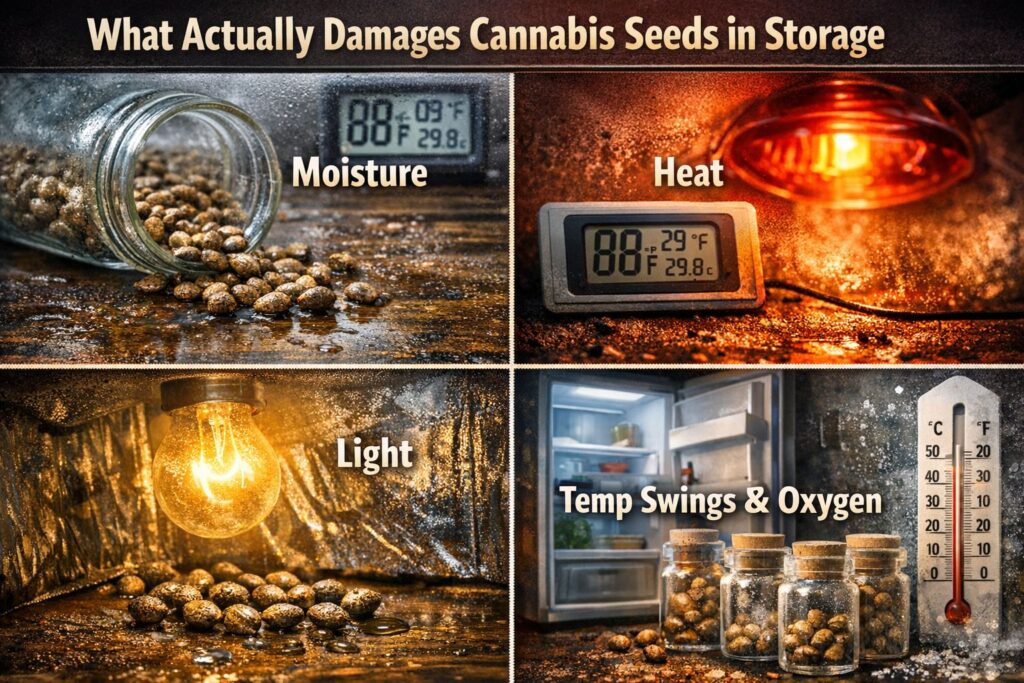
A cannabis (or marijuana, or weed) seed is alive, but dormant. Preservation is about slowing down the tiny processes inside the shell that continue over time. In my experience, four factors do most of the damage:
- Moisture
- Heat
- Light
- Oxygen exchange and repeated environmental swings
If you want long-term cannabis seed viability, you want stability. Every time seeds absorb moisture, warm up, or cycle through temperature changes, they’re more likely to burn through stored energy and degrade. Light can also contribute to temperature spikes and can trigger micro-condensation if a container heats unevenly.
The goal of How to Preserve Cannabis Seeds isn’t to “freeze time” (you can’t), but to reduce the rate of decline. My baseline approach is simple: keep them dark, keep them cool, keep them dry, and keep them sealed so those conditions don’t swing.
My target ranges for reliable preservation
I’ve tested seed lots kept in a cabinet, in a dedicated mini-fridge, and in a typical kitchen refrigerator. The dedicated mini-fridge setup has given me the most consistent long-term cannabis seed viability, but you can still do very well with a cabinet method if your home stays cool and stable.
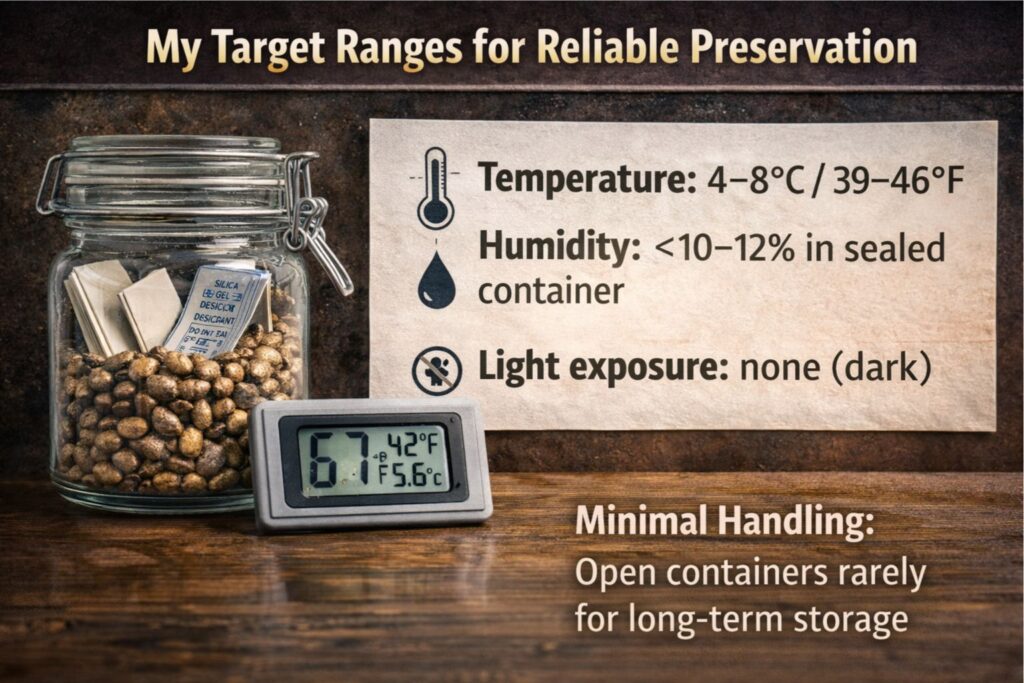
Here are the targets I aim for:
- Temperature: 4–8°C (39–46°F) for long-term storage; 15–18°C (59–64°F) is workable for short-term storage if stable.
- Relative humidity in the sealed container: low and steady, supported by desiccant. For most home growers, the best practical guideline is a humidity range for seed preservation that stays under roughly 10–12% inside the container.
- Light exposure: none. I store in opaque containers or keep clear containers in a dark box.
- Handling: minimal. Opening containers repeatedly is one of the fastest ways to ruin long-term cannabis seed viability.
If you take only one idea from this guide on How to Preserve Cannabis Seeds, let it be this: stable conditions beat “perfect” conditions that change constantly.
Picking the right container: what I actually use

A seed can’t stay dry if its container breathes. The single biggest upgrade most growers can make is moving from plastic baggies or porous organizers to an airtight seed storage container that seals reliably.
Here’s what I’ve tried, and what I learned:
- Glass vials with a tight lid: excellent. Glass is non-porous and doesn’t slowly exchange moisture.
- Metal tins with a good gasket: also excellent, as long as the seal is real (not a decorative friction fit).
- Hard plastic pill bottles: acceptable short-term, but many plastics are slightly permeable over long timelines.
- Zip bags: fine as a secondary barrier, not my primary long-term solution.
- Paper envelopes: useful inside the main container to separate batches and allow a seed to “breathe” away surface moisture, but only when the envelope lives inside an airtight seed storage container.
My current setup is a small glass jar (or vial) with a gasketed lid, and inside it I use labeled paper coin envelopes. That combination makes labeling and cataloging seed collections easy without letting humidity drift.
If you’re shopping for seeds and you’re choosing between options like feminized seeds, autoflowering lines, or classic photoperiod genetics, preservation matters the same way for all of them. The container and the environment are what keep them viable—not the marketing on the pack.
Conditioning seeds before storage: dryness and maturity matter
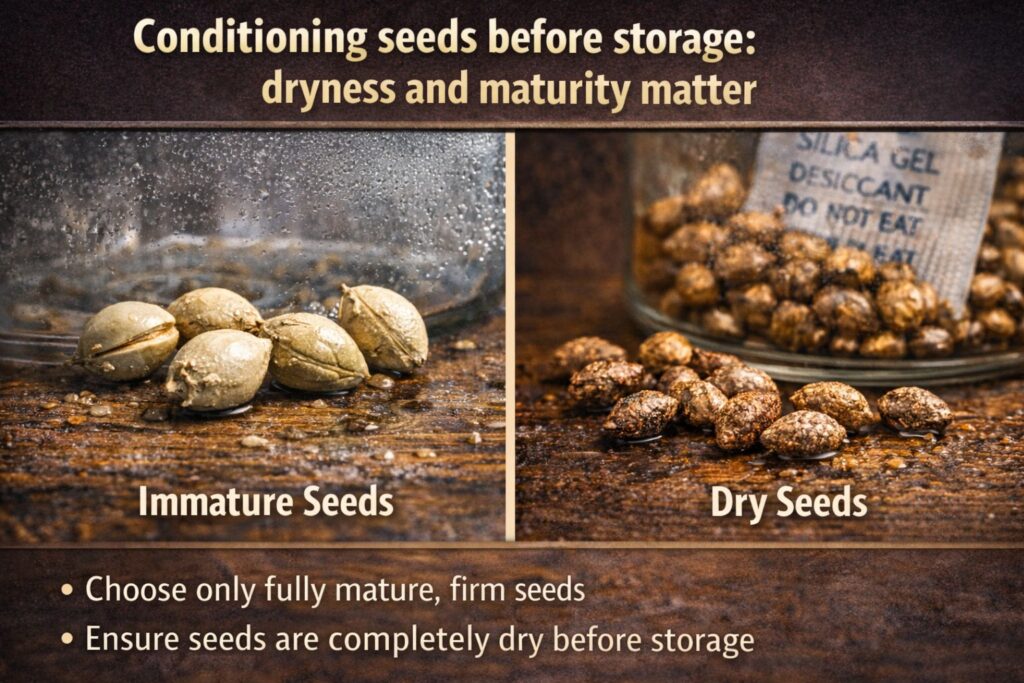
If you bought seeds from a reputable source, they should arrive dry and mature. If you produced seeds yourself (from a controlled pollination), conditioning becomes even more important.
I’m careful about two things:
- Maturity: immature seeds (pale, soft, or with thin shells) don’t store well. They can fail early even under good conditions.
- Surface moisture: seeds that feel dry can still carry humidity in tiny surface grooves.
When I’ve produced seeds, I dry them in a clean, dark space with stable conditions. I aim for roughly 20–22°C (68–72°F) and 45–55% room RH for the initial drying period, and I keep airflow gentle. Aggressive fans can over-dry the outer shell while the interior equilibrates slowly.
If I’m unsure, I do a simple test: I put a small sample in my intended airtight seed storage container with a fresh desiccant pack and leave it closed for a few hours. If I see any fogging or moisture on the inner surface, I stop and recondition. This is one of the simplest steps for preventing mold on cannabis seeds during long storage.
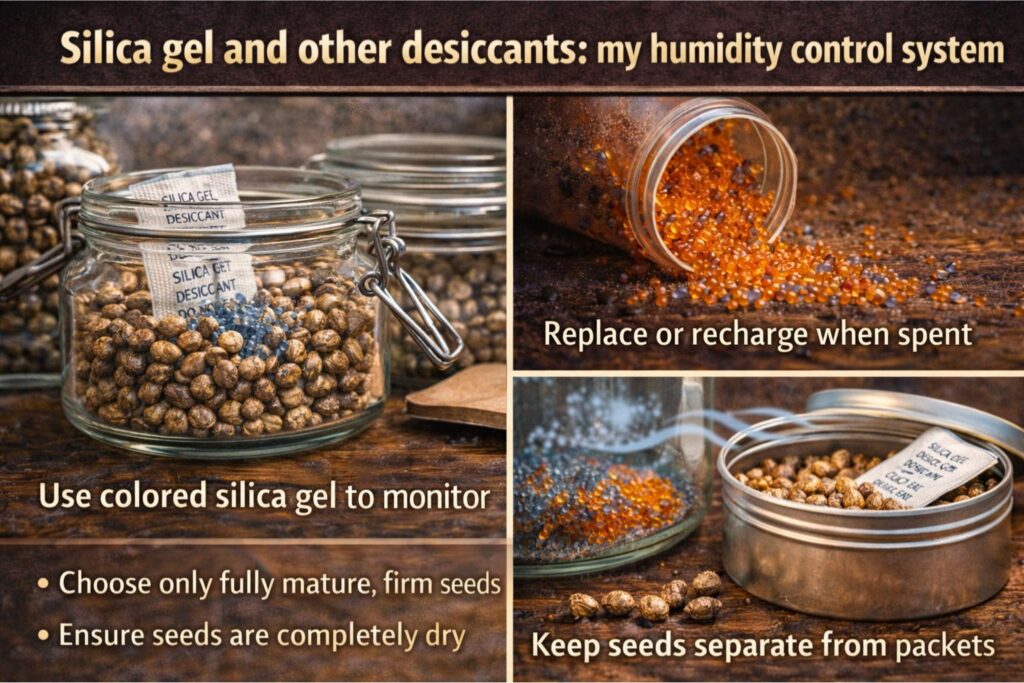
Silica gel and other desiccants: my humidity control system
Desiccant is where most “seed storage” guides get vague. I’m not vague because I’ve seen what happens when humidity creeps up: slower germination, more duds, and occasional mold when someone stores seeds that weren’t fully dry.
I rely on silica gel for seed humidity control because it’s predictable and reusable if you buy the color-indicating style. You can also use other desiccants designed for storage, but I prefer silica gel for seed humidity control because it’s easy to size and replace.
How I use it:
- I keep desiccant physically separated from seeds. I never let seeds sit directly on a desiccant packet.
- I size the desiccant amount to the container volume, not the number of seeds. A larger jar needs more protection.
- I replace or recharge it on a schedule if the jar will be opened periodically.
This system helps me keep the humidity range for seed preservation steady. The key is that the container must be truly sealed; otherwise, the desiccant just fights the room air and eventually loses.
If you’ve ever opened a storage jar in a damp room and felt that “cool, wet” air rush in, you understand why silica gel for seed humidity control matters. One sloppy opening can undo months of careful storage.
Refrigerator storage: the method that gives me consistent results
A refrigerator is the sweet spot for most growers, but only if you treat it as a stable environment rather than a kitchen accessory that gets opened 30 times a day. My favorite approach is a dedicated mini-fridge or a secondary fridge that doesn’t get constant door swings.
I call my process the refrigerator seed storage protocol, and it’s built around two priorities: stability and condensation avoidance.
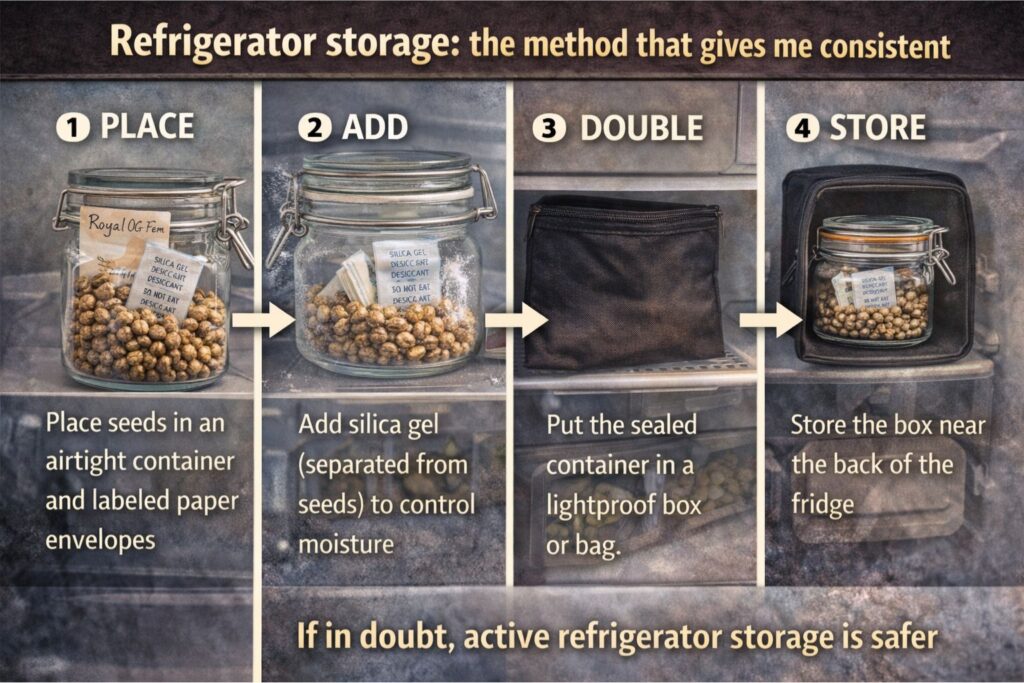
My refrigerator seed storage protocol step by step
- Place seeds in labeled paper envelopes, then into an airtight seed storage container.
- Add silica gel for seed humidity control in the same container (but separated from seeds).
- Put the sealed container inside a lightproof box or opaque bag (double barrier helps with temperature micro-swings).
- Store the box in the back of the fridge, not the door.
- Minimize openings. If I need a few seeds, I remove the container, take what I need quickly, and reseal immediately.
The refrigerator seed storage protocol works because a fridge slows metabolic degradation, but it also creates a risk: condensation. Condensation is the enemy of long-term cannabis seed viability.
How I prevent condensation when I take seeds out
When you move a cold container into a warmer room, moisture condenses on the outside first. If the container is opened cold, that moisture can end up inside.
Here’s what I do:
- I keep the container sealed until it reaches room temperature.
- Only then do I open it, remove what I need, and reseal.
This one habit has done more for preventing mold on cannabis seeds than any fancy gadget I’ve bought.
Freezer storage: when it can work and when I avoid it
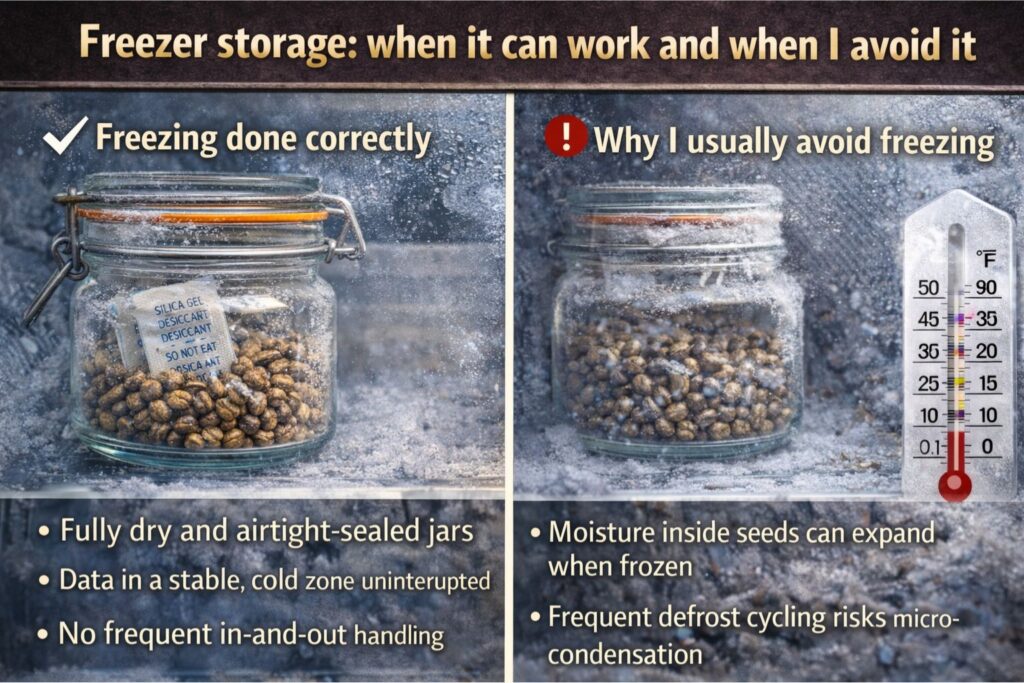
Freezers sound appealing because colder is usually better, but freezer risks for cannabis seeds are real. Freezing can damage cells if there’s too much moisture inside the seed, and home freezers also cycle temperatures more than people realize.
I personally avoid the freezer for most seed lots. If I do freeze, I do it only when:
- The seeds are fully conditioned and proven dry.
- They’re sealed in a robust container with desiccant.
- I plan to keep them frozen without frequent removal.
In other words, I treat it like an archive, not a “grab a seed whenever” situation.
If you’re considering freezer storage, respect the freezer risks for cannabis seeds:
- Moisture expands when frozen, which can stress or rupture cellular structures.
- Defrost cycles can create repeated micro-condensation events.
- Frequent in-and-out handling is worse than slightly warmer, stable storage.
The freezer risks for cannabis seeds make it a tool for specific situations, not my default.
The labeling system that saves me money and headaches
Once your collection grows, the problem isn’t just preserving viability—it’s remembering what you have. I’ve seen growers lose track of age, provenance, and parentage, then waste months running mystery seeds.
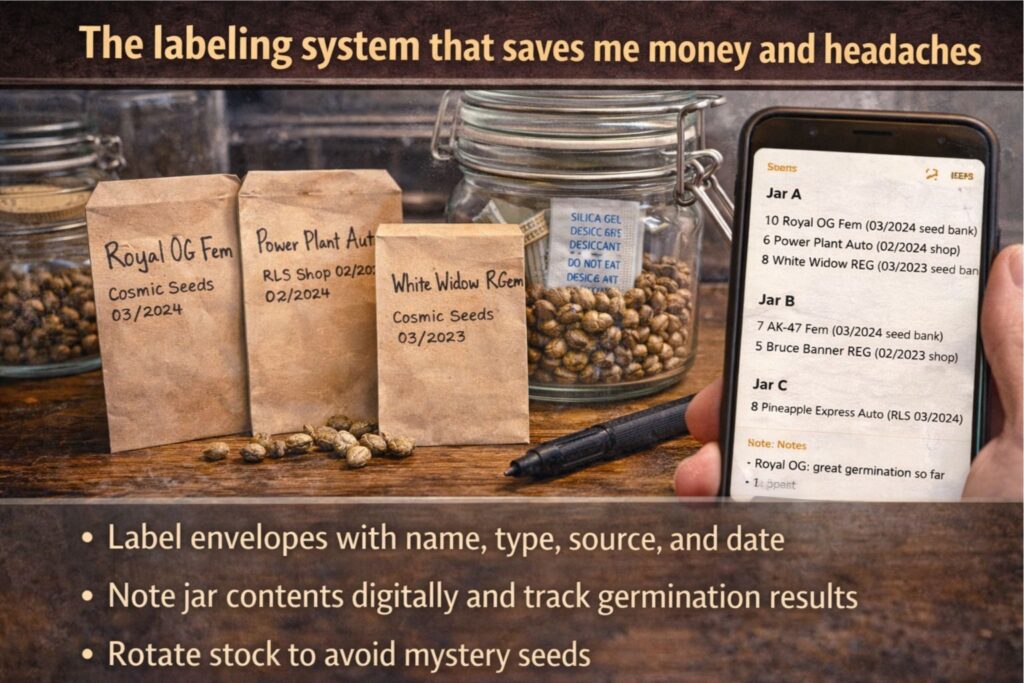
This is where labeling and cataloging seed collections becomes part of preservation. My system is simple:
- Every envelope gets: cultivar label (whatever the pack calls it), seed type (feminized/autoflower/regular), source, and the date I sealed it.
- Every jar gets: a jar ID and a list of envelopes inside.
- I keep a digital note with jar ID, quantities, and a quick “performance” note after I germinate.
Labeling and cataloging seed collections also helps you rotate stock. Older seeds get used first. Newer packs stay sealed until needed.
If you’re buying seeds online, keep purchase confirmations and lot info. Even if you don’t plan to breed, tracking helps you make better choices next time you buy cannabis seeds online.
My seed storage checklist for home growers
If you want a quick routine you can repeat, here is the seed storage checklist for home growers I wish I’d used from day one.
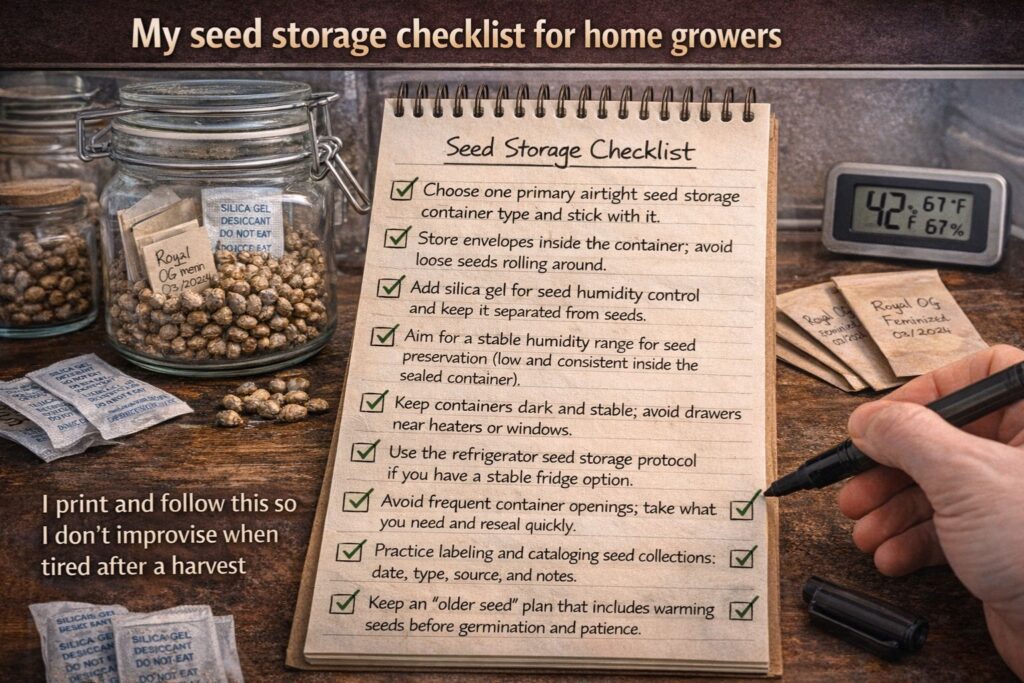
Seed storage checklist for home growers
- Choose one primary airtight seed storage container type and stick with it.
- Store envelopes inside the container; avoid loose seeds rolling around.
- Add silica gel for seed humidity control and keep it separated from seeds.
- Aim for a stable humidity range for seed preservation (low and consistent inside the sealed container).
- Keep containers dark and stable; avoid drawers near heaters or windows.
- Use the refrigerator seed storage protocol if you have a stable fridge option.
- Avoid frequent container openings; take what you need and reseal quickly.
- Practice labeling and cataloging seed collections: date, type, source, and notes.
- Keep an “older seed” plan that includes warming seeds before germination and patience.
- Inspect for damage before long storage; cracked shells get used first.
I print this seed storage checklist for home growers and keep it near my storage area so I don’t improvise when I’m tired after a harvest.
How I germinate older seeds (and what changes after a few years)
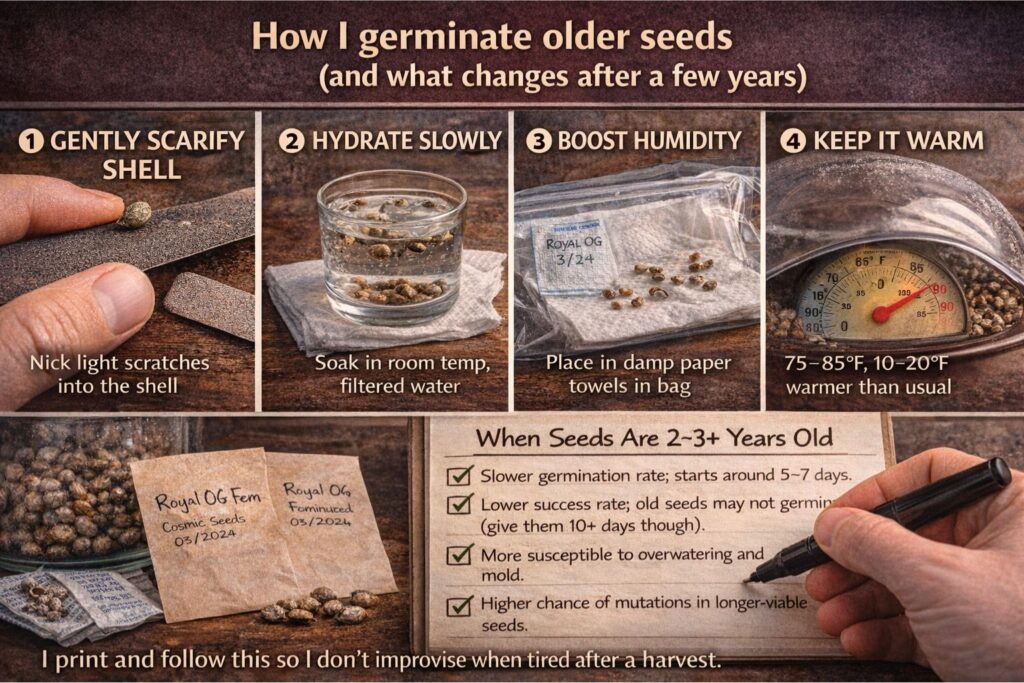
Even with careful storage, germination speed usually slows over time. That doesn’t mean the seeds are “bad.” It means they need better conditions and more patience.
When I’m working with older stock, I focus on warming seeds before germination and on creating a gentle, stable environment.
Here’s my approach:
- Warm up: I let the sealed container reach room temperature (as described earlier), then I let the seeds rest in a 22–25°C (72–77°F) space for several hours before any germination method.
- Moisture control: I avoid over-saturating media. Too much water is a common cause of failure with older seeds.
- Method: I use a simple, clean germination method (moist paper towel in a covered container, or direct to a lightly moistened starter plug). Consistency matters more than the brand of plug.
Warming seeds before germination is not a magic trick; it’s just matching conditions to what the embryo can handle after time in dormancy.
If you’re running a grow after germination, your early environment still matters. I keep seedlings under gentle light (PPFD roughly 150–250 µmol/m²/s), temperatures around 24–26°C (75–79°F), and RH 60–70% for the first days, then I gradually increase intensity. Those ranges aren’t about storage, but they reduce stress so you don’t blame the seed for a seedling environment issue.
Troubleshooting: common problems and what I do about them
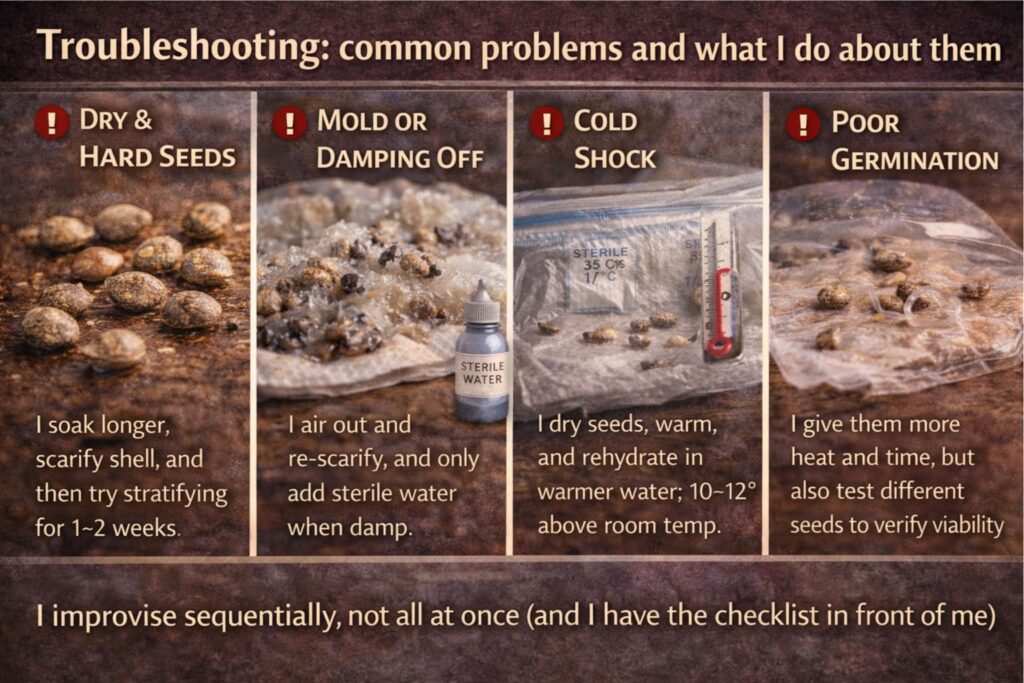
Mold and “musty” odors
This is the failure mode I see most when people ignore the humidity range for seed preservation. Mold usually means one of three things:
- Seeds were stored with too much moisture.
- The container wasn’t sealed.
- Condensation occurred during temperature changes.
For preventing mold on cannabis seeds, I do three things:
- I re-check my silica gel for seed humidity control.
- I stop opening the jar in humid rooms.
- I discard any desiccant that may have gotten damp and replace it.
Preventing mold on cannabis seeds is easier than fixing it. If you smell mustiness, don’t plant those seeds into your best medium—start them separately and observe.
Cracked shells or damaged seeds
Physical damage reduces long-term cannabis seed viability. If I see cracks, I prioritize those seeds for immediate use. I do not store them “for later,” and I keep my handling gentle.
Seeds that take a long time to pop
This is normal with age. It’s where warming seeds before germination and stable moisture pays off. I also remind myself not to overcorrect by adding water. Most failed germination attempts are drowned, not dried.
Unknown age or poor labeling
If you don’t know how old a seed is, treat it like an older seed. Start with the refrigerator seed storage protocol going forward, and prioritize labeling and cataloging seed collections so you don’t repeat the problem.
Where preservation fits into the bigger cultivation picture
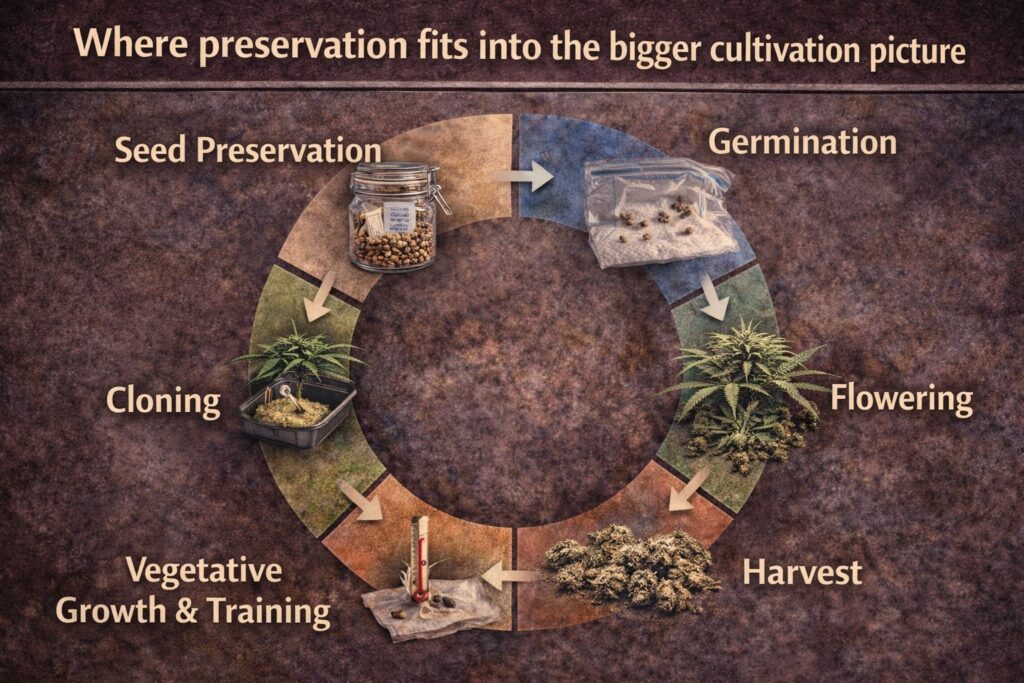
Many growers only think about seeds at purchase time, but preservation links back to cultivation decisions.
If you make seeds yourself, environmental stability affects maturity and storage performance. During seed production runs, I aim for:
- Vegetative photoperiod: 18/6
- Flower photoperiod: 12/12
- Canopy temps: roughly 24–28°C (75–82°F) lights on
- RH: adjusted for a reasonable VPD (I keep things in a stable band rather than chasing a single number)
- EC/PPM: I avoid pushing heavy salts late in flower because I want plant health and seed maturity, not maximum leaf shine
Integrated pest management matters, too. You don’t want pests hitchhiking into storage areas, and you don’t want to store seeds near plant material that could harbor mold. Cleanliness is part of How to Preserve Cannabis Seeds, even if most people don’t mention it.
Seed shopping considerations: buying now, using later
If you like to plan ahead and buy cannabis seeds online during promos, preservation becomes even more important. Here are a few practical purchase habits that support long-term cannabis seed viability:
- Buy only what you can reasonably run within a couple of seasons unless you have a stable storage setup.
- Keep packs sealed until you’re ready. Every opening invites humidity shifts.
- Store different seed types separately. Autoflowering genetics often get used sooner in my garden because I schedule them around space, while photoperiod plants can wait for a bigger window.
When people ask me “where should I keep my seeds?” my answer is the same whether they call them cannabis, marijuana, or seeds for a weed grow for their next run: pick stable conditions, then build your routine around keeping those conditions stable.
FAQ: long-tail questions I get from growers
Can I keep cannabis seeds at room temperature?
Yes, if your room stays cool, dark, and stable. For short-term holding, a cabinet can work. For best long-term cannabis seed viability, I prefer the refrigerator seed storage protocol because it reduces degradation. If you choose room storage, an airtight seed storage container plus silica gel for seed humidity control becomes even more important.
Is it safe to put seeds in the fridge door?
I don’t recommend it. The door gets the most temperature swing. Put your sealed container in the back where conditions are steadier. That’s a core part of my refrigerator seed storage protocol.
What is the best humidity range for seed preservation?
Inside the sealed container, I aim for low and stable, supported by desiccant. A humidity range for seed preservation that stays under roughly 10–12% inside the container has been a practical, reliable target in my home setup. The exact number is less important than consistency and avoiding condensation.
Do feminized seeds store differently than regular seeds?
In my experience, no. Feminized seeds, regular seeds, and autoflowering lines all respond similarly to temperature and moisture stability. The same airtight seed storage container approach and silica gel for seed humidity control works across types. What changes is your planning: if you have limited space, you may choose to run feminized seeds first to avoid wasted plant slots.
Are there special freezer rules?
The main rule is to respect the freezer risks for cannabis seeds. Freeze only if seeds are fully dry, sealed well, and you won’t be moving them in and out. Most home growers do better with the refrigerator seed storage protocol than with the freezer, because condensation events are less likely.
How do I wake up very old seeds?
I start by warming seeds before germination and keeping conditions stable. I also accept that older seeds can be slower. Patience is part of success. If a seed has been stored poorly, no trick will fully restore it.
How long can seeds last?
It depends on initial quality and storage conditions. With careful practices focused on long-term cannabis seed viability—sealed containers, low humidity, cool temperatures—multi-year performance is common. But germination rates still decline over time, and some seeds will fail no matter what.
What’s the biggest mistake beginners make?
Opening containers repeatedly in humid rooms, or storing seeds in porous packaging. If you want a simple fix, follow a seed storage checklist for home growers and commit to labeling and cataloging seed collections so you aren’t constantly re-handling seeds.
Final notes: the routine I trust
When I’m teaching someone How to Preserve Cannabis Seeds, I keep it simple: stable, dark, dry, sealed. Add desiccant, pick a consistent spot, and stop opening containers casually. If you do those things, you’ll protect long-term cannabis seed viability and you’ll waste fewer seeds.
My go-to setup remains:
- Airtight jar or vial (airtight seed storage container)
- Silica gel for seed humidity control
- Dedicated fridge space (refrigerator seed storage protocol)
- A written label and a digital note (labeling and cataloging seed collections)
- A realistic plan for older seeds (warming seeds before germination)
If you’re building your next garden, planning a future run of feminized seeds, or stocking up because you like to buy cannabis seeds online when you see a deal, preservation is the quiet skill that keeps your options open. That’s why I treat seed care with the same seriousness as lighting schedules, nutrient management, and IPM—because in the end, genetics are the foundation of every cannabis, marijuana, or weed harvest.