How to Prepare Your Outdoor Cannabis Plants for Flowering
Outdoor cannabis cultivation can be highly rewarding, providing bountiful yields and high-quality buds. For your harvest to be successful, the vegetative stage to blooming stage transition is essential. This guide will detail the steps and considerations necessary to prepare your outdoor cannabis plants for flowering, covering environmental conditions, nutrient requirements, pest control, and more.
Understanding the Flowering Stage
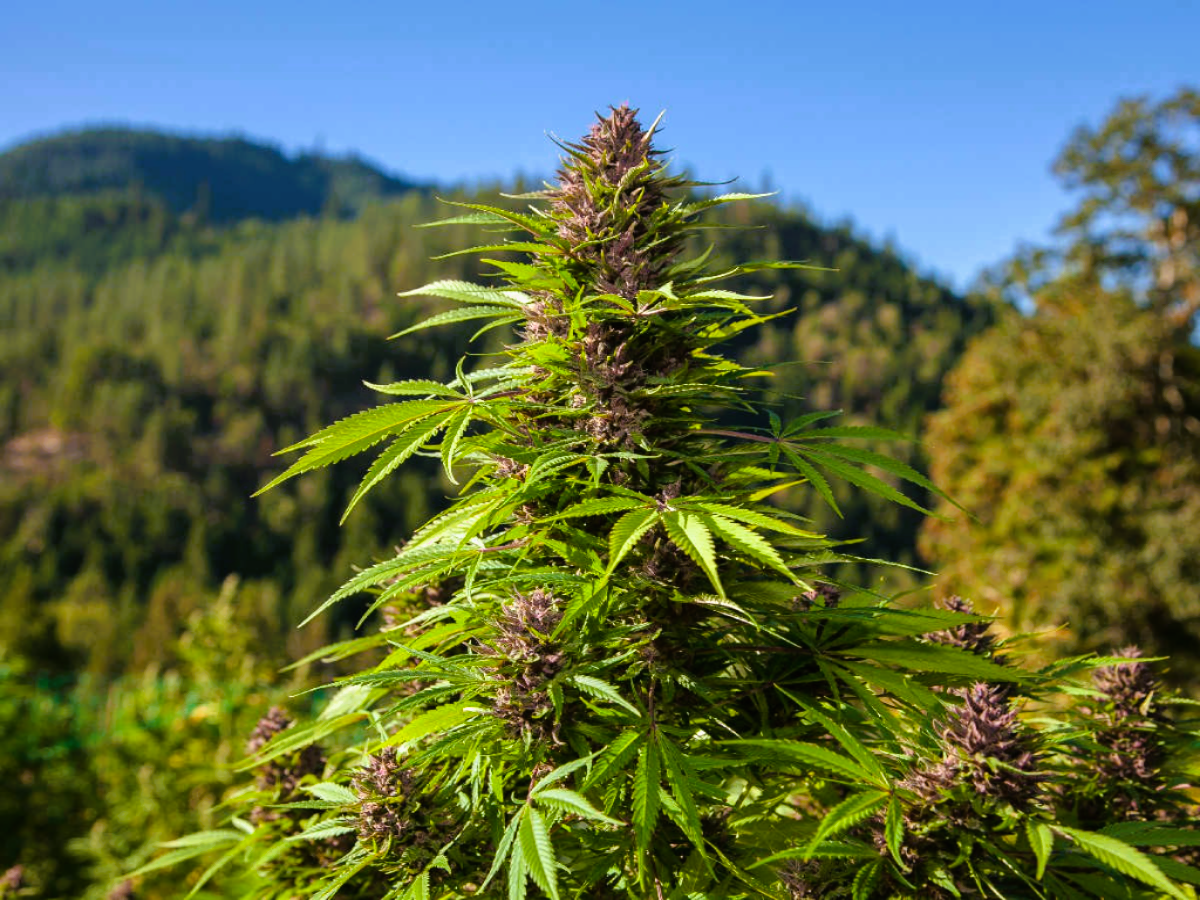
The flowering stage is the most crucial part of the cannabis plant’s life cycle, during which it produces the buds that are harvested for their cannabinoids and terpenes. Proper preparation and care during this stage are essential for maximizing yield and quality. This article provides a thorough analysis of flowering stage events and tips for keeping your plants healthy.
1. Photoperiod Sensitivity
Light Cycle
Cannabis plants are photoperiodic, meaning their flowering phase is triggered by changes in light exposure. Outdoor cannabis plants typically begin flowering when the days shorten and nights become longer, usually around mid to late summer. For most strains, this occurs when the plant receives about 12 hours of darkness each day.
Autoflowering Varieties
Autoflowering cannabis strains do not rely on changes in light cycles to flower. Instead, they begin flowering based on age, usually around 2-4 weeks after germination. This can be advantageous for growers in regions with unpredictable light cycles or those who wish to have multiple harvests in a season.
2. Stages of Flowering
Pre-Flowering
Pre-flowering is the transition phase where the plant prepares to enter full flowering. It usually lasts 1-3 weeks, during which you’ll notice the formation of small, hair-like pistils at the nodes. These pistils indicate the plant’s sex and the beginning of bud development.
Early Flowering
During early flowering (weeks 1-3), the plant will stretch significantly, sometimes doubling in size. Bud sites become more prominent, and you’ll see an increase in pistil development. It’s crucial to manage nutrient levels and environmental conditions to support this rapid growth.
Mid-Flowering
Mid-flowering (weeks 4-6) is when bud development accelerates. The buds start to thicken, and trichome production begins. Trichomes are tiny, resinous glands that produce cannabinoids like THC and CBD. During this phase, maintaining optimal conditions and pest control is vital.
Late Flowering
In late flowering (weeks 7-9 and beyond), the buds reach their full size, and trichome production peaks. The plant’s focus shifts from growth to resin and terpene production. Trichomes change from clear to milky to amber, indicating different levels of cannabinoid maturity.
Environmental Conditions for Flowering Cannabis Plants
Creating the optimal environment for your cannabis plants during the flowering stage is essential for maximizing yield and quality. This involves managing light, temperature, humidity, and ensuring proper airflow. Here’s a detailed guide on how to create and maintain the best environmental conditions for flowering cannabis plants.
1. Light Requirements
Light Exposure
During the flowering stage, cannabis plants need as much direct sunlight as possible. Ideally, they should receive at least 6-8 hours of direct sunlight each day. In outdoor growing, position your plants where they get the most sunlight, avoiding any potential shading from nearby plants or structures.
Light Cycle
The transition to flowering is triggered by changes in the light cycle. For photoperiodic strains, this typically occurs when the plant receives about 12 hours of darkness each day. This natural light cycle change happens in mid to late summer for most outdoor environments. Ensure your plants are not exposed to artificial light during their dark period, as this can disrupt the flowering process.
Supplemental Lighting
In regions with less optimal natural sunlight, consider using supplemental lighting to extend the daylight hours during early flowering or to enhance light intensity on cloudy days. Use full-spectrum LED grow lights if necessary, as they provide the right light wavelengths for flowering.
2. Temperature Control
Optimal Temperature Range
Maintaining the right temperature range is crucial for the healthy development of cannabis buds. During the flowering stage, the ideal daytime temperature ranges from 65°F to 80°F (18°C to 26°C). Nighttime temperatures should be slightly cooler, ideally between 55°F and 70°F (13°C to 21°C).
Temperature Management
- Daytime: If temperatures exceed 80°F (26°C), use shade cloths or position your plants to receive morning sunlight and avoid the intense midday heat. In cooler climates, consider using greenhouse structures to retain heat.
- Nighttime: Ensure nighttime temperatures do not drop below 55°F (13°C) to prevent stress and potential damage to the plants. In cooler climates, use row covers or portable heaters to maintain warmth during chilly nights.
Heat Stress
High temperatures can cause heat stress, leading to issues like leaf curling, stunted growth, and reduced bud development. Signs of heat stress include wilting, yellowing leaves, and leaf edges turning brown. If you notice these symptoms, take immediate steps to cool down your plants, such as increasing shade and airflow.
3. Humidity Management
Optimal Humidity Levels
During the flowering stage, lower humidity levels (40-50%) are preferable. High humidity can lead to mold and mildew, which are detrimental to your buds. Lower humidity also encourages resin production, enhancing the quality of your cannabis.
Humidity Control
- Ventilation: Ensure good airflow around your plants by spacing them adequately and using fans if necessary. Proper ventilation helps reduce humidity and prevents stagnant air, which can foster mold growth.
- Dehumidification: In areas with high humidity, consider using dehumidifiers to maintain optimal levels. Position the dehumidifier to cover the entire growing area.
- Watering Practices: Water your plants in the morning to allow excess moisture to evaporate during the day. Avoid overwatering, which can increase humidity levels around the plant base.
Humidity Stress
High humidity can cause issues like powdery mildew and bud rot. Signs of high humidity stress include white powdery spots on leaves and buds, and buds turning brown and mushy. If you detect these signs, immediately reduce humidity and improve airflow.
Nutrient Management for Flowering Cannabis Plants
Proper nutrient management is crucial during the flowering stage of cannabis plants to ensure healthy growth and maximize bud development. During this phase, cannabis plants require specific nutrients in balanced proportions to support bud formation and resin production. Here’s a detailed guide on nutrient management for flowering cannabis plants.
1. Understanding Nutrient Needs
Primary Nutrients
- Nitrogen (N): Essential for vegetative growth but needed in lower amounts during flowering. Excess nitrogen can inhibit bud development.
- Phosphorus (P): Crucial for bud development and overall plant energy transfer. Higher levels are needed during flowering.
- Potassium (K): Important for overall plant health, water regulation, and resistance to disease. High potassium levels support robust flowering.
Secondary Nutrients
- Calcium (Ca): Vital for cell wall structure and stability. It helps in nutrient uptake and overall plant vigor.
- Magnesium (Mg): Central to chlorophyll production and enzyme activation. It’s necessary for energy transfer within the plant.
Micronutrients
- Iron (Fe), Manganese (Mn), Zinc (Zn), Copper (Cu), Molybdenum (Mo), Boron (B): Required in trace amounts, these micronutrients support various physiological functions, including enzyme production and chlorophyll formation.
2. Transitioning Nutrients
From Vegetative to Flowering
During the transition from vegetative growth to flowering, adjust the nutrient mix to reduce nitrogen and increase phosphorus and potassium. This shift supports the energy-intensive process of bud formation.
- Vegetative Stage Nutrients: Typically higher in nitrogen (e.g., N-P-K ratio of 3-1-2).
- Flowering Stage Nutrients: Higher in phosphorus and potassium (e.g., N-P-K ratio of 1-3-3 or similar).
Timing the Transition
Begin transitioning nutrients when pre-flowering signs appear, such as the development of pistils. Gradually reduce nitrogen over 1-2 weeks while increasing phosphorus and potassium.
3. Types of Nutrients
Organic Nutrients
- Compost Teas: Made from compost, worm castings, and other organic materials, compost teas provide a balanced nutrient source and beneficial microbes.
- Bone Meal: High in phosphorus, bone meal is excellent for promoting bud development.
- Fish Emulsion: Provides a balanced nutrient source with additional trace elements.
- Bat Guano: Rich in phosphorus and beneficial microbes, it enhances flowering and soil health.
Synthetic Nutrients
- Liquid Fertilizers: These are pre-formulated nutrient solutions specifically designed for cannabis flowering. They offer precise control over nutrient ratios.
- Powdered Fertilizers: Dissolved in water, these provide a customizable nutrient solution for different stages of growth.
- Slow-Release Fertilizers: Gradually release nutrients over time, reducing the need for frequent feeding.
Pruning and Training for Flowering Cannabis Plants
Pruning and training are essential techniques for maximizing the yield and quality of cannabis plants during the flowering stage. These practices help manage plant shape, improve light penetration, increase airflow, and direct the plant’s energy toward producing large, potent buds. Here’s a detailed guide on how to prune and train your cannabis plants effectively during the flowering stage.
1. Benefits of Pruning and Training
- Increased Yield: Proper pruning and training can lead to more bud sites and larger colas, significantly increasing overall yield.
- Improved Light Penetration: Removing excess foliage and shaping the plant allows more light to reach lower branches, promoting even growth.
- Enhanced Airflow: Pruning reduces the density of the canopy, improving airflow and reducing the risk of mold and mildew.
- Energy Efficiency: Training techniques direct the plant’s energy towards the most productive bud sites, enhancing bud development.
2. Pruning Techniques
Basic Pruning
- Removing Dead or Damaged Leaves: Regularly inspect your plants and remove any dead, yellowing, or damaged leaves. This prevents disease and pests from taking hold and allows the plant to focus energy on healthy growth.
- Clearing Lower Branches: Prune lower branches that receive little light and produce small, underdeveloped buds. This is often referred to as “lollipopping” because it leaves the plant with a clear stem and a canopy of productive branches.
Defoliation
- Strategic Leaf Removal: Carefully remove fan leaves that block light from reaching lower bud sites. Focus on leaves in the center of the plant and those shading multiple bud sites.
- Timing: Defoliation is typically done in stages to avoid stressing the plant. Perform a major defoliation at the start of flowering and another light defoliation midway through the flowering stage.
Lollipopping
- Purpose: Lollipopping involves removing lower growth that doesn’t receive adequate light. This helps the plant concentrate its energy on the top buds, which receive the most light and have the potential to become the largest and most potent.
- Execution: Remove all small branches and buds from the lower third of the plant. This technique is usually performed early in the flowering stage.
3. Training Techniques
Low-Stress Training (LST)
- Bending and Tying: LST involves gently bending and tying down branches to create a more even canopy. This allows light to penetrate deeper into the plant and promotes the growth of multiple colas.
- Materials: Use soft plant ties, garden wire, or twine to secure branches in place. Avoid using materials that can cut into the stems.
- Execution: Begin LST during the vegetative stage and continue adjusting ties as the plant grows. Be gentle to avoid breaking branches.
High-Stress Training (HST)
- Topping: Topping involves cutting off the main stem’s top to encourage the growth of multiple colas. This creates a bushier plant with more bud sites.
- Timing: Perform topping during the vegetative stage. The plant will need time to recover before transitioning to flowering.
- Execution: Use sharp, sterilized scissors to cut the main stem just above a node. This encourages the growth of two new main stems.
- FIMing (FIM stands for “Fk, I Missed”)**: Similar to topping but less precise, FIMing involves pinching or cutting the top growth slightly above the new growth tip. This can result in more than two new main stems.
- Timing: Perform FIMing during the vegetative stage.
- Execution: Use your fingers or scissors to remove about 75% of the new growth tip.
Super Cropping
- Purpose: Super cropping involves gently crushing the inner tissues of stems without breaking the outer skin. This creates stronger, thicker branches capable of supporting larger buds.
- Execution: Use your fingers to squeeze and bend the stem until you feel a slight crunch. Bend the stem to the desired angle. The plant will repair the damage and grow back stronger.
- Timing: Perform super cropping during the vegetative stage or early flowering.
Screen of Green (ScrOG)
- Purpose: The ScrOG technique uses a screen or net to create an even canopy. This maximizes light exposure and promotes the growth of multiple colas.
- Materials: Use a plastic or metal screen with large enough holes to weave branches through.
- Execution: Install the screen above your plants and weave the branches through as they grow. Adjust the branches daily to maintain an even canopy.
- Timing: Start ScrOG during the vegetative stage and continue adjusting during the early flowering stage.
Pest and Disease Control for Flowering Cannabis Plants
Effective pest and disease control is crucial for ensuring healthy growth and maximizing the yield of your flowering cannabis plants. Plants grown outdoors are subject to a variety of pests and illnesses that can negatively affect their well-being and yield. Here’s a comprehensive guide to handling and avoiding these problems.
1. Common Pests and Diseases
Common Pests
- Spider Mites: Tiny arachnids that feed on plant sap, causing stippling and webbing on leaves.
- Aphids: Small, soft-bodied insects that suck plant sap and excrete honeydew, leading to sooty mold.
- Whiteflies: The tiny white flying insects cause yellowing and wilting of leaves by feeding on their undersides.
- Caterpillars: Larvae of butterflies and moths that chew through leaves and buds.
- Thrips: Tiny, slender insects that scrape plant surfaces and suck out contents, causing silvery streaks.
- Fungus Gnats: Small, dark flies whose larvae feed on roots, leading to root damage and plant stunting.
Common Diseases
- Powdery Mildew: Fungal disease characterized by white, powdery spots on leaves and buds.
- Bud Rot (Botrytis): Fungal infection that causes gray mold to develop inside buds, leading to decay.
- Leaf Septoria: Fungal disease causing yellow spots on leaves, which can lead to leaf drop.
- Downy Mildew: Fungal disease presenting as yellow patches on upper leaf surfaces and white fuzz on undersides.
- Rust: Fungal infection that produces orange or brown pustules on leaves.
- Root Rot: Caused by overwatering and poor drainage, leading to brown, mushy roots and wilting plants.
2. Prevention Strategies
Cultural Practices
- Clean Growing Area: Keep the growing area free of debris and weeds, which can harbor pests and pathogens.
- Proper Spacing: Ensure adequate spacing between plants to improve airflow and reduce humidity.
- Sanitation: Regularly clean and sterilize tools and equipment to prevent disease spread.
- Companion Planting: Plant herbs and flowers like marigolds, basil, and garlic around cannabis plants to repel pests.
Soil and Water Management
- Well-Draining Soil: Use well-draining soil to prevent waterlogging and root rot.
- Watering Practices: Water plants in the morning to allow excess moisture to evaporate during the day.
- Avoid Overwatering: Maintain proper watering practices to avoid creating conditions conducive to fungal growth.
Environmental Control
- Humidity Management: Maintain lower humidity levels (40-50%) during flowering to prevent mold and mildew.
- Temperature Control: Keep temperatures within the optimal range (65°F to 80°F) to reduce plant stress and susceptibility to pests and diseases.
- Airflow: Use fans or natural wind to improve air circulation and reduce humidity.
Companion Planting
Use companion plants like marigolds, basil, and garlic to repel pests naturally. These plants can also attract beneficial insects, creating a balanced ecosystem in your garden.
Watering Practices for Flowering Cannabis Plants
Proper watering practices are essential for healthy growth and maximizing the yield of flowering cannabis plants. During the flowering stage, cannabis plants have specific water requirements that differ from the vegetative stage. Here’s a detailed guide on how to manage watering for your flowering cannabis plants.
1. Understanding Water Needs
Increased Water Demand
During the flowering stage, cannabis plants generally require more water due to increased bud production and warmer temperatures. Proper watering ensures that plants receive the necessary hydration to support robust bud development.
Soil Moisture Levels
Maintaining the right soil moisture level is crucial. Underwatering can cause stress to the plants and lower output, while overwatering can cause root rot and subsequent problems. The soil should be continuously damp but not overly wet.
2. Watering Frequency
Factors Affecting Watering Frequency
- Plant Size: Larger plants with more foliage and buds require more water.
- Container Size: Plants in smaller containers may need more frequent watering as they dry out faster.
- Environmental Conditions: Hot, dry weather increases water evaporation, necessitating more frequent watering.
- Soil Type: Well-draining soil dries out faster than heavy, compacted soil.
Establishing a Schedule
- Daily Checks: Check soil moisture levels daily to determine watering needs.
- Finger Test: Insert your finger about an inch into the soil. If it feels dry, it’s time to water. If it feels moist, wait another day before checking again.
Watering Guidelines
- Young Plants: Water every 2-3 days, depending on soil moisture and environmental conditions.
- Mature Plants: Water every 1-2 days, increasing frequency during hot, dry weather.
3. Water Quality
Importance of Clean Water
Using clean, pH-balanced water is crucial for preventing nutrient lockout and other issues. Poor water quality can introduce contaminants and disrupt plant health.
pH Balance
- Ideal pH Range: The optimal pH range for cannabis plants is 6.0-7.0. Nutrient intake can be impeded outside of this range, which can result in deficiencies.
- Testing: Regularly test the pH of your water using pH meters or pH test kits.
- Adjustment: Use pH up or pH down solutions to adjust the water to the desired pH range.
Water Sources
- Rainwater: Collect and use rainwater, which is typically free of chlorine and other chemicals.
- Filtered Water: Use filtered water to remove impurities and chemicals like chlorine and fluoride.
- Tap Water: If using tap water, let it sit for 24 hours to allow chlorine to evaporate. Consider using a dechlorinator if necessary.
4. Watering Techniques
Deep Watering
- Purpose: Ensure water reaches the deeper root zones to promote healthy root growth and nutrient uptake.
- Method: Water slowly and evenly until water begins to drain from the bottom of the container. This ensures thorough saturation of the soil.
Drip Irrigation
- Advantages: Drip irrigation provides consistent and efficient watering, reducing water waste and ensuring even moisture distribution.
- Installation: Install a drip irrigation system with emitters placed at the base of each plant. Set a timer for regular watering intervals.
Hand Watering
- Control: Hand watering allows for precise control over the amount and placement of water.
- Method: Use a watering can or hose with a gentle spray nozzle. Water slowly to avoid runoff and ensure even distribution.
Soil Preparation for Flowering Cannabis Plants
Preparing the soil properly is crucial for the healthy growth and optimal yield of flowering cannabis plants. Good soil preparation provides the necessary nutrients, drainage, and structure that cannabis plants need throughout their lifecycle. Here’s a detailed guide on how to prepare your soil for flowering cannabis plants.
1. Understanding Soil Composition
Components of Good Soil
- Organic Matter: Provides nutrients and improves soil structure. Examples include compost, manure, and decaying plant material.
- Mineral Content: Includes sand, silt, and clay. Ideal soil (loam) has a balanced mixture of these minerals.
- Soil Structure: Refers to the arrangement of soil particles. Good soil structure improves water infiltration, root penetration, and air exchange.
Soil pH
- Optimal pH Range: Cannabis plants prefer slightly acidic soil with a pH of 6.0-7.0. Proper pH ensures that nutrients are available to the plant.
- Testing pH: Use a soil pH meter or test kit to measure soil pH. Test regularly to maintain optimal levels.
- Adjusting pH: Use lime to raise pH (make soil more alkaline) and sulfur to lower pH (make soil more acidic).
2. Soil Types
Types of Soil
- Sandy Soil: Drains quickly and is easy to work with but may require frequent watering and additional nutrients.
- Clay Soil: Retains water and nutrients well but can be compacted and poorly drained. Amend with organic matter to improve structure.
- Silty Soil: Fertile and retains moisture well but may require organic matter to improve drainage.
- Loamy Soil: Ideal for cannabis cultivation, loamy soil has a balanced mixture of sand, silt, and clay, providing good drainage and nutrient retention.
Soil Amendments
- Compost: Adds organic matter, improves soil structure, and provides nutrients.
- Perlite: Increases aeration and drainage.
- Vermiculite: Retains moisture and nutrients.
- Coco Coir: Enhances water retention and aeration.
- Worm Castings: Rich in nutrients and beneficial microbes.
3. Preparing the Soil
Soil Testing
- Nutrient Testing: Conduct a soil test to determine nutrient levels and deficiencies. This helps in planning appropriate amendments.
- Texture Testing: Perform a soil texture test to understand the proportions of sand, silt, and clay. Adjust soil texture by adding appropriate amendments.
Mixing Soil
- Base Soil Mix: Create a base soil mix using high-quality garden soil or commercial potting mix.
- Example Mix: 40% compost, 30% coco coir, 20% perlite, 10% worm castings.
- Amending Soil: Add specific amendments based on soil test results to balance nutrients and improve soil properties.
Sterilizing Soil
- Purpose: Sterilizing soil helps eliminate pests, diseases, and weed seeds.
- Methods: Bake soil in the oven at 180-200°F (82-93°C) for 30 minutes, or use a microwave on high for 2-5 minutes.
4. Organic vs. Synthetic Soil Amendments
Organic Amendments
- Compost: Provides a slow-release source of nutrients and improves soil structure.
- Manure: Adds organic matter and nutrients but should be well-composted to avoid burning plants.
- Bone Meal: High in phosphorus, promoting root and bud development.
- Blood Meal: Rich in nitrogen, supporting vegetative growth.
Synthetic Amendments
- Slow-Release Fertilizers: Gradually release nutrients over time, reducing the need for frequent feeding.
- Chemical Fertilizers: Provide precise nutrient formulations but can lead to salt buildup and require careful management to avoid overfeeding.
5. Preparing the Planting Site
Site Selection
- Sunlight: Choose a location that receives at least 6-8 hours of direct sunlight daily.
- Drainage: Ensure the site has good drainage to prevent waterlogging and root rot.
- Airflow: Select a site with good airflow to reduce humidity and prevent mold and mildew.
Soil Preparation Steps
- Clearing the Site: Remove weeds, rocks, and debris from the planting area.
- Tilling: Loosen the soil to a depth of 12-18 inches (30-45 cm) to improve root penetration and aeration.
- Adding Amendments: Mix in organic or synthetic amendments based on soil test results to enhance soil fertility and structure.
- Leveling: Level the soil surface to ensure even watering and prevent runoff.
6. Mulching
Benefits of Mulching
- Moisture Retention: Mulch helps retain soil moisture by reducing evaporation.
- Temperature Regulation: Mulch insulates the soil, keeping it cooler in hot weather and warmer in cold weather.
- Weed Suppression: Mulch suppresses weed growth, reducing competition for water and nutrients.
Types of Mulch
- Organic Mulch: Use straw, wood chips, or shredded leaves. As these components break down over time, the earth gains organic matter.
- Inorganic Mulch: Use materials like gravel or landscape fabric. These do not decompose but effectively control weeds and retain moisture.
Applying Mulch
- Layer Thickness: Apply a 2-3 inch (5-7.5 cm) layer of mulch around the base of the plants, leaving a small gap around the stem to prevent rot.
- Maintenance: Replenish mulch as needed to maintain effective coverage.
Staking and Support for Flowering Cannabis Plants
Providing adequate support for your flowering cannabis plants is essential to ensure they remain upright, receive sufficient light, and develop high-quality buds. Proper staking and support techniques prevent branches from breaking under the weight of heavy buds and improve overall plant health. Here’s a detailed guide on how to stake and support your flowering cannabis plants effectively.
1. Importance of Staking and Support
Preventing Damage
- Branch Breakage: Heavy buds can cause branches to snap, particularly during wind or rain. Staking and support prevent this damage.
- Stem Stability: Supporting the main stem and branches helps maintain plant structure, especially as they grow taller and heavier.
Improving Light Penetration
- Even Canopy: Proper staking and training create an even canopy, allowing more light to reach lower branches and bud sites.
- Airflow: Improved plant structure enhances airflow, reducing the risk of mold and mildew.
2. Types of Support Systems
Stakes
- Materials: Use bamboo, wooden, or metal stakes. Bamboo is lightweight and durable, while metal stakes offer robust support.
- Placement: Insert stakes into the soil near the main stem or heavy branches. Angle stakes outward for better stability.
Trellises
- Types: Vertical trellises support tall plants, while horizontal trellises (such as SCROG nets) help spread out the canopy.
- Materials: Use plastic, metal, or string netting for trellises. Ensure the material is strong enough to support the plant’s weight.
Cages
- Tomato Cages: Commonly used for cannabis plants, these cylindrical wire frames support multiple branches.
- Custom Cages: Create custom cages using wire mesh or other materials to fit your plant’s size and shape.
Soft Ties
- Materials: Use soft plant ties, garden wire, or Velcro strips to secure branches to stakes or trellises.
- Advantages: Soft ties prevent damage to the plant and are adjustable as the plant grows.
3. Staking Techniques
Supporting the Main Stem
- Single Stake: Insert a sturdy stake near the main stem and secure the stem to the stake with soft ties at multiple points.
- Multiple Stakes: Use several stakes around the plant for added support, especially for larger plants.
Supporting Branches
- Individual Branches: Stake heavy branches individually, securing them with soft ties to prevent snapping.
- Crisscross Method: Place stakes in a crisscross pattern around the plant to support multiple branches simultaneously.
Early Staking
- Timing: Stake plants early in their growth stage to establish support before they become too heavy.
- Placement: Insert stakes carefully to avoid damaging the roots. Position stakes as close to the base of the stem as possible without disturbing the root system.
4. Trellis Techniques
Vertical Trellising
- Installation: Install vertical trellises by placing them on either side of the plant row or individually around each plant.
- Securing: Tie branches to the trellis as they grow, guiding them upwards and providing support.
Horizontal Trellising (SCROG)
- Screen of Green (SCROG): This method involves placing a horizontal screen or netting above the plants and weaving branches through the net as they grow.
- Advantages: SCROG maximizes light exposure to all parts of the plant, promoting even bud development and higher yields.
Adjusting Trellises
- Regular Checks: Check trellises regularly to ensure branches are properly supported and not constricted.
- Adjusting Ties: Adjust ties and branch placement as the plant grows to maintain even support and light distribution.
5. Caging Techniques
Tomato Cages
- Installation: Place tomato cages around young plants and guide branches through the cage as they grow.
- Support: Use soft ties to secure branches to the cage for added support.
Custom Cages
- Construction: Build custom cages using wire mesh or similar materials. Shape the cage to fit around the plant, providing ample support for all branches.
- Securing: Attach branches to the cage with soft ties, ensuring they are well-supported as they develop heavy buds.
Maintaining Cages
- Inspection: Regularly inspect cages for any signs of damage or wear. Replace or repair as needed.
- Adjustments: Adjust the position of branches within the cage as the plant grows to ensure continued support and even light distribution.
6. Soft Ties and Clips
Soft Ties
- Usage: Secure branches to stakes, trellises, or cages using soft ties. Ensure ties are tight enough to provide support but loose enough to avoid constriction.
- Materials: Use materials like garden wire, Velcro strips, or specialized plant ties. Avoid using harsh materials that can damage the plant.
Plant Clips
- Usage: Plant clips can be used to secure branches to support structures without tying. They are easy to adjust and reposition.
- Advantages: Clips provide gentle support and are less likely to cause damage compared to tying.
Regular Adjustment
- Monitoring Growth: As plants grow, adjust ties and clips to accommodate new growth and shifting weight.
- Preventing Constriction: Check regularly to ensure ties and clips are not constricting the branches as they thicken.
Monitoring and Adjustments
Regular Inspections
Conduct regular inspections of your plants to monitor their health and development. Look for signs of nutrient deficiencies, pests, or diseases and address them promptly.
Adjustments
Be prepared to adjust your care routine based on environmental conditions and plant needs. Flexibility and attentiveness are key to successful flowering.
Record Keeping
Maintain detailed records of your plants’ progress, including feeding schedules, pruning activities, and any issues encountered. This information will be valuable for future growing seasons.
Preparing for Harvesting Cannabis Plants
Harvesting is a crucial phase in the cannabis cultivation process. Proper preparation ensures that you harvest at the optimal time, preserving the potency, flavor, and overall quality of your buds. Here’s a comprehensive guide on how to prepare for harvesting your flowering cannabis plants.
1. Monitoring Trichomes
Trichome Development
- Clear Trichomes: Early in the flowering stage, trichomes appear clear. This indicates that the plant is not yet ready for harvest.
- Milky Trichomes: As the plant matures, trichomes turn milky or cloudy. This stage signifies peak THC levels and is often the ideal time to harvest for a balanced effect.
- Amber Trichomes: Over time, some trichomes will turn amber. This indicates a higher concentration of CBN (cannabinol), providing a more sedative effect. Harvesting at this stage can result in a more relaxing product.
Tools for Monitoring
- Magnifying Glass or Jeweler’s Loupe: Use a magnifying tool with at least 30x magnification to closely inspect trichomes.
- Digital Microscope: For more detailed observation, use a digital microscope connected to a smartphone or computer.
2. Flushing
Importance of Flushing
Flushing removes excess nutrients from the soil, resulting in a cleaner, smoother final product. It helps prevent the harsh chemical taste that can result from residual fertilizers.
When to Flush
- Timing: Start flushing your plants 1-2 weeks before the anticipated harvest date.
- Indicators: Begin flushing when trichomes are mostly milky, and the plant shows signs of nearing maturity.
How to Flush
- Water Quality: Use clean, pH-balanced water (pH 6.0-7.0) for flushing.
- Procedure: Water the plants generously until runoff is clear. Repeat this process with each watering during the flushing period.
3. Preparing Harvest Tools
Necessary Tools
- Scissors and Pruners: Use sharp, clean scissors or pruning shears for cutting branches and trimming buds.
- Gloves: Wear disposable gloves to keep your hands clean and avoid transferring oils to the buds.
- Trimming Tray: Use a trimming tray to collect buds and trimmings efficiently.
- Cleaning Supplies: Keep alcohol wipes or a cleaning solution handy to clean tools and hands during the process.
Tool Sterilization
- Importance: Sterilizing tools prevents the spread of diseases and contaminants.
- Method: Clean tools with rubbing alcohol or a similar disinfectant before and during the trimming process.
4. Setting Up a Drying Space
Optimal Conditions
- Temperature: Maintain a drying room temperature of 60-70°F (15-21°C).
- Humidity: Keep humidity levels between 50-60% to prevent mold and ensure slow, even drying.
- Airflow: Ensure good airflow with fans to circulate air without blowing directly on the buds.
Drying Space Setup
- Dark Room: Use a dark room or area, as light can degrade cannabinoids and terpenes.
- Hanging Method: Hang branches upside down from strings, wire racks, or specialized drying racks.
- Spacing: Ensure adequate spacing between branches to promote airflow and prevent mold.
Conclusion
Successfully cultivating cannabis, particularly as it transitions into the flowering stage, involves a comprehensive understanding of various essential practices. From preparing the environment and managing nutrients to pruning, training, and monitoring plant health, each step plays a vital role in ensuring a bountiful and high-quality harvest.
Key Takeaways
- Understanding the Flowering Stage: Recognizing the importance of photoperiod sensitivity and the distinct phases within the flowering stage helps in planning and executing timely interventions that support robust bud development.
- Environmental Conditions: Providing optimal light, temperature, humidity, and airflow is crucial for the health and productivity of flowering cannabis plants. Regular adjustments based on environmental monitoring ensure the plants thrive.
- Nutrient Management: Balancing primary, secondary, and micronutrients, along with maintaining the right soil pH, supports healthy growth and maximizes bud production. Switching to flowering-specific nutrients at the appropriate time ensures plants have what they need during this critical stage.
- Pruning and Training: Techniques like LST, topping, and defoliation help shape the plant, improve light penetration, and promote an even canopy. Proper pruning removes unnecessary foliage and redirects energy to bud development.
- Pest and Disease Control: Regular monitoring, preventive cultural practices, and the use of organic or biological controls keep pests and diseases at bay, ensuring healthy plants throughout the flowering stage.
- Watering Practices: Understanding the water needs of your plants, maintaining water quality, and using efficient watering techniques such as deep watering or drip irrigation help in preventing overwatering and underwatering issues.
- Soil Preparation: Using well-draining, nutrient-rich soil with the right pH and incorporating organic amendments ensures a strong foundation for plant growth. Regular soil testing and adjustments keep the growing medium optimal.
- Staking and Support: Providing adequate support through stakes, trellises, and cages prevents branch breakage and maintains plant structure, especially as buds become heavier.
- Monitoring and Adjustments: Regular inspections and timely adjustments based on plant health and environmental conditions are crucial for addressing any issues promptly and maintaining optimal growing conditions.
- Preparing for Harvest: Monitoring trichomes, flushing plants, and setting up the ideal drying and curing environment ensure that your final product is of the highest quality, with preserved potency and flavor.
Final Thoughts
Successful cannabis cultivation is both an art and a science. It requires a deep understanding of the plant’s needs and a willingness to invest time and effort into each stage of growth. By carefully managing each aspect of the growing process, from soil preparation to harvesting, growers can achieve a rewarding yield of high-quality cannabis.
Patience, attention to detail, and a proactive approach to problem-solving are key to navigating the challenges that come with outdoor cannabis cultivation. By following the guidelines outlined in this comprehensive guide, you can ensure that your flowering cannabis plants are well-prepared for each stage of their development, leading to a successful and bountiful harvest.
Cultivating cannabis not only provides a valuable product but also offers the satisfaction of nurturing a living plant through its complete lifecycle. With dedication and care, you can enjoy the fruits of your labor in the form of potent, aromatic, and flavorful buds that reflect the quality of your cultivation practices