Drying harvested cannabis plants is a crucial step in the cultivation process to preserve their potency, flavor, and overall quality. Here’s a step-by-step guide to drying cannabis:
- Harvesting: Harvest your cannabis plants when the trichomes (small resin glands) are cloudy or amber in color. This signifies that the THC levels have reached their peak.
- Trimming: Trim excess leaves and stems from the buds.
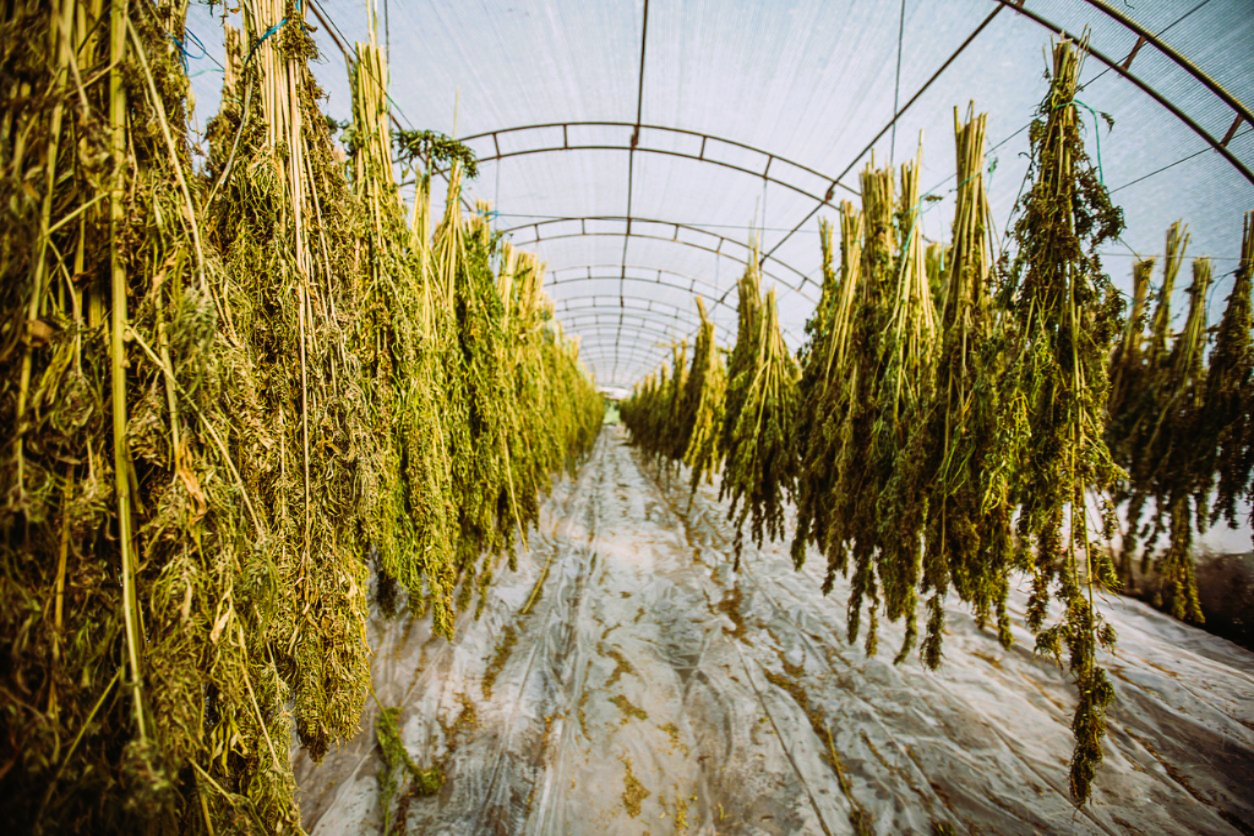
- Prepare the Drying Area: Set up a designated drying area in a cool, dark, and well-ventilated space. Hang drying racks or lines horizontally to hang the cannabis buds.
- Hang the Buds: Hang the trimmed buds upside down on the drying racks or lines. Make sure to leave some space between the buds to allow air circulation.
- Control Temperature and Humidity: Maintain an average temperature of 60-70°F (15-21°C) and a humidity level of 45-55%. High temperatures and humidity can encourage mold growth, but low temperatures might hinder the drying process.
- Check and Monitor: Regularly check the buds for any signs of mold, mildew, or over-drying. To achieve the best possible outcomes, the drying process must be continuously monitored.
- Patience is Key: Allow the buds to dry slowly over a period of 7-14 days, depending on the humidity levels and environmental conditions. Rushing the drying process can result in harsh-tasting cannabis with reduced potency.
- Curing: When the buds are dry to the touch and the stems break rather than bend, they are ready to cure. Place the dried buds in airtight receptacles, such as glass jars, and keep them somewhere cool and dark. Burp the jars every day for the first week to remove excess moisture and ensure proper curing.
- Final Check: After a few weeks of curing, your cannabis buds should be fully dried and cured, ready for consumption. Enjoy the fruits of your labor responsibly!
Harvesting cannabis properly is essential for achieving the best quality and potency in your final product. Here’s a step-by-step guide to harvesting cannabis for drying:
- Choose the Right Time: Harvest your cannabis plants when the majority of the trichomes have turned milky white or amber in color. This means that THC levels have reached their peak and the plant is ready for harvest. To thoroughly inspect the trichomes, use a magnifying tool such as a jeweler’s loupe or a digital microscope.
- Prepare Your Tools: Before you start harvesting, gather all the necessary tools such as sharp pruning shears or scissors, gloves, and containers for collecting the trimmed buds.
- Harvest in the Morning: It’s best to harvest your cannabis plants in the morning just after the lights have turned on. This is when the plants are the freshest and contain the highest levels of cannabinoids and terpenes.
- Cut the Main Stems: Begin by cutting the main stems of the plants near the base using sharp pruning shears. Take care to leave a few inches of stem attached to the base of the plant. This will make it easier to hang the plants upside down for drying.
- Trim Excess Leaves: Once the main stems are cut, trim off any large fan leaves from the branches using scissors or shears. Leave behind the smaller sugar leaves that are coated with trichomes, as they contain cannabinoids and contribute to the potency of the final product.
- Hang to Dry: Hang the trimmed branches upside down in a cool, dark, and well-ventilated space. Use drying racks or lines to hang the branches, ensuring that there is enough space between them for air circulation.
- Monitor the Drying Process: Check the drying buds regularly for any signs of mold, mildew, or over-drying. Maintain a steady temperature and humidity level in the drying area to achieve the best drying conditions.
- Be Patient: Allow the buds to dry slowly over a period of 7-14 days, depending on environmental conditions. Rushing the drying process can result in poor-quality cannabis with reduced potency.
- Curing: The buds are ready for curing when they are dry to the touch and the stems snap rather than bend. After the buds have dried, place them in airtight jars or other airtight containers and keep them in a cold, dark area to cure for several weeks. In order to facilitate appropriate curing and relieve excess moisture, don’t forget to burp the jars every day for the first week.
Trimming cannabis involves removing excess leaves and stems from the buds before drying to improve the overall quality and appearance of the final product. Here’s how to properly trim cannabis for drying:
- Gather Your Tools: Before you begin trimming, gather all the necessary tools such as sharp pruning shears or scissors, gloves, a clean work surface, and containers for collecting the trimmed buds and discarded plant material.
- Prepare Your Workspace: Set up a clean and well-lit workspace where you can comfortably trim the cannabis buds. You may want to lay down a clean surface or use a trimming tray to catch any trimmings and keep your workspace tidy.
- Handle the Buds with Care: Handle the cannabis buds gently to avoid damaging the delicate trichomes, which contain cannabinoids and terpenes. Avoid touching the buds excessively with your fingers to prevent the transfer of oils and contaminants.
- Trim Away Large Fan Leaves: Begin by trimming away any large fan leaves that are protruding from the buds using sharp pruning shears or scissors. These leaves do not contain many trichomes and can be discarded.
- Trim Sugar Leaves: Next, carefully trim away the smaller sugar leaves that surround the buds. These leaves may be coated with trichomes and can contribute to the potency of the final product, so trim them close to the bud without removing too much material.
- Inspect and Clean Up: After trimming each bud, inspect it closely for any remaining leaves or stems that need to be removed. Use your fingers or scissors to clean up any stray leaves or stems to ensure a neat and uniform appearance.
- Collect Trimmed Buds: As you trim each bud, place the trimmed buds in a container for drying. Make sure to leave some space between the buds to allow for air circulation during the drying process.
- Dispose of Waste: Dispose of the trimmed leaves and stems responsibly. You can compost them if you have a composting system, or simply discard them in the trash.
- Continue Trimming Until Finished: Repeat the trimming process for each of the harvested buds until you have trimmed them all. Take your time and work methodically to ensure that each bud is properly trimmed.
Preparing the drying area for cannabis is crucial for ensuring an optimal drying process that preserves the potency, flavor, and overall quality of the buds. Here’s how to properly prepare the drying area:
- Choose a Suitable Location: Select a cool, dark, and well-ventilated space for drying your cannabis. Avoid areas with direct sunlight, as this can degrade the cannabinoids and terpenes in the buds. A dedicated drying room, closet, or tent works well for this purpose.
- Clean and Sanitize: Before setting up the drying area, clean and sanitize the space to remove any dust, dirt, or potential contaminants that could affect the quality of the drying buds. Wipe down surfaces with a mild disinfectant or cleaning solution and allow them to dry completely.
- Control Temperature and Humidity: Maintain a consistent temperature of around 60-70°F (15-21°C) and a humidity level of 45-55% in the drying area. Regularly check the temperature and humidity levels with a thermometer and hygrometer. Low temperatures might impede the drying process, while high temperatures and humidity can encourage the formation of mold.
- Set Up Drying Racks or Lines: Arrange drying racks or lines horizontally in the drying area to hang the cannabis buds. Make sure there is enough space between the racks or lines to allow for adequate airflow around the buds. Alternatively, you can hang the buds from strings or wires stretched across the room.
- Hang the Buds: Hang the trimmed cannabis buds upside down from the drying racks or lines. Use clothespins or clips to secure the buds in place. Make sure to leave some space between the buds to prevent them from touching each other, which can promote mold growth.
- Ensure Proper Ventilation: Proper ventilation is essential for promoting airflow and preventing mold during the drying process. Use fans or air circulation systems to maintain gentle airflow in the drying area. However, avoid placing fans directly on the buds, as this can cause them to dry too quickly and lose their potency.
- Check for Light Leaks: Inspect the drying area for any potential light leaks that could disrupt the natural drying process. Cover windows with blackout curtains or use lightproof materials to block out any light from entering the drying space.
- Monitor the Drying Process: Keep a close eye on the drying buds and monitor the temperature and humidity levels regularly. Check for any signs of mold, mildew, or over-drying, and make adjustments as needed to maintain optimal drying conditions.
Patience is Key to dry cannabis
Absolutely, patience is indeed key when it comes to drying cannabis. Rushing the process can lead to subpar results, including diminished potency, harsh taste, and even mold growth. Here’s why patience matters:
- Preservation of Cannabinoids and Terpenes: Drying cannabis slowly allows for the gradual breakdown of chlorophyll and preservation of cannabinoids and terpenes.
- Prevention of Mold and Mildew: Proper drying involves maintaining the right balance of humidity and airflow. Rushing the process or drying in high humidity conditions can create an environment conducive to mold and mildew growth. Patience allows you to monitor and adjust conditions to prevent these issues.
- Improved Curing: Drying is just the first step in the process of preparing cannabis for consumption. After drying, the buds need to undergo a curing process, which involves storing them in airtight containers to allow for further moisture redistribution and flavor development. Patience during drying sets the stage for a successful curing process.
- Enhanced Potency and Flavor: Slow drying helps preserve the potency and flavor profile of the cannabis. Rapid drying methods can lead to a harsher taste and reduced potency due to the loss of volatile compounds.
- Uniform Drying: Patience ensures that all parts of the buds dry evenly. Rushing the process may result in uneven drying, with some parts of the buds drying faster than others, leading to inconsistencies in quality and potency.
Curing
Curing is a critical step in the post-harvest process of cannabis cultivation. Here’s how to properly cure harvested cannabis:
- Prepare Airtight Containers: Once your cannabis buds are dry to the touch and the stems snap instead of bend, they are ready for curing. Use airtight glass jars or containers that can be sealed tightly to store the buds during the curing process.
- Fill Jars with Buds: Transfer the dried cannabis buds into the glass jars, filling them to about 3/4 of their capacity. Avoid packing the buds too tightly, as this can impede airflow and increase the risk of mold.
- Monitor Humidity Levels: During the initial stages of curing, it’s crucial to monitor the humidity levels inside the jars. Ideally, the humidity should stabilize at around 60-65%. Use a hygrometer to measure the humidity regularly and adjust as needed by burping the jars.
- Burp the Jars: Burping the jars involves opening them for a few minutes each day to allow excess moisture to escape and fresh air to circulate. Begin by burping the jars once or twice a day for the first week, then progressively drop to once every few days over several weeks.
- Check for Mold and Mildew: While burping the jars, inspect the buds closely for any signs of mold or mildew. If you notice any moldy or musty-smelling buds, remove them immediately to prevent the spread of mold to the rest of the batch.
- Store in a Cool, Dark Place: Keep the curing jars in a cool, dark place away from direct sunlight and extreme temperatures. This helps preserve the potency and flavor of the cannabis by protecting it from degradation caused by light and heat.
- Patience: Curing is a gradual process that takes time. It’s recommended to cure cannabis for a minimum of two weeks.
- Enjoy Responsibly: Once the cannabis buds have been properly cured, they are ready for consumption. Enjoy the fruits of your labor responsibly, knowing that you’ve taken the time to produce high-quality cannabis with optimal flavor and potency.
Performing a final check before completing the drying process of cannabis ensures that the buds are ready for the next steps, such as curing or consumption. Here’s a checklist for the final check:
- Visual Inspection: Examine the buds closely for any signs of mold, mildew, or discoloration. Moldy or discolored buds should be discarded to prevent contamination of the rest of the batch.
- Touch Test: Gently squeeze the buds between your fingers. They should feel dry to the touch and have a slight crispness, indicating that most of the moisture has been removed.
- Stem Snap Test: Take a small stem from one of the buds and attempt to bend it. It should snap cleanly instead of bending, indicating that the buds are sufficiently dried.
- Aroma Check: Smell the buds to assess their aroma. Properly dried cannabis should have a strong, pleasant aroma that is indicative of its strain and terpene profile.
- Moisture Content: If you have a moisture meter, you can use it to check the moisture content of the buds. Ideally, the moisture content should be between 10-15% for optimal curing.
- Weigh the Buds: Weigh the dried buds to determine their total weight. This will help you keep track of the yield and estimate the amount of product you have for curing or consumption.
- Record Keeping: Keep detailed records of the drying process, including the date of harvest, drying duration, environmental conditions, and any observations or notes. This information can be valuable for future harvests and troubleshooting any issues that may arise.
- Prepare for Curing: If the buds pass all the checks and are deemed sufficiently dried, they are ready for curing. Start the curing process by transferring the dried buds to sealed glass jars or containers.
Conclusion
In conclusion, properly drying cannabis is a crucial step in the cultivation process that directly impacts the quality, potency, and overall experience of the final product. Patience, attention to detail, and careful monitoring are essential throughout the drying process to ensure optimal results.
By following the steps outlined in this guide, including harvesting at the right time, trimming the buds properly, preparing the drying area, and conducting a final check, you can achieve high-quality dried cannabis that is ready for curing or consumption.
Remember that each step of the process, from harvesting to curing, plays a vital role in preserving the potency, flavor, and aroma of the cannabis.
For cannabis fans, making the effort to do it correctly will ultimately result in a more fulfilling and pleasurable experience.
Learning the craft of cannabis drying is essential if you want to produce high-quality buds that live up to your expectations, regardless of skill level. So, approach the process with care, patience, and a commitment to quality, and you’ll be rewarded with a bountiful harvest of premium cannabis.