Detailed Guide to Drying Your Cannabis Plants
Drying cannabis is a critical step in the post-harvest process. Proper drying ensures the preservation of cannabinoids and terpenes, prevents mold, and lays the foundation for successful curing. Here’s an in-depth guide on how to dry your cannabis plants effectively.
1. Preparation for Drying
Harvesting:
- Timing: Ensure that the plants are harvested at the right time by inspecting the trichomes and pistils as previously described.
- Trimming: Decide whether to wet trim (trimming leaves immediately after harvest) or dry trim (after drying). Wet trimming can be less messy and faster, while dry trimming can preserve more terpenes and cannabinoids.
Tools Needed:
- Pruning Shears: For cutting branches or whole plants.
- Drying Racks or Hangers: Depending on the method you choose.
- Fans: For air circulation.
- Hygrometer: To monitor humidity levels.
2. Setting Up the Drying Environment
Location:
- Dark Room: Light degrades cannabinoids and terpenes, so the drying area should be dark.
- Temperature: Maintain a temperature between 60-70°F (15-21°C).
- Humidity: Keep relative humidity between 45-55% to prevent mold and ensure slow, even drying.
- Air Circulation: Ensure good air circulation in the room. Use fans to circulate air, but do not point them directly at the plants.
3. Drying Methods
Hanging Whole Plants:
- Process: Cut the plant at the base and hang it upside down from a drying line or hanger.
- Advantages: Slower drying process, which can enhance the smoothness and flavor.
- Considerations: Requires a large space and careful monitoring.
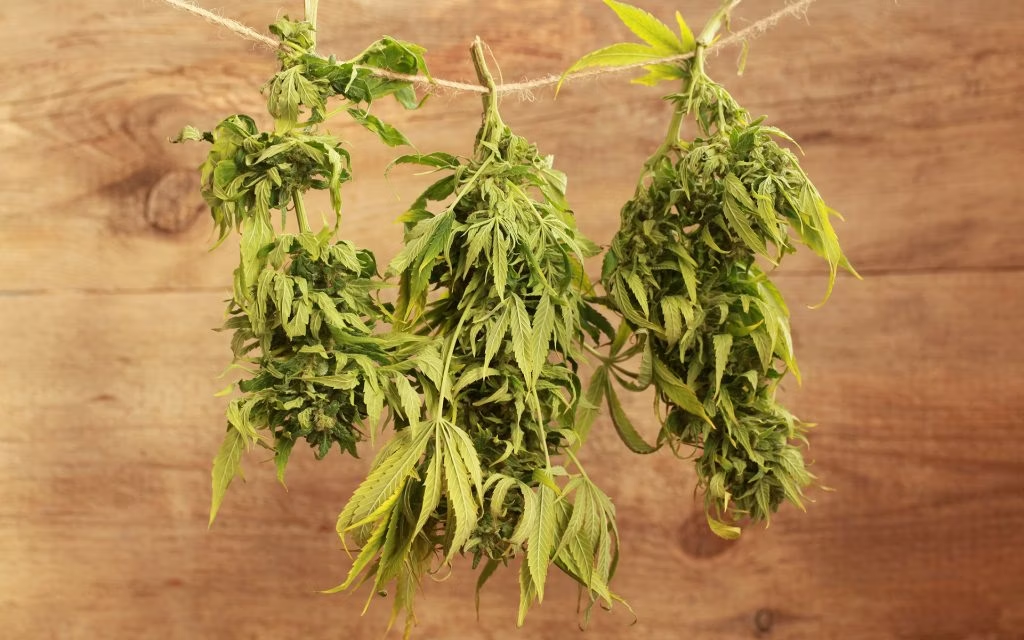
Hanging Branches:
- Process: Cut individual branches and hang them upside down.
- Advantages: Easier to manage than whole plants and still allows for a gradual drying process.
- Considerations: Ensures adequate spacing for proper air circulation.
Using Drying Racks:
- Process: Trim the buds and place them on mesh drying racks.
- Advantages: Space-efficient, good for small-scale grows.
- Considerations: Requires careful placement to avoid flattening buds.
4. Monitoring the Drying Process
Daily Inspections:
- Mold and Mildew: Check for any signs of mold or mildew. Remove any affected buds immediately.
- Dryness Check: Feel the buds daily to monitor dryness.
The Snap Test:
- Method: Bend the small stems. If they snap rather than bend, the buds are ready for curing.
- Timeline: Drying typically takes 7-10 days, but this can vary based on environmental conditions and plant size.
5. Controlling Environmental Factors
Humidity:
- Adjustment: If humidity is too high, use a dehumidifier. If it’s too low, consider adding a humidifier or increasing air circulation.
- Monitoring: Use a hygrometer to keep an eye on humidity levels throughout the drying process.
Temperature:
- Consistency: Maintain a consistent temperature to avoid fluctuations that can impact drying.
- Adjustment: Use heaters or air conditioning as needed to keep the temperature in the desired range.
6. Troubleshooting Common Issues
Overdrying:
- Signs: Buds become too brittle and crumbly.
- Solution: Rehydrate slightly with a humidity pack or a small piece of citrus peel (removed after a few hours).
Underdrying:
- Signs: Buds feel too moist or spongy, and small stems bend instead of snapping.
- Solution: Continue drying and improve air circulation.
Mold:
- Signs: Visible mold growth or musty odor.
- Solution: Remove affected buds immediately and adjust humidity and air circulation.
7. Transition to Curing
- Readiness: Once the buds are properly dried, transition them to airtight containers for curing.
- Initial Curing: Begin the curing process by “burping” the containers daily to release moisture and ensure an optimal environment for long-term storage.
Detailed Guide to Curing Your Cannabis Plants
Curing cannabis is an essential process that follows drying, aimed at enhancing the flavor, potency, and overall quality of your buds. This is a complete guide to properly curing your cannabis plants.
1. Preparing for Curing
Drying Completeness:
- Dryness Check: Ensure that your cannabis is properly dried. The buds should be dry to the touch, and small stems should snap instead of bend.
Trimming:
- Final Trim: If you performed a rough trim before drying, now is the time for a final, detailed trim to remove any remaining sugar leaves.
Containers:
- Airtight Jars: Use glass mason jars or other airtight containers. Avoid plastic, as it can affect the taste and smell.
- Size: Choose jars that allow you to fill them about 75% full, leaving some space for air circulation.
2. Initial Curing Process
Filling the Jars:
- Method: Place the dried buds loosely into the jars, filling them about 75% full to ensure adequate airflow.
- Labeling: Label each jar with the strain name and the date to keep track of the curing process.
Burping the Jars:
- Frequency: For the first week, open the jars for 15-30 minutes once or twice a day. This process, known as “burping,” allows fresh air to replace the humid air inside the jar.
- Method: Gently shake the jars to ensure even air distribution and to prevent the buds from sticking together.
3. Monitoring Humidity
Ideal Humidity:
- Target Range: Aim for a relative humidity of 60-65% within the jars.
- Tools: Use small hygrometers inside the jars to monitor humidity levels accurately.
Humidity Packs:
- Usage: Consider using 62% humidity control packs to maintain a consistent environment inside the jars. These packs can help prevent the buds from drying out too much or becoming too moist.
4. Adjusting the Environment
Too Dry:
- Signs: If the humidity drops below 55%, the buds may become too dry and lose flavor.
- Solution: Add a small piece of citrus peel or a humidity pack to the jar temporarily. Remove the peel after a few hours to avoid over-humidification.
Too Moist:
- Signs: If the humidity exceeds 65%, there is a risk of mold growth.
- Solution: Leave the jars open for a longer period during burping or spread the buds out on a drying rack for a few hours to reduce moisture.
5. Long-Term Curing
Extended Burping:
- Frequency: After the first week, reduce burping to once every few days or once a week. This gradual reduction allows for a controlled curing environment.
- Duration: Continue curing for at least 2-4 weeks, though some growers prefer to cure for several months to achieve the best results.
Quality Checks:
- Smell and Taste: Regularly check the aroma and flavor of the buds. A well-cured bud will have a more pronounced and pleasant smell.
- Texture: Properly cured buds should feel slightly sticky and spongy but not overly dry or moist.
6. Final Storage
Sealing the Jars:
- Method: Once the curing process is complete, seal the jars tightly to prevent any further air exchange.
- Storage Conditions: To keep the buds fresh, store the jars in a cool, dark place.
Long-Term Preservation:
- Monitoring: Check the jars periodically for any changes in humidity or signs of mold. If necessary, burp the jars occasionally to maintain optimal conditions.
- Avoid Light and Heat: Keep the jars away from light and heat sources, as these can degrade cannabinoids and terpenes over time.
7. Troubleshooting Common Issues
Mold Growth:
- Signs: Visible mold or a musty smell indicates excessive moisture.
- Solution: Immediately remove affected buds and improve air circulation. Ensure the remaining buds are dry enough before continuing to cure.
Overly Dry Buds:
- Signs: Buds that crumble easily and lack stickiness.
- Solution: Rehydrate slightly with a humidity pack or a piece of citrus peel (remove after a few hours).
Tips for Successful Cannabis Drying and Curing
Ensuring the highest quality of your cannabis requires attention to detail and patience during the drying and curing processes. Here are some tips to help you achieve the best results:
Drying Tips:
- Maintain Optimal Environment:
- Temperature: Keep the drying room between 60-70°F (15-21°C).
- Humidity: Aim for a relative humidity of 45-55%.
- Air Circulation: Use fans to circulate air but avoid blowing air directly on the buds.
- Monitor Regularly:
- Daily Checks: Inspect your drying cannabis daily for signs of mold or overdrying.
- Stem Test: Perform the snap test on small stems to determine dryness (they should snap rather than bend).
- Avoid Overcrowding:
- Spacing: Ensure enough space between hanging plants or branches to allow for proper air circulation.
- Drying Racks: If using drying racks, make sure buds are spread out evenly and not piled up.
- Dark Environment:
- Light Exposure: Keep the drying room dark to protect cannabinoids and terpenes from light degradation.
- Cleanliness:
- Sanitize Tools: Use clean and sanitized tools to avoid contamination.
- Clean Workspace: Maintain a clean drying area to prevent mold and pests.
Curing Tips:
- Choose the Right Containers:
- Glass Jars: Use airtight glass jars, such as mason jars, for curing.
- Size: Fill jars about 75% full to allow for proper air circulation within the container.
- Initial Burping:
- Frequency: For the first week, open the jars once or twice a day for 15-30 minutes.
- Shake Gently: Gently shake the jars to ensure even air distribution and to prevent buds from sticking together.
- Monitor Humidity:
- Hygrometers: Place small hygrometers inside the jars to monitor humidity levels.
- Ideal Range: Keep the humidity between 60-65% to prevent mold and ensure optimal curing.
- Use Humidity Packs:
- Consistency: Consider using 62% humidity control packs to maintain a stable environment inside the jars.
- Extended Curing:
- Patience: Cure for at least 2-4 weeks, with some growers preferring several months for the best results.
- Reduce Burping: After the first week, reduce burping to once every few days or once a week.
- Store Properly:
- Cool, Dark Place: Store jars in a cool, dark place to preserve the quality of the buds.
- Avoid Light and Heat: Light and heat can degrade cannabinoids and terpenes over time.
- Rehydrate if Necessary:
- Dry Buds: If buds become too dry, rehydrate slightly with a humidity pack or a small piece of citrus peel (removed after a few hours).
- Regular Quality Checks:
- Smell and Texture: Regularly check the aroma and texture of the buds. Well-cured buds should have a pleasant smell and a slightly sticky, spongy texture.
- Monitor for Mold: Continuously check for any signs of mold. If mold is detected, remove affected buds and adjust the environment.
Troubleshooting Common Issues in Drying and Curing Cannabis
Proper drying and curing are essential to achieving high-quality cannabis, but several common issues can arise during these processes. Here’s a detailed guide to troubleshooting these problems:
Drying Issues:
1. Mold and Mildew:
Signs:
- Visible fuzzy growths, usually white, gray, or green.
- A musty or off smell.
Causes:
- High humidity levels above 55%.
- Poor air circulation.
- Excessive moisture in the drying environment.
Solutions:
- Humidity Control: Use a dehumidifier to maintain humidity levels between 45-55%.
- Air Circulation: Ensure proper air circulation with fans, but avoid direct airflow on buds.
- Immediate Action: Remove and discard any moldy buds to prevent spread. Increase ventilation and consider drying the remaining buds more quickly.
2. Overdrying:
Signs:
- Buds feel too dry and crumbly.
- Loss of flavor and aroma.
Causes:
- Low humidity levels below 45%.
- High temperatures above 70°F (21°C).
Solutions:
- Humidity Adjustment: Increase humidity to the optimal range using a humidifier or by adding a bowl of water to the drying room.
- Temperature Control: Maintain consistent temperatures between 60-70°F (15-21°C).
- Rehydration: If buds are already too dry, rehydrate slightly using humidity packs or a small piece of citrus peel (remove after a few hours).
3. Uneven Drying:
Signs:
- Some buds dry faster than others.
- Uneven texture within the same batch.
Causes:
- Inconsistent airflow.
- Overcrowded drying area.
Solutions:
- Spacing: Ensure proper spacing between hanging branches or buds on drying racks.
- Airflow: Use fans to maintain consistent air circulation throughout the drying area.
Curing Issues:
1. High Humidity in Jars:
Signs:
- Hygrometer reads above 65% RH.
- Buds feel overly moist or spongy.
Causes:
- Inadequate drying before curing.
- Insufficient burping during the initial curing phase.
Solutions:
- Extended Burping: Open the jars for longer periods or more frequently to allow excess moisture to escape.
- Additional Drying: Spread the buds out on a drying rack for a few hours before returning them to the jars.
2. Low Humidity in Jars:
Signs:
- Hygrometer reads below 55% RH.
- Buds feel dry and brittle.
Causes:
- Overdrying during the drying phase.
- Insufficient humidity control.
Solutions:
- Humidity Packs: Add humidity control packs (62% RH) to maintain proper moisture levels.
- Rehydration: Place a small piece of citrus peel or a damp paper towel inside the jar for a short period, but monitor closely to prevent overhydration.
3. Loss of Aroma and Flavor:
Signs:
- Buds lack the characteristic cannabis smell and taste.
- Bland or muted aroma.
Causes:
- Overdrying.
- Exposure to light and heat during curing.
Solutions:
- Proper Storage: Store jars in a cool, dark place to protect terpenes and cannabinoids.
- Gradual Drying: Ensure a slow, controlled drying process to preserve flavor compounds.
General Troubleshooting Tips:
- Regular Monitoring:
- Check buds daily during drying and curing for any changes in humidity, mold, or other issues.
- Cleanliness:
- Keep tools and the drying/curing area clean to prevent contamination.
- Use sanitized jars and equipment.
- Adjustments:
- Be prepared to adjust environmental conditions (humidity, temperature, airflow) based on the specific needs of your cannabis strain and drying/curing space.
- Record Keeping:
- Keep detailed notes on your drying and curing processes, including any issues encountered and how you resolved them. This helps refine your techniques for future harvests.
- Patience:
- Rushing the drying and curing process can result in lower-quality cannabis. Allow enough time for each stage to ensure the best possible outcome.
Conclusion
Drying and curing your cannabis plants is an essential process to achieve high-quality buds with optimal potency, flavor, and aroma. By carefully managing the environment during drying and patiently curing the buds in airtight containers, you can enhance the overall quality of your harvest. Remember to monitor humidity levels and ensure proper air circulation to prevent mold and preserve the integrity of your cannabis. With attention to detail and patience, you will be rewarded with smooth, flavorful, and potent buds that reflect the care and effort put into their cultivation and post-harvest processing.