How to Clone Medical Cannabis Plants: A Comprehensive Guide
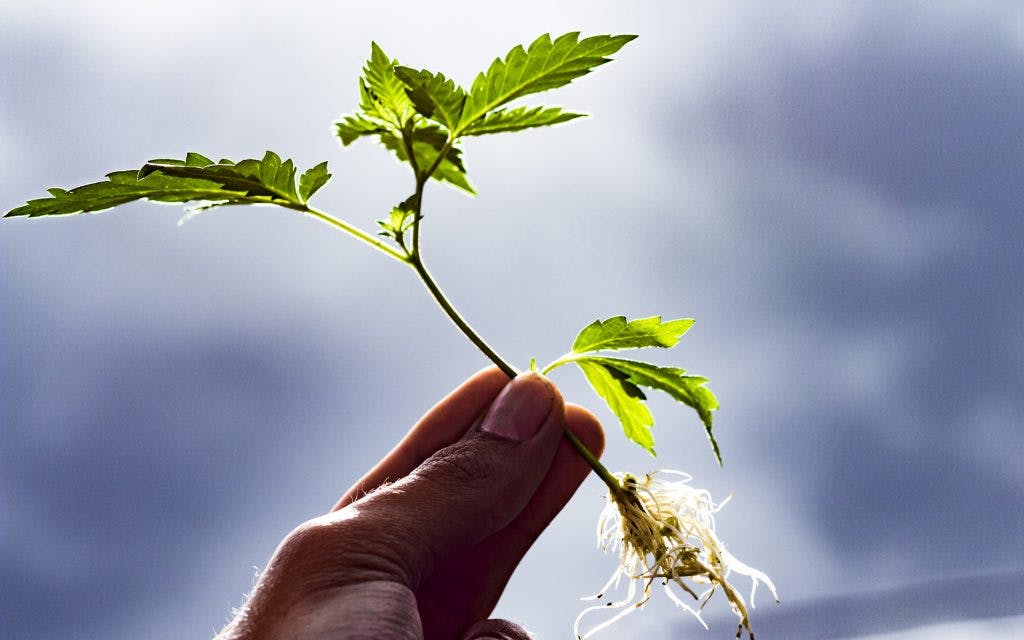
Cloning cannabis plants is a method that allows growers to reproduce their best plants consistently. This is particularly useful for medical cannabis, where consistency in strain and potency is crucial for patients relying on cannabis for treatment. In order to clone a plant, a cutting from a healthy “mother” plant must be encouraged to grow roots of its own. Here’s a detailed guide on how to clone medical cannabis plants, covering everything from the basics to advanced techniques.
Understanding the Basics of Cloning
Why Clone Cannabis Plants? Cloning ensures genetic consistency. Unlike growing from seeds, which can result in slight variations even within the same strain, clones are genetically identical to the mother plant. This is vital for medical cannabis users who require specific cannabinoid profiles for their treatments.
Selecting the Mother Plant Choosing the right mother plant is critical. The ideal mother plant should be healthy, robust, and free from pests or diseases. It should also exhibit the desired traits consistently, such as potency, yield, flavor, and therapeutic effects.
Preparing for Cloning
Proper preparation is crucial for successful cannabis cloning. This section will guide you through the necessary materials, setting up the cloning area, and ensuring the optimal conditions for your clones to thrive.
Materials Needed
Before you start cloning, gather all the essential materials to ensure a smooth and efficient process. Here’s a detailed list of what you’ll need:
- Healthy Mother Plant:
- The mother plant should be healthy, pest-free, and exhibit the desired traits you want to replicate.
- Cutting Tools:
- Sharp, sterile scissors or a razor blade are necessary for making clean cuts. To avoid infections, make sure the instruments are sanitized.
- Rooting Hormone:
- Available in gel, powder, or liquid form, rooting hormones help stimulate root growth. Common products include Clonex, Olivia’s Cloning Gel, and Dip ‘n Grow.
- Cloning Medium:
- The medium provides support and moisture for the clones. Options include rock wool cubes, peat pellets, perlite, vermiculite, or hydroponic cloning machines like aeroponic cloners.
- Humidity Dome or Plastic Cover:
- These are used to maintain high humidity levels around the clones, which is crucial for their survival and root development.
- Spray Bottle with Water:
- Used to mist the clones and maintain humidity levels inside the dome.
- Grow Lights:
- Low-intensity lights, such as fluorescent or LED lights, provide the necessary light without stressing the clones.
- pH-Adjusted Water:
- The water used should be pH-balanced (ideally between 5.8 and 6.3) to promote healthy root development.
- Cloning Tray or Pots:
- These hold the cloning medium and support the clones during the rooting process.
- Heating Mat (Optional):
- A heating mat can help maintain consistent temperatures, especially in cooler environments.
Setting Up the Cloning Area Choose a clean, well-lit area with controlled temperature and humidity. Ideally, the temperature should be between 70-75°F (21-24°C) with a humidity level around 70-80%. Cleanliness is essential to prevent contamination.
The Cloning Process

The cloning process involves several critical steps, from taking cuttings from the mother plant to ensuring the clones develop healthy roots. Here’s a detailed, step-by-step guide to successfully cloning cannabis plants.
Step 1: Select and Cut the Clone
- Choose the Branch:
- Select a healthy branch from the mother plant. The branch should be about 6-8 inches long and have multiple nodes. Look for vigorous growth with no signs of pests or diseases.
- Make the Cut:
- Using a sharp, sterile scissors or razor blade, make a clean cut at a 45-degree angle just below a node. This angle increases the surface area for root development.
- Immediate Submersion:
- Immediately place the cut end of the clone into a cup of pH-adjusted water to prevent air embolism, which can block the uptake of water and nutrients.
Step 2: Trim the Leaves
- Remove Lower Leaves:
- Leave a few little leaves at the top after trimming away the lower leaves on the cutting. This helps the clone focus its energy on root development rather than sustaining large leaves.
- Cut Large Leaves:
- Cut the remaining big leaves in half to minimize transpiration-related water loss. This step helps prevent wilting and supports better moisture retention.
Step 3: Apply Rooting Hormone
- Dip in Water:
- Dip the cut end of the clone into water to ensure it is moist.
- Apply Rooting Hormone:
- Dip the moist end of the clone into rooting hormone. Ensure an even coating. Auxins, which promote root growth, are found in rooting hormones, which are available in liquid, powder, or gel forms.
Step 4: Insert the Clone into the Cloning Medium
- Prepare the Medium:
- Ensure the cloning medium is moist but not waterlogged. Rock wool cubes, peat pellets, or a hydroponic system can be used.
- Plant the Clone:
- Insert the treated end of the clone into the prepared medium. To make sure the clone and the medium are in excellent contact, gently press around the base.
- Label the Clones:
- If cloning multiple strains, label each clone to keep track of the different varieties.
Step 5: Place the Clone in the Cloning Tray
- Arrange Clones:
- Place the clones in a cloning tray, ensuring they are upright and secure.
- Cover with Humidity Dome:
- To keep the humidity levels high, place a plastic cover or humidity dome over the tray. This helps prevent the clones from drying out.
- Mist the Clones:
- Use a spray bottle to mist the clones and the inside of the dome with water. This maintains high humidity and supports the clones during the initial stages.
Step 6: Provide Light
- Set Up Grow Lights:
- Place low-intensity grow lights, such as fluorescent or LED lights, about 12-18 inches above the clones. Allocate 18 to 24 hours of illumination daily.
- Adjust Light Intensity:
- Ensure the light intensity is sufficient to support photosynthesis without causing stress to the clones. Clones need light but not as much as mature plants.
Step 7: Monitor and Maintain
- Daily Checks:
- Check the clones daily. Make sure the medium stays damp but not soggy. Mist the clones and the inside of the dome as needed to maintain humidity.
- Ventilation:
- Gradually open the vents on the humidity dome over the course of a week to acclimate the clones to lower humidity levels.
- Temperature and Humidity:
- Maintain a temperature range of 70-75°F (21-24°C) and humidity levels around 70-80%.
Care for Clones
Transplanting Clones: After 1-2 weeks, the clones should develop a healthy root system. Gently pulling on the clone or searching for roots poking out of the media are two ways to check for roots. Move the clones into bigger pots or your preferred growing media once the roots have taken hold.
Acclimatizing Clones: Before fully exposing the clones to your regular growing environment, gradually acclimatize them to avoid shock. Slowly increase light intensity and reduce humidity over a few days.
Advanced Cloning Techniques
For experienced growers looking to enhance their cloning practices, advanced cloning techniques can offer increased efficiency, higher success rates, and even the ability to propagate cannabis plants on a larger scale. Here, we explore aeroponic cloning, tissue culture, and other advanced methods that can take your cannabis cultivation to the next level.
Aeroponic Cloning
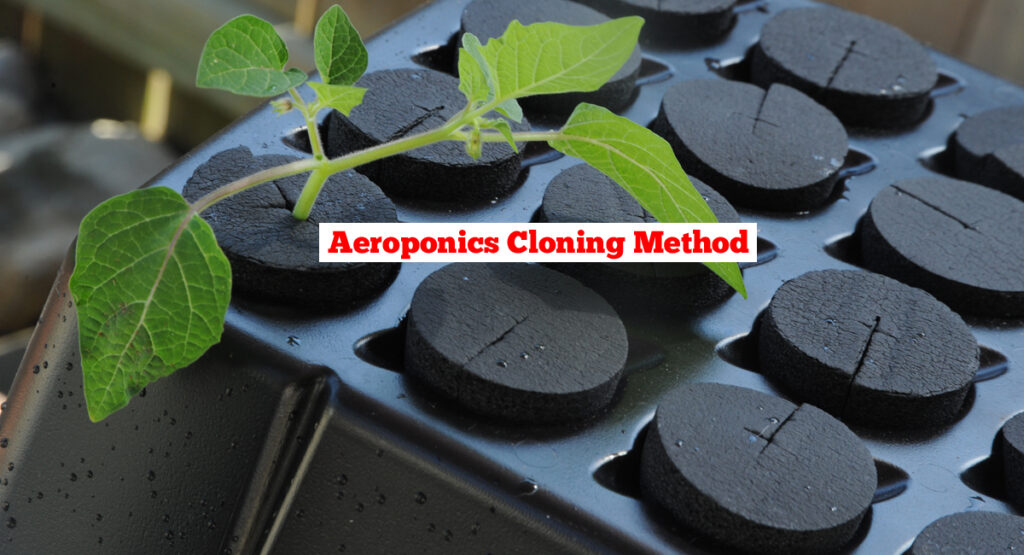
Aeroponic cloning involves suspending the cuttings in an air chamber and misting the roots with a nutrient solution. This method can result in faster root development and higher success rates.
Materials Needed:
- Aeroponic cloning machine
- Rooting hormone (optional)
- pH-adjusted water
- Nutrient solution
- Sterile cutting tools
Step-by-Step Process:
- Prepare the Cloning Machine:
- Set up the aeroponic cloning machine according to the manufacturer’s instructions. Fill the reservoir with pH-adjusted water and add a mild nutrient solution if desired.
- Take Cuttings:
- Select healthy branches from the mother plant and make clean cuts at a 45-degree angle just below a node. Immediately place the cuttings into water to prevent air embolism.
- Apply Rooting Hormone:
- Optionally, dip the cut ends into rooting hormone to stimulate root growth.
- Place Cuttings in the Machine:
- Insert the cuttings into the neoprene collars or support structures of the cloning machine. Ensure the cut ends are exposed to the misting nozzles.
- Monitor and Maintain:
- Run the cloning machine according to the recommended cycle (typically 1-2 minutes on, 5-10 minutes off). Maintain a temperature of 70-75°F (21-24°C) and high humidity.
- Transplant Clones:
- After 7-10 days, check for root development. Once the roots are 1-2 inches long, transplant the clones into your preferred growing medium.
Advantages:
- Faster root development
- Higher success rates
- Reduced risk of diseases and pests
Disadvantages:
- Higher initial cost for equipment
- Requires electricity and maintenance
Tissue Culture
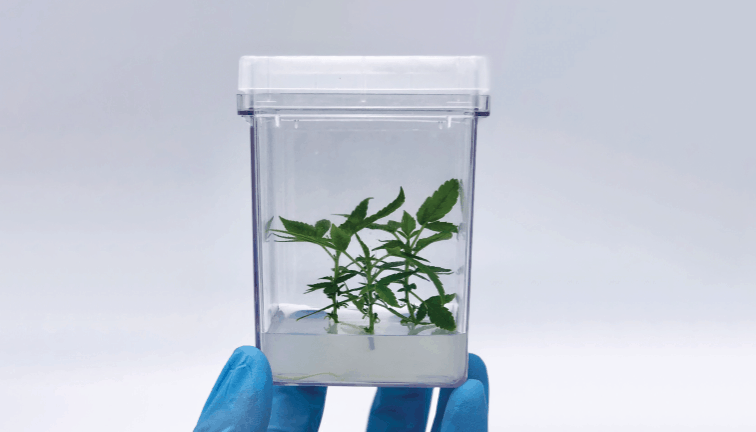
Tissue culture, or micropropagation, is an advanced technique that involves growing cannabis cells in a sterile lab environment. This method allows for mass production of disease-free plants and can preserve genetic material for long periods.
Materials Needed:
- Sterile tissue culture containers
- Agar medium or tissue culture gel
- Sterile cutting tools
- Growth hormones (cytokinins and auxins)
- Laminar flow hood or sterile work environment
Step-by-Step Process:
- Prepare the Medium:
- Prepare a sterile tissue culture medium containing nutrients, agar, and growth hormones. Sterilize the medium in an autoclave.
- Select and Sterilize Explants:
- Choose small, healthy tissue samples (explants) from the mother plant. Sterilize the explants by immersing them in a bleach solution followed by a rinse in sterile water.
- Inoculate Explants:
- Under sterile conditions, place the sterilized explants onto the prepared tissue culture medium. Once the containers are sealed, give them the proper labels.
- Incubate:
- Place the containers in a controlled environment with appropriate light and temperature conditions (typically 75-80°F or 24-27°C with 16-18 hours of light per day).
- Subculture:
- After 4-6 weeks, transfer the growing plantlets to fresh medium to encourage further development. Repeat this process as needed.
- Acclimatize and Transplant:
- Once the plantlets have developed roots and shoots, gradually acclimatize them to normal growing conditions. Plant them in a different growing medium, such as dirt.
Advantages:
- Mass production of identical plants
- Long-term preservation of genetic material
- Disease-free propagation
Disadvantages:
- Requires specialized equipment and expertise
- Time-consuming and labor-intensive
Grafting
Grafting is the process of fusing two plants’ tissues together to make one. This technique can be used to combine desirable traits from different plants, such as disease resistance and high yield.
Materials Needed:
- Rootstock plant (base plant with desirable traits)
- Scion (cutting from the desired strain)
- Sterile cutting tools
- Grafting tape or clips
Step-by-Step Process:
- Prepare the Rootstock and Scion:
- Select a healthy rootstock and a healthy scion. Make a clean, diagonal cut on both the rootstock and the scion.
- Join the Tissues:
- Ensure that the scion’s and rootstock’s cut surfaces line up. Secure them together with grafting tape or clips.
- Maintain the Graft:
- Keep the grafted plant in a controlled environment with high humidity and moderate temperature. Monitor the graft for signs of union and new growth.
- Care for the Grafted Plant:
- As soon as new growth starts to emerge from the graft, gradually acclimate the plant to typical growing circumstances. Remove the grafting tape or clips once the graft is secure.
Advantages:
- Combines desirable traits from different plants
- Can improve disease resistance and yield
Disadvantages:
- Requires skill and precision
- Grafted plants may be more fragile
Using Cloning Gels and Powders
While not as advanced as aeroponic cloning or tissue culture, using specialized cloning gels and powders can significantly improve the success rate of your clones.
Materials Needed:
- Cloning gel or powder
- Sterile cutting tools
- Cloning medium (rock wool, peat pellets, etc.)
Step-by-Step Process:
- Prepare the Cuttings:
- Take healthy cuttings from the mother plant and make clean cuts at a 45-degree angle.
- Apply Cloning Gel or Powder:
- Dip the cut ends of the cuttings into the cloning gel or powder. Ensure an even coating to stimulate root growth.
- Insert into Medium:
- Place the treated cuttings into the cloning medium. Make sure the cutting and the media make excellent contact.
- Maintain the Environment:
- Keep the clones in a high-humidity environment with moderate temperature and low-intensity light.
- Monitor and Transplant:
- Check for root development after 1-2 weeks. Once roots are established, transplant the clones into a larger growing medium.
Advantages:
- Easy to use and widely available
- Improves root development and success rates
Disadvantages:
- Not as effective as more advanced techniques
- Requires consistent environmental control
Troubleshooting Common Cloning Issues
Despite best efforts and careful preparation, issues can still arise during the cloning process. Troubleshooting these problems effectively is crucial to ensure high success rates and healthy clone development. This section outlines common cloning issues and provides detailed solutions to address them.
Common Cloning Issues
- Wilting Clones
- Yellowing Leaves
- Root Rot
- Slow Root Development
- Pests and Diseases
- Mold and Mildew
- Clones Not Taking Root
1. Wilting Clones
Symptoms:
- Clones appear limp and lifeless.
- Leaves droop and may curl inward.
Causes:
- Low humidity levels.
- Insufficient moisture in the cloning medium.
- Poor air circulation.
- Transplant shock.
Solutions:
- Increase Humidity: Ensure the humidity dome is properly sealed and mist the clones regularly to maintain high humidity levels around 70-80%.
- Proper Moisture Levels: Check that the cloning medium is consistently moist but not waterlogged. Adjust watering as needed.
- Improve Air Circulation: Use a small fan to gently circulate air around the clones, but avoid direct airflow.
- Acclimatize Gradually: When transplanting, gradually acclimatize clones to their new environment by slowly increasing light intensity and reducing humidity.
2. Yellowing Leaves
Symptoms:
- Leaves turn yellow, especially the lower ones.
- Yellowing can start at the tips and spread inward.
Causes:
- Nutrient deficiencies (especially nitrogen).
- Overwatering or underwatering.
- pH imbalances.
- Root development issues.
Solutions:
- Check Nutrient Levels: If clones are rooted, start feeding them with a weak nutrient solution (1/4 strength). Ensure the nutrient mix is balanced and appropriate for cannabis.
- Adjust Watering: Maintain consistent moisture levels in the cloning medium. Avoid overwatering and underwatering.
- Monitor pH: Use pH-adjusted water (pH 5.8-6.3) to ensure proper nutrient uptake.
- Inspect Roots: Check for healthy white roots. If roots are brown or mushy, it may indicate root rot or nutrient lockout. Adjust watering and feeding practices accordingly.
3. Root Rot
Symptoms:
- Roots appear brown, slimy, and have a foul smell.
- Clones exhibit slow growth and may wilt.
Causes:
- Overwatering.
- Poor drainage in the cloning medium.
- Inadequate air circulation together with high humidity levels.
Solutions:
- Improve Drainage: Ensure the cloning medium has good drainage. Rock wool, perlite, or well-draining soil mixes can help prevent waterlogging.
- Reduce Watering Frequency: To avoid standing water around the roots, let the medium thoroughly dry out in between waterings.
- Enhance Air Circulation: Use fans to improve air movement and reduce excess humidity. Avoid water pooling in the cloning area.
4. Slow Root Development
Symptoms:
- Clones take longer than usual to develop roots.
- Stunted growth and lack of new root formation.
Causes:
- Inadequate temperature or humidity levels.
- Poor light conditions.
- Insufficient use of rooting hormones.
- Overly large leaves diverting energy from root development.
Solutions:
- Optimize Temperature and Humidity: Maintain temperatures around 70-75°F (21-24°C) and humidity levels at 70-80%.
- Provide Adequate Light: Ensure clones receive 18-24 hours of low-intensity light daily. Adjust the light height and intensity to avoid stress.
- Use Rooting Hormones: Apply rooting hormones (gel, powder, or liquid) to stimulate root growth.
- Trim Leaves: Cut large leaves in half to reduce transpiration and encourage energy allocation to root formation.
5. Pests and Diseases
Symptoms:
- Visible pests such as spider mites, aphids, or fungus gnats on clones.
- Signs of disease, including spots, discoloration, or mold on leaves.
Causes:
- Contamination in the cloning area.
- Poor environmental control.
- Introduction of infected plant material.
Solutions:
- Inspect Regularly: Check clones daily for signs of pests or diseases. Take a closer look with a magnifying glass.
- Maintain Cleanliness: Keep the cloning area clean and sanitized. Sterilize tools and surfaces regularly.
- Use Preventative Measures: Apply organic pest control products like neem oil or insecticidal soap. Make sure there is adequate airflow to stop the growth of mold.
- Isolate Affected Clones: Remove and isolate any clones showing signs of pests or disease to prevent spreading.
6. Mold and Mildew
Symptoms:
- White, powdery substance on leaves or stems (powdery mildew).
- Gray or white fuzzy mold on the medium or clones.
Causes:
- High humidity levels.
- Poor air circulation.
- Overcrowding of clones under the humidity dome.
Solutions:
- Reduce Humidity Gradually: Open the vents on the humidity dome over a week to acclimate clones to lower humidity.
- Improve Airflow: Use fans to increase air movement around the clones. Avoid overcrowding the cloning tray.
- Use Fungicides: Apply organic fungicides or a diluted hydrogen peroxide solution to affected areas.
- Remove Infected Material: Trim and discard any parts of the clones affected by mold or mildew.
7. Clones Not Taking Root
Symptoms:
- Clones fail to develop roots after several weeks.
- No visible root growth from the cuttings.
Causes:
- Poor quality or unhealthy mother plant.
- Inadequate use of rooting hormones.
- Environmental conditions not optimal for rooting.
- Cuttings taken from unsuitable parts of the mother plant.
Solutions:
- Select Healthy Mother Plants: Ensure the mother plant is vigorous, pest-free, and exhibits desirable traits.
- Apply Rooting Hormones Properly: Use rooting hormones on the cut ends of the clones to stimulate root growth.
- Optimize Environmental Conditions: Maintain consistent temperature, humidity, and light levels conducive to rooting.
- Take Cuttings from Suitable Areas: Choose branches with multiple nodes and healthy growth for cuttings.
Legal and Ethical Considerations
When cloning cannabis plants, especially for medical purposes, it is crucial to be aware of and comply with legal and ethical guidelines. This ensures that your activities are lawful, respectful of intellectual property, and considerate of the health and safety of all involved.
Legal Considerations
- Compliance with Local Laws:
- Cultivation Laws: Ensure that your cloning and cultivation activities comply with the laws and regulations of your jurisdiction. Different regions have varying laws regarding the number of plants you can grow, where you can grow them, and who is allowed to cultivate cannabis.
- Licensing and Permits: If you are a commercial grower, you may need specific licenses or permits to clone and cultivate cannabis. Obtain all necessary legal documentation before starting your operation.
- Medical Use Regulations: For medical cannabis, adhere to regulations regarding the production and distribution of cannabis for medical use. This includes obtaining approvals from relevant health authorities and following guidelines for patient safety.
- Respecting Intellectual Property:
- Patented Strains: Some cannabis strains are patented or have intellectual property protections. Ensure you have the right to clone and cultivate specific strains, particularly if they are commercially protected.
- Trademarks: Be mindful of trademarks associated with specific strains or products. Unauthorized use of trademarked names can lead to legal issues.
- Environmental Regulations:
- Waste Disposal: Dispose of plant waste, chemical residues, and other materials responsibly. Follow local guidelines for waste disposal to minimize environmental impact.
- Water Use: Be aware of water usage regulations in your area, especially if water resources are limited. Use water-saving techniques to preserve water.
Ethical Considerations
- Patient Safety:
- Consistency and Quality: Ensure that clones used for medical purposes consistently exhibit the desired traits, such as potency, cannabinoid profile, and therapeutic effects. This reliability is essential for patients relying on cannabis for treatment.
- Contaminant-Free: Cannabis should be grown in a sterile, controlled environment to avoid contamination from mold, pesticides, or other dangerous materials. To guarantee the safety of the product, test it frequently.
- Respecting Genetic Diversity:
- Avoiding Monoculture: While cloning ensures consistency, it can also lead to genetic homogeneity. Maintain a diverse genetic pool to prevent the spread of diseases and pests that can thrive in monoculture environments.
- Preserving Wild Strains: Contribute to the conservation of wild and heirloom cannabis strains by avoiding over-reliance on a few popular clones.
- Transparency with Patients:
- Accurate Labeling: Provide accurate information about the strain, cannabinoid content, and potential effects of the clones. Transparency helps patients make informed decisions about their treatment.
- Patient Education: Inform patients about the advantages and possible drawbacks of utilizing cloned cannabis plants for medicinal use.
The Science Behind Cloning
Plant Hormones: Rooting hormones used in cloning often contain auxins, which are plant hormones that promote root growth. Understanding the role of auxins and other hormones can help optimize the cloning process.
Genetic Stability: Repeated cloning from clones (cloning the clones) can lead to genetic drift, where the genetic makeup slowly changes over generations. To maintain genetic stability, always clone from a healthy mother plant.
Optimizing Cloning Success
Choosing the Best Rooting Medium: Different mediums have their pros and cons. Rock wool provides good aeration, peat pellets are easy to transplant, and cloning machines can offer high success rates with less manual effort.
Environmental Control: Maintaining consistent temperature, humidity, and light conditions is crucial for cloning success. Invest in good quality grow lights, humidity domes, and environmental control systems.
Sterility and Cleanliness: Prevent contamination by using sterile tools, clean workspaces, and fresh cloning mediums. Even minor contamination can significantly reduce cloning success rates.
Conclusion
Cloning cannabis plants, particularly for medical purposes, is a practice that requires careful attention to detail, adherence to legal and ethical standards, and a commitment to ensuring the health and safety of both growers and consumers. By understanding and implementing the basics of cloning, preparing thoroughly, following a detailed cloning process, and addressing common issues with advanced techniques, cultivators can achieve high success rates and produce consistent, high-quality plants.
Summary of Key Points
- Understanding the Basics:
- Cloning offers genetic consistency, faster turnaround times, and cost-effectiveness. Selecting a healthy mother plant with desirable traits is crucial.
- Preparing for Cloning:
- Gathering the necessary materials, setting up a clean and controlled environment, and ensuring the health and hydration of the mother plant are vital steps for successful cloning.
- The Cloning Process:
- This involves taking cuttings, applying rooting hormones, placing clones in the appropriate medium, maintaining optimal environmental conditions, and carefully monitoring and maintaining the clones until they are ready for transplanting.
- Care for Clones:
- Proper care includes maintaining the right temperature, humidity, and light conditions, ensuring proper watering and feeding, and regularly checking for root development, pests, and diseases.
- Advanced Cloning Techniques:
- Techniques like aeroponic cloning, tissue culture, and grafting can improve efficiency and success rates, although they may require specialized equipment and expertise.
- Troubleshooting Common Cloning Issues:
- Addressing issues like wilting, yellowing leaves, root rot, slow root development, pests, mold, and clones not taking root through specific solutions helps maintain healthy clones.
- Legal and Ethical Considerations:
- Compliance with local laws, respecting intellectual property, maintaining patient safety, and ensuring environmental sustainability are essential for responsible cloning practices.
- Health Considerations:
- Protecting the health of growers and consumers by using personal protective equipment, maintaining a clean growing environment, conducting regular testing, and providing clear labeling and education are critical.
By following these guidelines and best practices, cultivators can not only produce reliable and effective medical cannabis but also contribute to a responsible and sustainable cannabis industry. The ability to clone plants successfully ensures that patients receive consistent and high-quality medicine, enhancing their treatment outcomes and overall well-being. Additionally, adhering to legal, ethical, and health standards fosters a safe and trustworthy cultivation environment, benefiting everyone involved in the process.
In conclusion, mastering the art and science of cloning cannabis plants involves a combination of technical knowledge, meticulous preparation, ongoing care, and a commitment to best practices. By doing so, growers can achieve excellence in their cultivation efforts, ensuring that their medical cannabis plants meet the highest standards of quality and efficacy.