
Growing Cannabis Outdoors for Beginners: 10 Tricks to Start Off on the Right Foot
Growing cannabis outdoors can be an incredibly rewarding experience, offering the opportunity to cultivate your own high-quality cannabis while enjoying the natural process. For beginners, however, it can also be a bit daunting. Here are ten detailed tricks to help you start your outdoor cannabis cultivation journey on the right foot.
1. Choose the Right Strain
Selecting the right cannabis strain is one of the most crucial decisions for a successful outdoor grow. The choice will impact not only the yield and potency of your harvest but also the plant’s ability to thrive in your specific climate. The ideal strain for your outside garden can be chosen using this comprehensive advice.
Understanding Strain Types
Cannabis strains are broadly categorized into three primary types: Indica, Sativa, and Hybrid. Each type has unique characteristics that influence the plant’s growth pattern, flowering time, and overall hardiness.
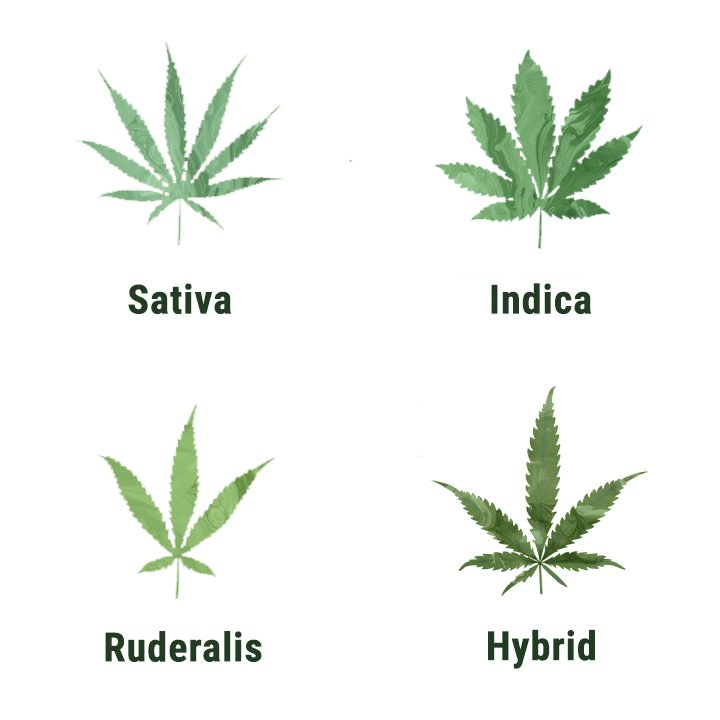
Indica Strains
Characteristics:
- Short and bushy plants with broad leaves.
- Fast flowering time, typically 8-10 weeks.
- Dense, compact buds.
Best For:
- Cooler climates with shorter growing seasons.
- Growers looking for a relaxing, sedative effect.
Popular Indica Strains:
- Northern Lights: Known for its resilience and fast flowering, making it ideal for beginners in cooler climates.
- Blueberry: Offers a fruity flavor and potent relaxation effects, suitable for temperate regions.
Sativa Strains
Characteristics:
- Tall, lanky plants with narrow leaves.
- Longer flowering time, usually 10-14 weeks.
- Airy, elongated buds.
Best For:
- Warmer climates with longer growing seasons.
- Growers seeking an uplifting, energetic high.
Popular Sativa Strains:
- Durban Poison: A pure Sativa strain that thrives in hot, sunny conditions and provides a clear-headed, energetic effect.
- Acapulco Gold: Renowned for its high THC content and invigorating effects, suitable for tropical climates.
Hybrid Strains
Characteristics:
- A mix of Indica and Sativa genetics.
- Can exhibit a range of growth patterns and effects.
- Versatile and adaptable to various climates.
Best For:
- Growers who want a balance of Indica and Sativa traits.
- Those seeking specific effects or growth characteristics.
Popular Hybrid Strains:
- Girl Scout Cookies (GSC): A balanced hybrid known for its potent effects and adaptability to different climates.
- OG Kush: Offers a blend of relaxing and euphoric effects, suitable for a variety of growing conditions.
-
 CBD OG Kush Cannabis SeedsFrom: $24.99
 -
 Girl Scout Cookies Cannabis SeedsFrom: $24.99
Climate Considerations
Selecting a strain for your outdoor garden depends largely on the climate where you live. Consider the following factors:
Temperature
- Hot Climates: Sativa strains and some hybrids that can handle high temperatures and intense sunlight.
- Cool Climates: Indica strains and hybrids with shorter flowering times to avoid early frosts.
Humidity
- Dry Climates: Strains with dense buds are more prone to mold, so choose airy Sativas or hybrids.
- Humid Climates: Strains that are resistant to mold and mildew, such as those with looser bud structures.
Growing Season
- Short Growing Seasons: Indica strains or autoflowering varieties that can mature quickly.
- Long Growing Seasons: Sativa strains or hybrids that require more time to reach full maturity.
Autoflowering vs. Photoperiod Strains
Autoflowering Strains
Characteristics:
- Automatically transition, independent of light conditions, after a predetermined amount of time from vegetative growth to flowering.
- Typically smaller and faster to harvest, often within 8-10 weeks from germination.
- More resilient to adverse conditions and pests.
Best For:
- Novices seeking a simple and rapid growth.
- Areas with unpredictable weather or short growing seasons.
Popular Autoflowering Strains:
- Autoflowering Northern Lights: Combines the resilience of Northern Lights with the speed of autoflowering genetics.
- Autoflowering Amnesia Haze: Offers a Sativa-dominant high with a faster growth cycle.
Photoperiod Strains
Characteristics:
- Require specific light cycles (12 hours of darkness) to initiate flowering.
- Often larger plants with higher yields and potency.
- More control over the growth cycle and timing.
Best For:
- Experienced growers looking for higher yields and potency.
- Areas with consistent light cycles and longer growing seasons.
Popular Photoperiod Strains:
- White Widow: Known for its potency and balanced effects, suitable for various climates.
- Sour Diesel: Offers a strong Sativa effect and high yields, thriving in warm conditions.
2. Prepare Your Site
Preparing the site for your outdoor cannabis garden is crucial for ensuring healthy plant growth and maximizing yields. This process involves selecting the right location, improving soil quality, and setting up necessary structures and protections. This comprehensive guide will assist you in setting up your outdoor gardening space.
Location Selection
Sunlight
Cannabis plants need ample sunlight to thrive. Choose a location that receives at least 6-8 hours of direct sunlight per day. Ideally, your site should have a southern exposure to maximize sunlight throughout the day.
Wind Protection
While good airflow is essential to prevent mold and pests, strong winds can damage your plants. Pick a spot where there will be protection from high winds but enough airflow. Natural windbreaks like trees or shrubs, or man-made barriers like fences, can help protect your plants.
Water Source
Ensure your site is close to a reliable water source. Regular watering is essential, especially during dry periods. If you have to transport water, it will become a significant chore, so proximity to water is key.
Security and Discretion
Cannabis cultivation should be kept discreet and secure. Choose a location that is out of sight from neighbors and passersby to avoid unwanted attention. A secure fence or natural barriers can help keep your garden private and deter theft.
Soil Quality
Soil Composition
Cannabis thrives in well-draining, loamy soil rich in organic matter. The ideal soil mix is a combination of sand, silt, and clay, with plenty of organic material to support robust growth.
pH Level
Cannabis prefers slightly acidic soil with a pH level between 6.0 and 7.0. A home testing kit or sending a sample to your local agricultural extension office can be used to determine the pH of your soil.
Soil Amendments
Improving your soil with organic amendments can enhance its structure and fertility. Here are some common amendments to consider:
- Compost: Adds essential nutrients and improves soil structure.
- Manure: Provides a rich source of nitrogen and other nutrients. Ensure it is well-rotted to avoid burning plants.
- Perlite/Vermiculite: Improves soil aeration and drainage.
- Lime: Raises soil pH if it is too acidic.
- Sulfur: Lowers soil pH if it is too alkaline.
Soil Preparation
Remove any rocks, weeds, and rubbish from the area before planting. To encourage root penetration, loosen the soil up to 12 to 18 inches below the surface. Mix in your chosen amendments thoroughly to ensure even distribution of nutrients.
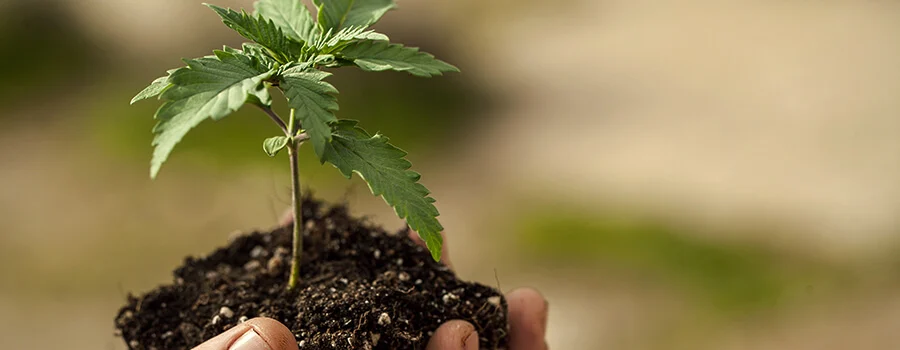
3. Germinate Your Seeds
Germinating cannabis seeds is the first step in your outdoor growing journey. Proper germination ensures healthy seedlings, which lead to strong and productive plants. This guide will walk you through the best practices for germinating cannabis seeds, from selecting high-quality seeds to the various germination methods.
Selecting High-Quality Seeds
Reputable Source
Always purchase seeds from a reputable seed bank or breeder. High-quality seeds have a higher germination rate and are more likely to produce robust plants with desirable traits.
Visual Inspection
Look for seeds that are:
- Color: Dark brown or gray with a mottled or striped appearance.
- Size: Larger seeds tend to be more mature and viable.
- Surface: Seeds should have a hard, smooth, and intact shell. Avoid seeds that are green, white, or have cracks.
Feminized vs. Regular Seeds
- Feminized Seeds: Because only female plants—the ones that yield the desired buds—are meant to come from these seeds.
- Regular Seeds: These can produce both male and female plants. If using regular seeds, you’ll need to identify and remove male plants to prevent pollination and ensure your females produce high-quality buds.
Germination Methods
Paper Towel Method
Materials Needed
- Cannabis seeds
- Paper towels
- Two plates or a plastic container
- Water (preferably distilled or filtered)
Steps
- Moisten Paper Towels: Wet two paper towels thoroughly. They ought to be somewhat damp, but not soggy.
- Place Seeds: Spread the seeds on one of the damp paper towels, leaving some space between each seed.
- Cover Seeds: Place the second damp paper towel over the seeds.
- Create a Humid Environment: Place the paper towels with seeds between two plates (to create a dark, humid environment) or in a plastic container with a loose lid.
- Store in a Warm Place: Keep the container in a warm place, ideally between 70-85°F (21-29°C).
- Monitor Moisture: Check the paper towels daily to ensure they remain moist. Add water if necessary.
- Wait for Taproots: Seeds should sprout taproots (small white roots) in 1-7 days. Once the taproots are about 0.5-1 inch long, they are ready for planting.
Direct Soil Method
Materials Needed
- Cannabis seeds
- Small pots or seedling trays
- Light, airy seed-starting mix
- Water (preferably distilled or filtered)
Steps
- Prepare Pots: Fill small pots or seedling trays with a light, airy seed-starting mix. Moisten the soil thoroughly.
- Plant Seeds: Make a small hole about 0.25-0.5 inches deep in the soil. Place one seed in each hole and cover lightly with soil.
- Water Gently: Water the soil gently to ensure it remains moist but not waterlogged.
- Provide Warmth: Keep the pots in a warm place with temperatures between 70-85°F (21-29°C).
- Maintain Moisture: Make sure there is constant moisture in the soil. If the soil begins to dry out, water it with a spray bottle.
- Wait for Sprouts: Seeds should germinate within 3-10 days. Plants can be moved to bigger pots or planted straight in the ground once they have sprouted and produced their first set of genuine leaves.
Water Glass Method
Materials Needed
- Cannabis seeds
- A glass of water (preferably distilled or filtered)
Steps
- Fill a Glass with Water: Fill a glass with water at room temperature.
- Soak Seeds: Place the seeds in the water. They may float initially but should sink after a few hours.
- Wait for Taproots: Keep the seeds in the water for 24-48 hours. Check regularly for the development of taproots.
- Plant Seeds: Once the seeds have sprouted taproots, carefully remove them from the water and plant them in soil or other growing medium.
Rockwool Cubes Method
Materials Needed
- Cannabis seeds
- Rockwool cubes
- Water (preferably distilled or filtered)
- Tray with a humidity dome
Steps
- Prepare Rockwool Cubes: Soak the Rockwool cubes in water for a few hours to fully saturate them.
- Place Seeds: Make a small hole in the top of each cube and place one seed in each hole.
- Cover Lightly: Lightly cover the seed with a small piece of Rockwool or just press it gently into the hole.
- Maintain Humidity: Place the cubes in a tray and cover with a humidity dome to maintain high humidity.
- Provide Warmth: Keep the tray in a warm place with temperatures between 70-85°F (21-29°C).
- Monitor Moisture: Ensure the Rockwool cubes remain moist. Add water to the tray if they start to dry out.
- Wait for Sprouts: Seeds should germinate within 3-10 days. The seedlings can be planted immediately in the ground or moved to larger pots once they have sprouted and produced their first set of genuine leaves.
4. Transplant Seedlings Carefully
Transplanting cannabis seedlings is a critical step in the growing process, requiring careful handling to ensure the young plants establish themselves in their new environment without experiencing undue stress. Successful transplantation involves selecting the right timing, preparing the seedlings and the new site, and using proper techniques to move the plants. Here’s a detailed guide to help you transplant your cannabis seedlings carefully and effectively.
Timing
When to Transplant
When your seedlings are robust enough to handle the transfer and have produced a few genuine leaves, transplant them. Usually, this happens two or three weeks following germination. By the time they are 4–6 inches tall, their roots should be well-established.
Avoid Transplant Shock
To minimize transplant shock, choose a cool, cloudy day for transplanting or do it in the late afternoon or evening. This helps the seedlings acclimate to their new environment without the added stress of intense sunlight.
Hardening Off
Gradual Acclimatization
Harden off your seedlings by exposing them to the outside gradually over a week or two prior to transplanting. Begin by putting them outside for a few hours every day, and then progressively extend their time outside and their exposure to direct sunlight. Through this procedure, the seedlings are more able to adapt to changes in wind, light, and temperature.
Preparing the New Site
Soil Preparation
Ensure the soil in the new planting site is well-prepared. Loose, well-draining, and organic matter-rich soil is ideal. Compost or other organic materials can be added to the soil to increase its fertility and structure.
Hole Size
Dig holes that are slightly larger than the root ball of your seedlings. This gives the roots enough space to spread out and establish themselves. A hole depth of 6-8 inches and width of 4-6 inches is typically sufficient.
Soil Moisture
Water the planting site thoroughly before transplanting. The soil should be moist but not waterlogged, providing a welcoming environment for the seedlings’ roots.
Transplanting Process
Gentle Handling
Handle the seedlings carefully to avoid damaging the delicate roots and stems. If you’re growing in biodegradable pots, you can plant the entire pot. If not, follow these steps:
Removing Seedlings from Pots
- Water Seedlings: Water the seedlings a few hours before transplanting. This helps to keep the root ball intact and makes it easier to remove from the pot.
- Loosen the Soil: Gently squeeze the sides of the pot to loosen the soil.
- Remove Seedling: Carefully turn the pot upside down, supporting the seedling with your hand, and gently slide the seedling out.
Planting the Seedlings
- Place Seedling in Hole: Place the seedling in the hole, ensuring it is at the same depth as it was in the pot. The root ball should be fully covered with soil.
- Fill the Hole: Fill in the hole with soil, gently pressing down to remove air pockets and secure the seedling.
- Water Thoroughly: Water the seedling thoroughly to help the soil settle around the roots and provide the necessary moisture for the plant to establish itself.
Supporting the Seedlings
If the seedlings are tall or leggy, consider adding a small stake or support to keep them upright. Tie the seedling to the support gently to avoid damaging the stem.
5. Provide Adequate Watering
Proper watering is essential for healthy cannabis growth. Understanding when and how to water your plants can significantly impact their development and yield. Overwatering or underwatering can both cause problems, so it’s crucial to strike the right balance. Here’s a detailed guide to ensure you provide adequate watering for your outdoor cannabis plants.
Understanding Water Needs
Growth Stages and Water Requirements
- Seedling Stage: Young plants require less water. Overwatering can easily drown delicate roots.
- Vegetative Stage: Plants grow rapidly and need more water to support this growth.
- Flowering Stage: Watering needs may increase further, but be cautious as excessive moisture can lead to mold in the dense buds.
Soil Type
Different soil types have different water retention capabilities. Well-draining soil, which is ideal for cannabis, requires more frequent watering compared to clay-heavy soil, which holds water longer.
Climate Considerations
- Hot Climates: Higher temperatures and increased evaporation rates mean more frequent watering is necessary.
- Cool Climates: Less frequent watering is needed as soil retains moisture longer.
- Humid Climates: High humidity can slow down water uptake, requiring careful monitoring to avoid overwatering.
Watering Techniques
Hand Watering
Steps
- Check Soil Moisture: Insert your finger about an inch into the soil. If it feels dry, it’s time to water.
- Water Evenly: Apply water evenly around the base of the plant, ensuring it soaks down to the root zone.
- Avoid Foliage: Try to avoid wetting the leaves to reduce the risk of mold and mildew.
- Water Slowly: Allow the soil to absorb water gradually to prevent runoff and ensure deep penetration.
Drip Irrigation
Benefits
- Consistent Moisture: Provides a steady supply of water directly to the root zone.
- Water Efficiency: Minimizes water wastage and evaporation.
- Ease of Use: Reduces the manual labor of hand watering.
Installation
- Lay Out Tubing: Arrange drip lines around your plants, ensuring even coverage.
- Install Emitters: Place emitters near the base of each plant.
- Connect to Water Source: Attach the system to a water source, such as a garden hose or rain barrel.
- Set Timer: Use a timer to automate watering schedules, ensuring consistent moisture levels.
Mulching
Benefits
- Moisture Retention: Mulch helps to retain soil moisture by reducing evaporation.
- Temperature Regulation: Keeps the soil cool in hot weather and warm in cooler conditions.
- Weed Suppression: Reduces competition for water by suppressing weed growth.
Application
- Material: Use organic materials like straw, wood chips, or leaves.
- Layer Thickness: Apply a 2-4 inch layer around the base of the plants, keeping it a few inches away from the stems to prevent rot.
Water Quality
pH Level
Cannabis plants prefer slightly acidic water with a pH level between 6.0 and 7.0. Use a pH meter to test your water regularly and adjust it if necessary using pH up or down solutions.
Source of Water
- Rainwater: Ideal for cannabis as it is naturally soft and free of chlorine.
- Tap Water: May need to be filtered to remove chlorine and other chemicals.
- Well Water: Test for minerals and adjust pH if necessary.
6. Feed Your Plants Properly
Feeding your cannabis plants properly is essential for robust growth, high yields, and potent buds. Cannabis plants require a balanced diet of macronutrients, micronutrients, and trace elements to thrive. This guide will walk you through the nutrient requirements at different growth stages, the types of fertilizers available, and how to apply them effectively.
Nutrient Requirements
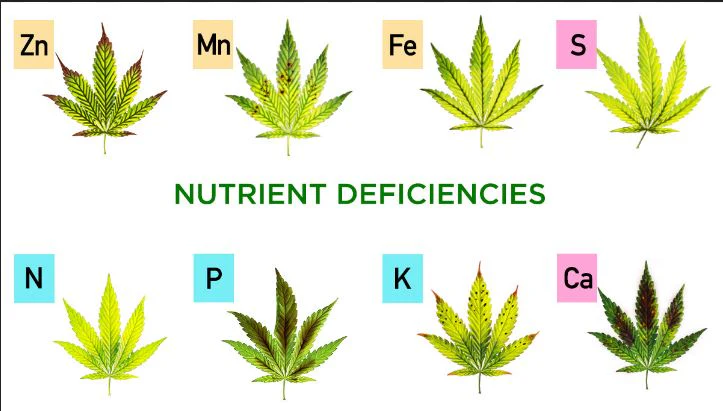
Macronutrients
Cannabis plants need three primary macronutrients in large amounts:
- Nitrogen (N): Essential for leaf and stem growth. High nitrogen levels are particularly important during the vegetative stage.
- Phosphorus (P): Crucial for root development and flowering. It aids in the formation of buds and seeds.
- Potassium (K): Supports overall plant health, improves disease resistance, and enhances water uptake.
Secondary Nutrients
These are also important but required in smaller amounts than macronutrients:
- Calcium (Ca): Strengthens cell walls and aids in root and leaf development.
- Magnesium (Mg): Central element in chlorophyll, necessary for photosynthesis.
- Sulfur (S): Integral for amino acids and proteins, contributes to plant structure.
Micronutrients
These are required in trace amounts but are still vital for healthy growth:
- Iron (Fe): Necessary for chlorophyll production.
- Manganese (Mn): Involved in enzyme activity and photosynthesis.
- Zinc (Zn): Important for growth hormone production and internodal spacing.
- Copper (Cu): Facilitates carbohydrate metabolism and oxygen reduction.
- Boron (B): Aids in cell wall formation and nutrient transport.
- Molybdenum (Mo): Essential for nitrogen utilization.
Nutrient Requirements by Growth Stage
Seedling Stage
- Nutrients Needed: Minimal nutrients; a light, balanced fertilizer if necessary.
- Application: Use a diluted, balanced fertilizer (e.g., 2-2-2 NPK) to avoid nutrient burn.
Vegetative Stage
- Nutrients Needed: High nitrogen, moderate phosphorus, and potassium.
- Application: Use a fertilizer with a higher nitrogen ratio (e.g., 3-1-2 NPK). Apply every 1-2 weeks, following the manufacturer’s instructions.
Flowering Stage
- Nutrients Needed: High phosphorus and potassium, lower nitrogen.
- Application: Switch to a fertilizer with a higher phosphorus and potassium ratio (e.g., 1-3-2 NPK). Apply every 1-2 weeks, reducing nitrogen levels to prevent excessive leaf growth and focus on bud development.
Types of Fertilizers
Organic Fertilizers
Derived from natural sources, organic fertilizers improve soil health and provide slow-release nutrients.
- Compost: Rich in organic matter and nutrients. Improves soil structure and moisture retention.
- Worm Castings: High in beneficial microbes and nutrients. Excellent for seedlings and vegetative growth.
- Fish Emulsion: High in nitrogen, promotes vigorous growth. Best used during the vegetative stage.
- Bone Meal: High in phosphorus, supports root development and flowering. Apply during the flowering stage.
- Kelp Meal: Provides potassium and trace elements. Enhances overall plant health and stress resistance.
Synthetic Fertilizers
Manufactured to provide precise nutrient ratios and fast-acting results.
- General Purpose Fertilizers: Available in various NPK ratios, suitable for different growth stages.
- Bloom Boosters: Formulated with high phosphorus and potassium for flowering.
- Liquid Fertilizers: Easy to apply and quickly absorbed. Ideal for correcting nutrient deficiencies.
Slow-Release Fertilizers
Granular fertilizers that release nutrients gradually over time.
- Pelletized Fertilizers: Provide a steady supply of nutrients for several months. Ideal for low-maintenance gardening.
Application Methods
Top Dressing
Sprinkle dry fertilizer on the soil surface around the base of the plant. Water thoroughly to help nutrients penetrate the soil.
Soil Drench
Dissolve liquid fertilizer in water and apply directly to the soil. This method ensures quick nutrient uptake.
Foliar Feeding
Spray a diluted nutrient solution directly onto the leaves. Useful for correcting micronutrient deficiencies quickly.
Compost Tea
Steep compost in water to create a nutrient-rich solution. Apply as a soil drench or foliar spray to boost plant health.
Feeding Schedule
Seedling Stage
- Week 1-2: Water with plain water or a very dilute fertilizer solution.
- Week 2-3: Introduce a light, balanced fertilizer if needed.
Vegetative Stage
- Week 3-4: Begin feeding with a high-nitrogen fertilizer. Apply every 1-2 weeks.
- Ongoing: Monitor plant growth and adjust feeding frequency and strength as needed. Increase feeding frequency during rapid growth phases.
Flowering Stage
- Week 1-2: Transition to a high-phosphorus and potassium fertilizer. Reduce nitrogen levels.
- Ongoing: Feed every 1-2 weeks, adjusting based on plant response. Monitor for signs of nutrient deficiencies or excesses.
7. Monitor and Manage Pests and Diseases
Pests and diseases can pose significant challenges to cannabis growers, potentially reducing yield and quality. Effective monitoring and management strategies are essential to protect your plants and ensure a healthy, bountiful harvest. Here’s a comprehensive guide on how to monitor and manage pests and diseases in your outdoor cannabis garden.
Common Pests and Diseases
Common Pests
- Aphids
- Description: Small, soft-bodied insects that suck plant sap, often found on new growth.
- Symptoms: Yellowing leaves, stunted growth, honeydew secretion, and sooty mold.
- Management: Use insecticidal soap or neem oil; introduce beneficial insects like ladybugs and lacewings.
- Spider Mites
- Description: Tiny arachnids that feed on plant sap, usually found on the underside of leaves.
- Symptoms: Speckled leaves, webbing, and leaf drop.
- Management: Increase humidity, use miticides, neem oil, or insecticidal soap; introduce predatory mites.
- Caterpillars
- Description: Larvae of moths and butterflies that chew on leaves and buds.
- Symptoms: Holes in leaves, chewed buds, and frass (caterpillar droppings).
- Management: Handpick caterpillars, use Bacillus thuringiensis (Bt), or introduce parasitic wasps.
- Whiteflies
- Description: Small, white flying insects that feed on plant sap.
- Symptoms: Yellowing leaves, honeydew secretion, and sooty mold.
- Management: Use yellow sticky traps, insecticidal soap, or neem oil; introduce beneficial insects like Encarsia formosa.
- Fungus Gnats
- Description: Small, dark flies whose larvae feed on plant roots.
- Symptoms: Wilting, yellowing leaves, and poor growth.
- Management: Allow soil to dry between watering, use sticky traps, beneficial nematodes, or mosquito dunks (Bti).
Common Diseases
- Powdery Mildew
- Description: Fungal disease characterized by white, powdery spots on leaves and stems.
- Symptoms: White, powdery growth on leaves, stunted growth, and leaf drop.
- Management: Improve air circulation, reduce humidity, use fungicides like sulfur or potassium bicarbonate.
- Botrytis (Bud Rot)
- Description: Fungal disease that affects buds, causing them to rot.
- Symptoms: Gray, moldy growth on buds, wilting, and brown or mushy buds.
- Management: Improve air circulation, reduce humidity, remove infected buds, use fungicides like copper or neem oil.
- Root Rot
- Description: Disease caused by fungi in waterlogged soil.
- Symptoms: Wilting, yellowing leaves, and brown, mushy roots.
- Management: Improve soil drainage, avoid overwatering, use beneficial microbes like Trichoderma or mycorrhizae.
- Leaf Septoria
- Description: Fungal disease causing yellow spots on leaves.
- Symptoms: Yellow or brown spots on leaves, leaf drop, and stunted growth.
- Management: Remove infected leaves, improve air circulation, use fungicides like copper or neem oil.
- Downy Mildew
- Description: Fungal disease characterized by yellow spots on the upper side of leaves and downy growth on the underside.
- Symptoms: Yellow spots on leaves, white or gray downy growth on the underside of leaves.
- Management: Improve air circulation, reduce humidity, use fungicides like copper or neem oil.
Monitoring Your Plants
Regular Inspections
- Frequency: Inspect your plants at least once a week, more frequently during peak growing seasons.
- Method: Check the tops and undersides of leaves, stems, and buds. Look for signs of pests, such as discolored leaves, holes, webbing, or visible insects. For diseases, look for unusual spots, mold, or wilting.
Tools
- Magnifying Glass: Helps spot tiny pests like spider mites and aphids.
- Yellow Sticky Traps: Useful for monitoring flying insects like whiteflies and fungus gnats.
- Monitoring Records: Keep a log of your observations to track the health of your plants and the effectiveness of your pest and disease management strategies.
Preventative Measures
Sanitation
- Clean Tools: Disinfect pruning tools and other equipment regularly to prevent the spread of diseases.
- Remove Debris: Clear dead leaves and plant debris from your garden, as they can harbor pests and diseases.
Environmental Control
- Air Circulation: Space plants adequately to ensure good airflow, reducing the risk of fungal diseases.
- Humidity Control: Avoid overwatering and ensure proper drainage to keep humidity levels in check.
- Crop Rotation: Avoid planting cannabis in the same spot year after year to reduce the risk of soil-borne diseases.
Biological Controls
- Beneficial Insects: Introduce predators like ladybugs, lacewings, and predatory mites to control pest populations naturally.
- Companion Planting: Grow pest-repellent plants like marigolds, basil, and mint near your cannabis to deter pests.
Resistant Strains
- Selection: Choose cannabis strains known for their resistance to pests and diseases. Research and select varieties that are well-suited to your local climate and growing conditions.
Organic and Chemical Controls
Organic Controls
- Neem Oil: Effective against a wide range of pests and fungal diseases. Use as a foliar spray.
- Insecticidal Soap: Safe for plants and effective against soft-bodied insects like aphids and spider mites.
- Bacillus thuringiensis (Bt): A natural bacterium that targets caterpillars and other larvae.
- Diatomaceous Earth: A natural powder that can be sprinkled on soil to control crawling insects.
- Compost Tea: Enhances plant health and resilience, making them less susceptible to pests and diseases.
Chemical Controls
- Synthetic Pesticides: Use as a last resort and follow the manufacturer’s instructions carefully. Be aware of potential impacts on beneficial insects and the environment.
- Fungicides: Effective for controlling fungal diseases. Choose products labeled for use on cannabis and follow the application guidelines.
Integrated Pest Management (IPM)
Principles of IPM
Integrated Pest Management (IPM) is a comprehensive approach that integrates many techniques to efficiently and sustainably manage pests and diseases.
- Prevention: Focus on cultural practices that reduce the risk of pest and disease problems.
- Monitoring: Regularly inspect plants and use monitoring tools to detect issues early.
- Identification: Accurately identify pests and diseases to choose the most appropriate control methods.
- Control: Implement a combination of biological, cultural, mechanical, and chemical controls as needed.
- Evaluation: Assess the effectiveness of your management strategies and adjust as necessary.
8. Train and Prune Your Plants
Training and pruning cannabis plants are essential techniques to maximize yield, improve plant health, and ensure even light distribution. These practices encourage robust growth, help manage plant shape and size, and can significantly enhance the quality of your harvest. Here’s a detailed guide on how to train and prune your outdoor cannabis plants.
Training Techniques
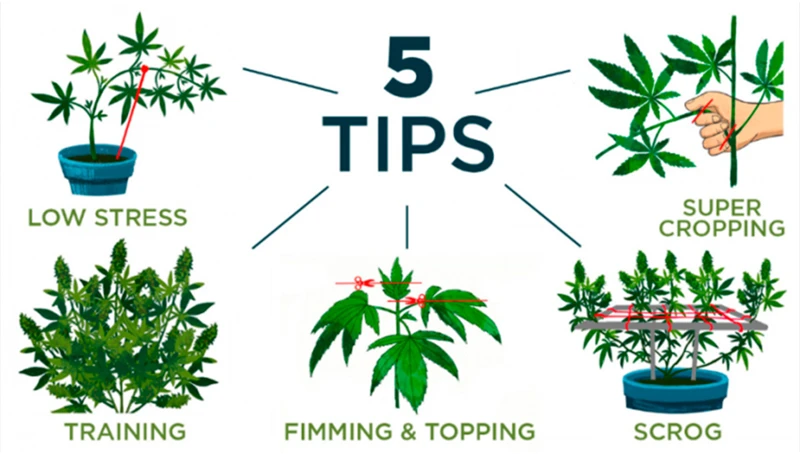
Low-Stress Training (LST)
Purpose: LST involves gently bending and tying down the branches of your cannabis plants to create an even canopy. This method increases light exposure to lower branches and improves overall plant structure without causing significant stress.
Steps:
- Preparation: Start LST when your plants are in the vegetative stage and have developed at least four to six nodes.
- Bend and Tie: Gently bend the main stem and branches down to a horizontal position. Use soft plant ties, garden wire, or string to secure them to the sides of the pot or to stakes in the ground.
- Adjust Regularly: As the plant grows, continue to tie down new growth to maintain an even canopy. Be careful not to break the branches.
- Monitor Growth: Ensure that all parts of the plant receive adequate light. Adjust ties as needed to avoid overcrowding and to promote airflow.
Screen of Green (ScrOG)
Purpose: The ScrOG method uses a horizontal screen or net to spread out the plant’s branches, ensuring even light distribution and maximizing bud production.
Steps:
- Install the Screen: Set up a screen or net about 12-24 inches above the base of your plants. The screen should have holes large enough to allow branches to pass through.
- Guide Branches: As the plant grows, guide the branches horizontally across the screen, tucking them under as needed to fill out the space.
- Maintain Even Canopy: Ensure that the top of the canopy remains level to maximize light exposure and airflow.
- Flowering Stage: Continue to guide and tuck branches until the first few weeks of the flowering stage. Once the plant stops stretching, focus on maintaining an even canopy and supporting the developing buds.
Topping and Fimming
Purpose: Topping and fimming are techniques used to encourage bushier growth and increase the number of main colas (primary bud sites).
Topping:
- Timing: Perform topping when the plant has developed at least four to six nodes.
- Cut the Main Stem: Using clean, sharp scissors or a blade, cut the main stem just above the fourth or fifth node. This encourages the plant to grow two main colas instead of one.
- Recovery: Allow the plant a few days to recover before performing any additional training or pruning.
Fimming:
- Timing: Perform fimming when the plant has developed at least four to six nodes.
- Pinch the New Growth: Pinch or cut about 75% of the new growth at the top of the plant. This can result in the growth of multiple new branches from the cut site.
- Recovery: Allow the plant to recover and monitor its response to ensure healthy growth.
Super Cropping
Purpose: Super cropping involves slightly damaging the inner tissues of the plant’s branches to make them more pliable, promoting stronger, bushier growth and increased bud production.
Steps:
- Timing: Perform super cropping during the vegetative stage when the plant is healthy and vigorous.
- Select Branches: Choose branches that you want to bend and strengthen.
- Gently Crush the Stem: Using your fingers, gently squeeze and twist the branch until you feel a slight crunch. Be careful not to break the outer skin of the branch.
- Bend the Branch: Bend the branch gently to the desired position. The plant will form a knuckle at the bend site, strengthening the branch and encouraging more bud sites.
Pruning Techniques
Basic Pruning
Purpose: Basic pruning involves removing unnecessary or unhealthy parts of the plant to improve airflow, light penetration, and overall plant health.
Steps:
- Timing: Prune during the vegetative stage and early flowering stage.
- Remove Lower Branches: Remove the lower branches and leaves that receive little light. These parts are unlikely to produce significant buds and can divert energy from the upper parts of the plant.
- Eliminate Dead or Damaged Leaves: Regularly inspect the plant and remove any yellow, dead, or damaged leaves to prevent disease and pest infestations.
- Maintain Airflow: Ensure there is good airflow through the canopy by removing any overcrowded or crossing branches.
Lollipopping
Purpose: Lollipopping involves removing the lower growth on the plant to focus energy on the top colas, resulting in larger, denser buds.
Steps:
- Timing: Perform lollipopping during the late vegetative stage or the first week of the flowering stage.
- Identify Lower Growth: Identify the lower third of the plant where buds will be small and less developed due to limited light.
- Remove Lower Growth: Use clean, sharp scissors to remove lower branches and leaves, leaving a clean stem at the bottom of the plant.
- Focus on Upper Growth: Ensure the remaining upper branches and buds receive maximum light and nutrients.
Defoliation
Purpose: Defoliation involves selectively removing fan leaves to improve light penetration and airflow, particularly in dense canopies.
Steps:
- Timing: Perform defoliation during the vegetative stage and early flowering stage. Avoid heavy defoliation during the late flowering stage.
- Remove Large Fan Leaves: Identify and remove large fan leaves that block light from reaching lower bud sites.
- Maintain Balance: Be careful not to remove too many leaves at once, as this can stress the plant. Gradually defoliate over time to maintain a healthy balance.
- Monitor Plant Response: Observe the plant’s response to defoliation and adjust your approach as needed. Healthy plants will recover quickly and benefit from improved light exposure.
9. Harvest at the Right Time
Harvesting cannabis at the right time is crucial for ensuring the highest quality, potency, and yield of your buds. Timing your harvest correctly can make the difference between a mediocre crop and an exceptional one. Here’s a detailed guide to help you determine the optimal time to harvest your cannabis plants and the steps involved in the harvesting process.
Recognizing Maturity
Trichome Development
Trichomes are tiny, resinous glands on the flowers and leaves of the cannabis plant. Monitoring trichome color and development is one of the most reliable methods to determine the best harvest time.
Tools Needed:
- Jeweler’s loupe (30x-60x magnification)
- Digital microscope (optional, but provides a clearer view)
Trichome Stages:
- Clear Trichomes: Indicate that the plant is still developing. Harvesting at this stage will result in lower potency and a more energetic, short-lived high.
- Milky Trichomes: Indicate peak potency. The majority of trichomes should be milky or cloudy for the highest THC content and a well-rounded effect.
- Amber Trichomes: Indicate the degradation of THC into CBN (Cannabinol), leading to a more sedative, couch-lock effect. For a more relaxing and calming high, wait until about 20-30% of trichomes turn amber.
Pistil Color
Pistils are the hair-like structures on the cannabis buds. They change color as the plant matures, providing another indicator of harvest readiness.
Pistil Stages:
- White Pistils: Indicate that the plant is still in the early stages of flowering. Not ready for harvest.
- Brown/Amber Pistils: When about 70-90% of the pistils have darkened and curled inwards, the plant is approaching peak maturity. This visual cue should be used alongside trichome inspection.
Flowering Time
Each cannabis strain has a general flowering time range provided by the breeder. This information can give you a rough estimate of when to start checking for maturity. Typically, Indica strains take 8-10 weeks to flower, while Sativa strains can take 10-14 weeks. Autoflowering strains may have even shorter flowering periods.
Harvesting Techniques
Tools Needed
- Sharp scissors or pruning shears
- Gloves (to protect your hands from sticky resin)
- Clean workspace
Harvesting Steps
- Prepare the Area: Ensure your workspace is clean and well-ventilated. Have all your tools ready.
- Cut the Branches: Using sharp scissors or pruning shears, cut the branches one at a time. Handle the branches gently to avoid damaging the buds.
- Remove Fan Leaves: Remove the large fan leaves immediately after cutting the branches. This helps improve airflow and makes the trimming process easier.
- Hang the Branches: Hang the branches upside down in a cool, dark, and well-ventilated area. Use a drying rack or string line to suspend the branches. Ensure there is enough space between branches to prevent mold and mildew.
Drying and Curing
Drying
Proper drying is essential for preserving the potency, flavor, and overall quality of your cannabis.
Steps:
- Temperature and Humidity: Maintain a temperature of 60-70°F (15-21°C) and humidity of 50-60%. Use fans to circulate air, but avoid blowing directly on the buds.
- Monitor: Check the drying buds daily for signs of mold or mildew. The drying process typically takes 7-14 days.
- Dryness Test: The buds are ready for curing when the small stems snap easily, but the larger stems are still slightly bendable.
Trimming
Once the buds are dry, it’s time to trim them to improve their appearance and remove any remaining leaves.
Steps:
- Preparation: Set up a clean workspace with good lighting. Wear gloves to avoid getting resin on your hands.
- Trim Leaves: Use sharp scissors to trim away the sugar leaves (small leaves sticking out of the buds). Be careful not to remove too much of the trichome-rich bud material.
- Collect Trimmings: Save the trimmings for making edibles, hash, or other cannabis products.
Curing
Curing enhances the flavor, potency, and smoothness of your cannabis. It also helps preserve the buds for long-term storage.
Steps:
- Jar the Buds: Place the trimmed buds in glass jars with airtight lids. Fill the jars about 75% full to allow for some air circulation.
- Initial Burping: For the first week, open the jars once or twice daily for 10-15 minutes to release excess moisture and allow fresh air to enter.
- Long-term Curing: After the first week, reduce the frequency of burping to once every few days. Continue curing for at least 2-4 weeks for optimal results. Some growers cure for several months to enhance the quality further.
10. Stay Legal and Discreet
Growing cannabis can be a fulfilling experience, but in order to prevent unwanted attention and any legal problems, it’s imperative to remain within the law and exercise prudence. This thorough guide will assist you in managing the legal elements of cannabis growth while maintaining the privacy of your garden.
Understanding Local Laws
Research Your Local Regulations
Cannabis cultivation laws vary widely by country, state, and even municipality. It’s crucial to understand the specific regulations in your area to ensure compliance.
Key Points to Research:
- Legality: Determine whether cannabis cultivation is legal for medical, recreational, or both purposes in your area.
- Plant Limits: Find out the maximum number of plants you can legally grow. Some areas have restrictions based on the number of mature and immature plants.
- Licensing: Check if you need a permit or license to cultivate cannabis, especially for larger or commercial grows.
- Location Restrictions: Be aware of any zoning laws that may restrict where you can grow cannabis, such as proximity to schools or public areas.
- Security Requirements: Some jurisdictions require specific security measures, such as fencing, locks, or alarms, to prevent unauthorized access.
Staying Updated
Cannabis laws are constantly evolving. Stay informed about any changes in legislation by regularly checking government websites or subscribing to updates from local cannabis advocacy groups.
Security Measures
Fencing
A sturdy fence can help keep your garden secure and out of sight from neighbors and passersby.
Tips for Effective Fencing:
- Height: Ensure the fence is tall enough (typically 6-8 feet) to prevent easy viewing and access.
- Material: Use opaque materials like wood or vinyl to block visibility.
- Locks: Install secure locks on gates to deter unauthorized access.
Alarms and Surveillance
Installing security systems can provide an additional layer of protection for your garden.
Options:
- Motion Sensors: Detect movement around your garden and trigger alarms or lights.
- Cameras: Use security cameras to monitor your garden and record any suspicious activity.
- Alarms: Install audible alarms to deter intruders and alert you to potential breaches.
Natural Barriers
Use natural barriers like hedges, trees, or shrubs to enhance privacy and security.
Benefits:
- Aesthetics: Natural barriers blend in with the environment and improve the overall appearance of your garden.
- Discretion: They provide an additional layer of privacy, making it harder for outsiders to see your plants.
Visibility and Odor Control
Visibility
Keeping your cannabis plants out of sight is essential to avoid attracting attention.
Tips:
- Greenhouses: Use greenhouses or hoop houses with opaque coverings to hide your plants while providing a controlled growing environment.
- Camouflaging: Plant cannabis alongside other tall or bushy plants to blend them into your garden.
- Strategic Placement: Place your plants in areas that are naturally shielded from view, such as behind buildings or fences.
Odor Control
Cannabis plants, especially during the flowering stage, can produce strong odors that may attract attention.
Strategies for Odor Control:
- Carbon Filters: Use carbon filters in enclosed growing spaces like greenhouses to neutralize odors.
- Companion Planting: Grow aromatic plants like lavender, mint, or basil around your cannabis to mask the smell.
- Odor Neutralizers: Use odor neutralizers or absorbers around your garden to reduce the cannabis scent.
Respecting Your Neighbors
Open Communication
Maintaining good relationships with your neighbors can help prevent conflicts and complaints.
Tips:
- Inform Discreetly: If appropriate, discreetly inform your neighbors about your cannabis cultivation and address any concerns they may have.
- Be Respectful: Respect your neighbors’ space and privacy. Avoid placing your garden near shared boundaries or public areas.
- Noise Control: Minimize noise from fans, pumps, or other equipment, especially during early morning or late evening hours.
Considerate Growing
Take steps to minimize any potential impact on your neighbors.
Tips:
- Odor Control: Implement odor control measures to prevent the smell from spreading to neighboring properties.
- Disposal: Dispose of plant waste responsibly to avoid creating unpleasant odors or attracting pests.
- Maintenance: Keep your garden tidy and well-maintained to avoid an unsightly appearance.
Legal Compliance
Documentation
Keep records of your cultivation activities to demonstrate compliance with local laws.
Key Documents:
- Licenses and Permits: Maintain copies of any required licenses or permits.
- Plant Count: Keep a log of the number of plants at each stage of growth to ensure you stay within legal limits.
- Medical Records: If growing for medical purposes, keep relevant medical documents and recommendations.
Avoiding Illegal Activities
Ensure your cultivation activities remain within the legal framework.
Tips:
- No Sales: Do not sell cannabis unless you are licensed to do so. Unauthorized sales can lead to severe legal consequences.
- No Exports: Do not transport cannabis across state or country borders, as this can result in federal offenses.
- Stay Within Limits: Adhere strictly to the plant count and location restrictions specified by your local laws.
Emergency Preparedness
Plan for Inspections
Be prepared for potential inspections from law enforcement or regulatory authorities.
Tips:
- Stay Calm: Remain calm and cooperative if authorities visit your garden.
- Know Your Rights: Recognize your responsibility and rights under the law. Make sure you have the necessary documentation on hand to prove compliance.
- Legal Assistance: Have contact information for legal assistance in case you need advice or representation.
Responding to Theft or Vandalism
Protect your investment by being prepared for potential theft or vandalism.
Tips:
- Report Immediately: Report any incidents of theft or vandalism to local authorities promptly.
- Document Evidence: Take photos or videos of the damage and keep records of any losses.
- Enhance Security: Review and improve your security measures to prevent future incidents.
Conclusion
Growing cannabis outdoors can be a highly rewarding and enjoyable experience, especially for beginners who take the time to understand the basics and plan carefully. By selecting the right strain, preparing your site, germinating and transplanting seedlings properly, providing adequate watering and nutrition, managing pests and diseases, training and pruning your plants, and harvesting at the right time, you can ensure a successful outdoor grow. Always stay informed about local laws and take steps to remain discreet and respectful of your neighbors. With these ten tricks, you’ll be well on your way to becoming a proficient outdoor cannabis grower.