Table of Contents
I’ve been Growing Cannabis Indoors long enough to know that indoor harvests aren’t won by one “secret” trick. They’re won by repeatable routines: steady light, stable air, a root zone that can breathe, and a finish that protects aroma and texture instead of rushing it. I’ve run grows in a tight closet, a 2×4 tent, and a spare room that doubled as a drying space. Every time I upgraded gear, the real improvement came from better control and better note-taking, not from chasing hype.
This is the playbook I use today. It’s written from my own grow-room habits: what I measure, what I ignore, what I fix first when something looks off, and how I plan a run from seed to jar. I’ll use cannabis, marijuana, and weed naturally throughout, because the questions people type into Google vary a lot.
If you’re reading from a seed shop page: this is cultivation information, not legal advice. Rules for growing and seed purchasing differ by region, and they change. I always suggest checking your local rules before you germinate anything. Growers who want a complete foundation—from germination through harvest—can explore our cannabis seed growing guides before dialing in an indoor setup.
My baseline indoor cannabis grow room setup
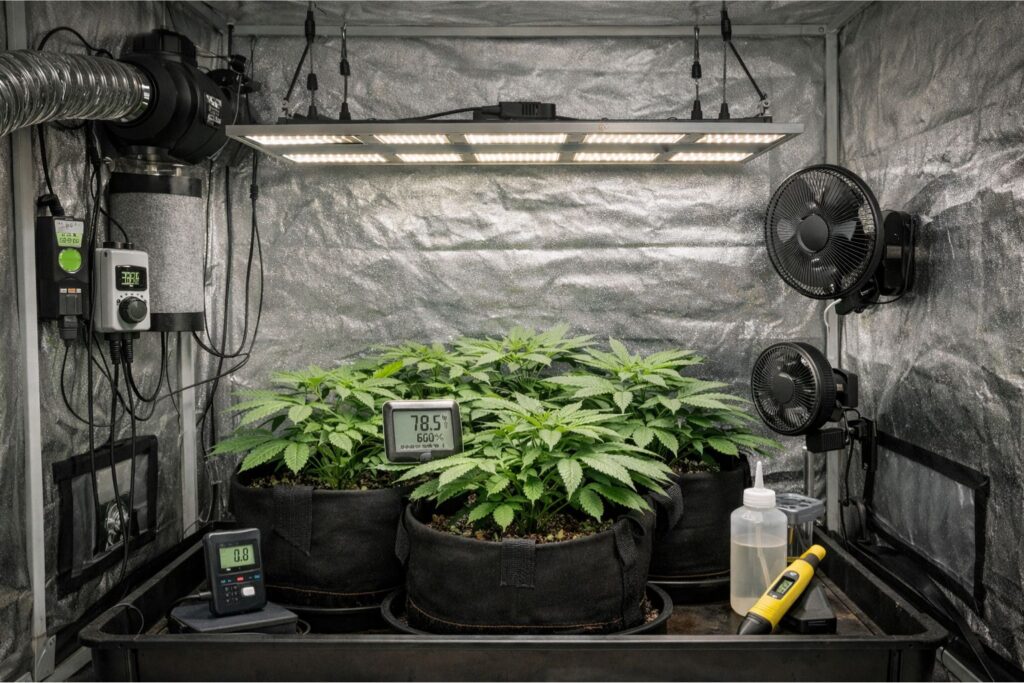
The first thing I do is build a simple indoor cannabis grow room setup that I can maintain daily. “Fancy” doesn’t help if the tent is a pain to access or the equipment is confusing to run.
My baseline indoor cannabis grow room setup focuses on four controls:
- Light intensity and coverage
- Temperature and humidity stability
- Fresh air exchange and internal airflow
- Clean watering and runoff handling
A workable starter kit can be modest:
- Dimmable LED fixture sized to the canopy
- Exhaust fan with a carbon filter (and ducting that actually fits)
- 1–2 oscillating fans for canopy and under-canopy movement
- A thermometer/hygrometer at canopy height
- A timer you trust (and ideally a backup timer)
I keep cords off the floor, I keep the floor dry, and I treat cleanup as part of the schedule. That same indoor cannabis grow room setup also makes troubleshooting easier, because there are fewer “mystery variables” hiding in the corners.
To make this concrete: when I change something big (new light, new fan, new tent), I write it down. That way, when I’m Growing Cannabis Indoors again next cycle, I can repeat what worked instead of guessing.
Light: intensity, coverage, and my meter-free habits
I used to think “more light” was always better. Then I bleached tops, cooked terpenes, and learned that the plant only benefits from light it can actually use. Now I build my lighting plan around canopy management and the idea of a PPFD baseline, even if I’m not holding a PAR meter every day.
Canopy PPFD targets without CO2
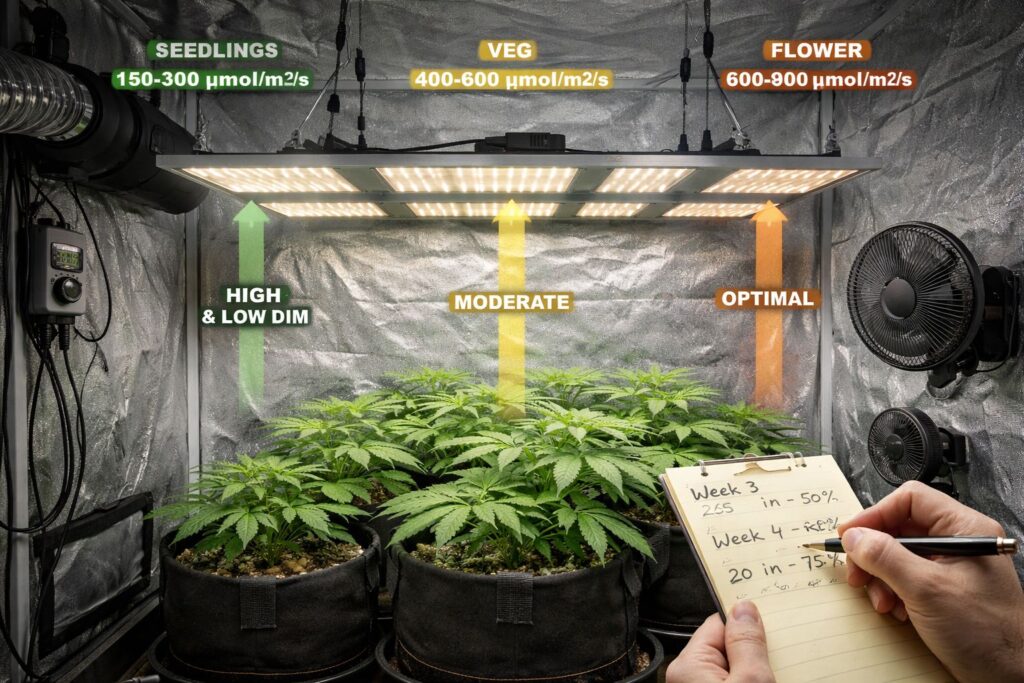
When I’m not supplementing CO2, I treat canopy intensity as a tool I ramp up gradually. I keep notes under the label canopy PPFD targets without CO2, because pushing too hard indoors can force me to run higher temperatures and higher feeding just to keep up.
Here’s a practical range I use as a starting point when Growing Cannabis Indoors:
- Seedlings and fresh transplants: gentle intensity and higher hanging height
- Vegetative growth: moderate intensity to build structure
- Flowering: higher intensity once the canopy is even and the plant is healthy
I’ll often aim for “comfort” rather than maximums: enough light for dense flower, without turning the room into a heat-management project. That’s the whole point of canopy PPFD targets without CO2 in my notes: stay in a zone where the plant thrives without needing extra gas or extreme climate control.
I revisit canopy PPFD targets without CO2 at least once per week, because training changes canopy distance, and stretch changes the hotspots.
LED dimming schedule for photoperiod weed
My easiest win with LEDs was treating dimming like a schedule, not a one-time setting. I keep a simple LED dimming schedule for photoperiod weed that ramps intensity slowly over 7–10 days after major transitions (transplant, topping, flip to flower).
A practical routine that’s worked for me:
- Start higher and dimmer than you think you need
- Increase intensity in small steps every few days
- Raise the light rather than blasting the dimmer if tops look stressed
- Re-check after training or defoliation
I mention LED dimming schedule for photoperiod weed repeatedly because it prevents the classic mistake: the plant looks a little slow, you crank the light, then the plant drinks harder and shows burn even though your feed didn’t change.
If you grow autos, you can still use a dimming plan, but photoperiod timing makes this especially straightforward: veg ramp, flower ramp, and then a steady middle period.
LED distance guide for marijuana plants
I don’t have one magic height that works for every fixture. I keep a handwritten LED distance guide for marijuana plants that’s specific to the lights I own. It includes a distance range for each stage and notes like “watch for canoeing” or “top leaves pale at this height.”
When I’m Growing Cannabis Indoors in a small tent, the LED distance guide for marijuana plants is how I avoid heat and intensity stress. If I see leaf edges curling up, I adjust height first. If I see pale tops and normal lowers, I assume a hotspot and consult the LED distance guide for marijuana plants again before touching nutrients.
The LED distance guide for marijuana plants is also how I keep coverage even. Even coverage beats one blazing center spot with dim corners.
Air and climate: controlling the room without fighting it
I’ve had grows where the plants were healthy but the flowers finished airy or the terpenes muted. In hindsight, the missing piece was climate stability. Indoors, the plant lives in your microclimate 24/7.
VPD dialing for a home grow tent
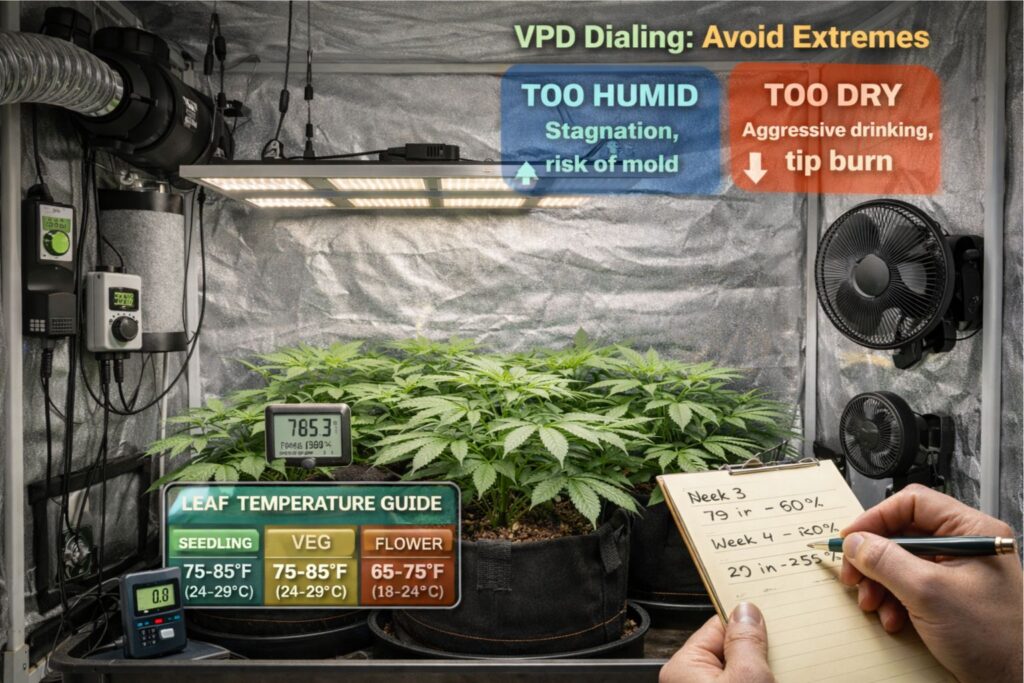
Instead of tracking temperature and humidity separately, I use VPD as a sanity check. I’m not obsessed with a “perfect” VPD number, but VPD dialing for a home grow tent helps me avoid extremes that create problems.
How I apply VPD dialing for a home grow tent in real life:
- Seedlings like warmer air and higher humidity, with gentle airflow
- Veg can run moderately warm with moderate humidity
- Flower demands lower humidity as buds get dense, especially late
The key is stability. Big swings between day and night make watering unpredictable and can increase mold risk. VPD dialing for a home grow tent also helps me interpret symptoms: if I’m too dry, the plant drinks aggressively and tip burn shows faster. If I’m too humid, transpiration slows and I see softer growth and higher pest pressure.
Cannabis grow tent airflow plan
Airflow is the unglamorous part of indoor growing that saves runs. I keep a cannabis grow tent airflow plan that is basically three layers:
- Exhaust and intake for air exchange
- Gentle air movement above the canopy
- Gentle air movement below the canopy
My cannabis grow tent airflow plan aims for leaves to lightly flutter, not whip around. I don’t point a fan directly at buds in late flower. I want circulation, not windburn.
I review the cannabis grow tent airflow plan whenever the canopy thickens. If the center of the plant feels stagnant, I thin a little foliage and adjust fans. That same cannabis grow tent airflow plan also matters for odor control, because it supports steady exhaust through the filter.
Carbon filter sizing for weed odor control
If you’ve ever had a flowering room stink up a hallway, you already know why filters matter. I learned quickly that carbon filter sizing for weed odor control isn’t just “buy the biggest thing.” It’s matching fan capacity, tent volume, and ducting resistance so the air actually passes through the carbon at the right pace.
My rule of thumb:
- Choose a filter rated for your space, then match the fan to the filter
- Keep ducting short and smooth when possible
- Replace carbon when odor begins to creep back
Carbon filter sizing for weed odor control also intersects with heat management. If the filter and fan are undersized, you can’t evacuate heat and humidity efficiently. I’ve had better results when I treat carbon filter sizing for weed odor control as part of the full ventilation system, not a bolt-on accessory.
Root zone fundamentals: medium, containers, and watering
Most indoor problems that look like “nutrients” are actually root-zone issues. When roots can’t breathe, the plant can’t drink and can’t uptake properly.
Root-zone oxygen and dryback in soil
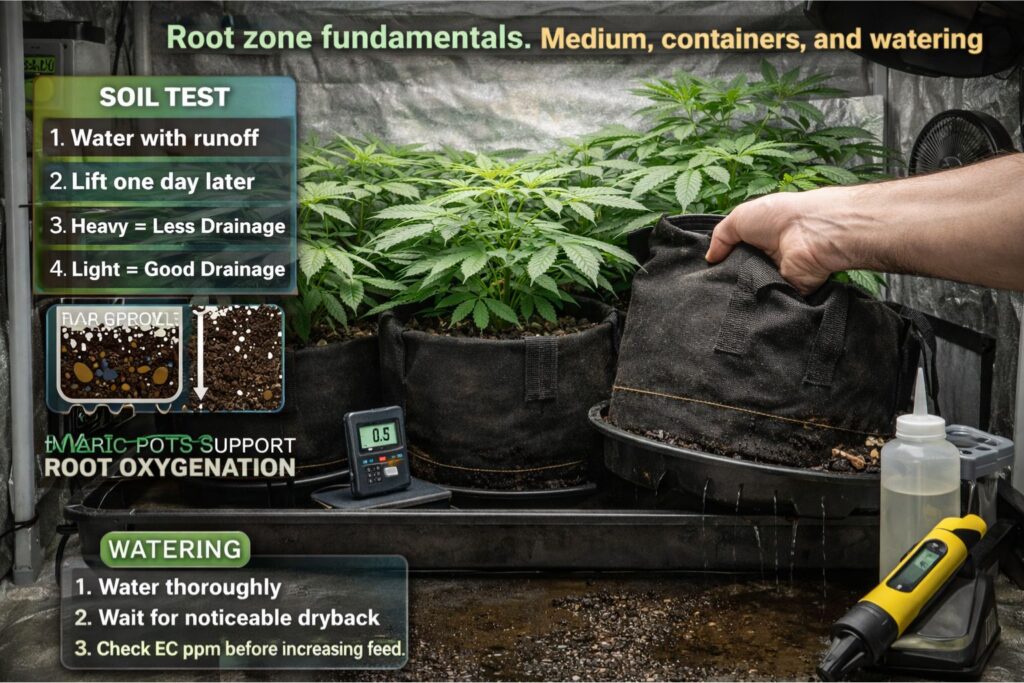
If I’m growing in soil, I obsess over two things: aeration and watering cadence. Root-zone oxygen and dryback in soil is the phrase I use in my notes, because it reminds me that wet soil isn’t automatically healthy soil.
What I do:
- Use containers with excellent drainage (fabric pots are my go-to)
- Build or buy a soil mix that is light and airy
- Water thoroughly, then wait for a real dryback before watering again
Root-zone oxygen and dryback in soil is also how I avoid fungus gnats. When the top stays wet constantly, gnats thrive. When I respect dryback, they struggle.
I’ll repeat it because it matters: root-zone oxygen and dryback in soil solves more “mystery deficiencies” than any supplement I’ve ever bought.
Runoff EC check in living soil
Even if I’m running organic inputs, I still pay attention to salt buildup and overfeeding. I keep a simple runoff EC check in living soil practice when something looks off: I measure my input water, then I measure runoff from a representative pot.
I’m not chasing lab precision. The runoff EC check in living soil is a direction tool:
- If runoff is far higher than input, I back off feeding and improve watering consistency
- If runoff is low and the plant is pale, I consider whether the plant is truly hungry or if the environment is suppressing uptake
I also use runoff EC check in living soil in FAQ-style troubleshooting when friends ask why their leaves claw or burn. Sometimes the answer is too much light, but often the runoff EC check in living soil shows that the root zone is simply too hot.
Training and timing: shaping a canopy that actually finishes well
When I’m Growing Cannabis Indoors, I’m thinking ahead to week 6–8 of flower. A crowded canopy becomes a humidity trap. A tall, uneven canopy wastes light and creates larf.
Here’s what I do most often:
- Top once after the plant is established
- Tie branches outward to create an even table
- Use a net only if I need support or I’m filling the tent wall-to-wall
- Remove only the leaves that block airflow or bury bud sites in shade
I’m careful with stress on autos. With photoperiod plants, I can pause and let them recover before flipping. If you’re shopping, this is why I like feminized seeds for predictable canopies: fewer surprises when you’re trying to train in a small space.
Integrated pest management: prevent first, treat second
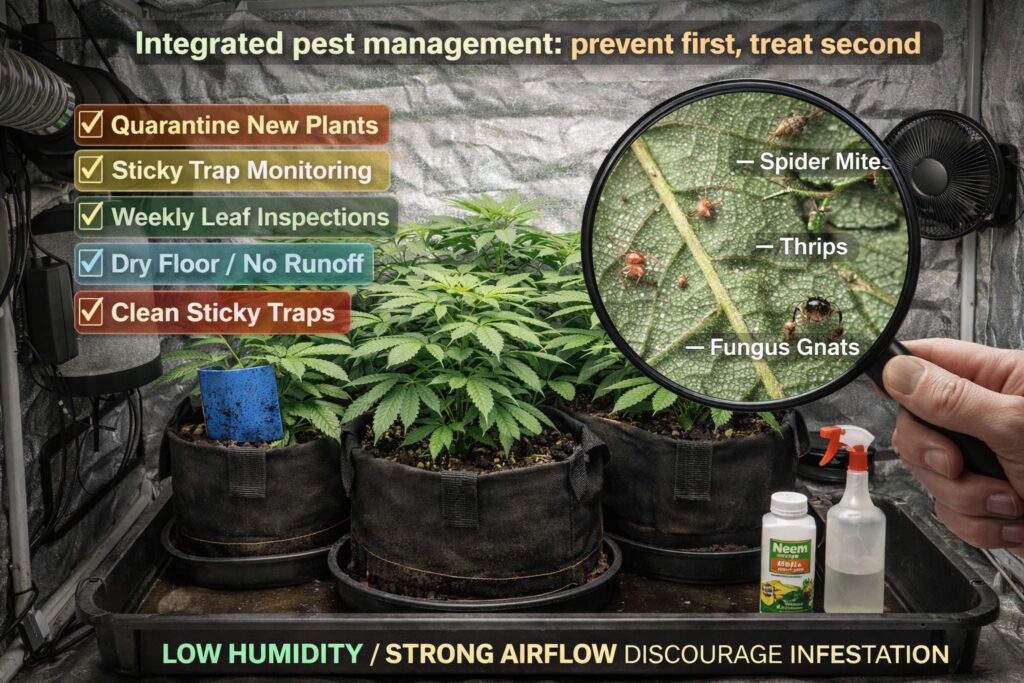
I’ve fought fungus gnats, seen the first signs of mites, and dealt with mild powdery mildew when humidity got away from me. Every time, I wished I’d been more disciplined earlier.
Integrated pest prevention in a small tent
My indoor strategy is boring on purpose. Integrated pest prevention in a small tent comes down to:
- Quarantine new plants and clones
- Sticky traps from day one
- Weekly leaf inspections (undersides especially)
- Keep the floor dry and remove dead leaves
- Don’t let runoff sit in trays
Integrated pest prevention in a small tent is also about environment. When humidity is high and airflow is poor, mildew pressure rises. When pots stay wet constantly, gnats show up. Prevention is cheaper than reacting.
I also avoid spraying anything late in flower. Even “gentle” products can leave residues or shift aroma. That’s why integrated pest prevention in a small tent is mostly routine and cleanliness.
Flowering: managing stretch, light, and risk
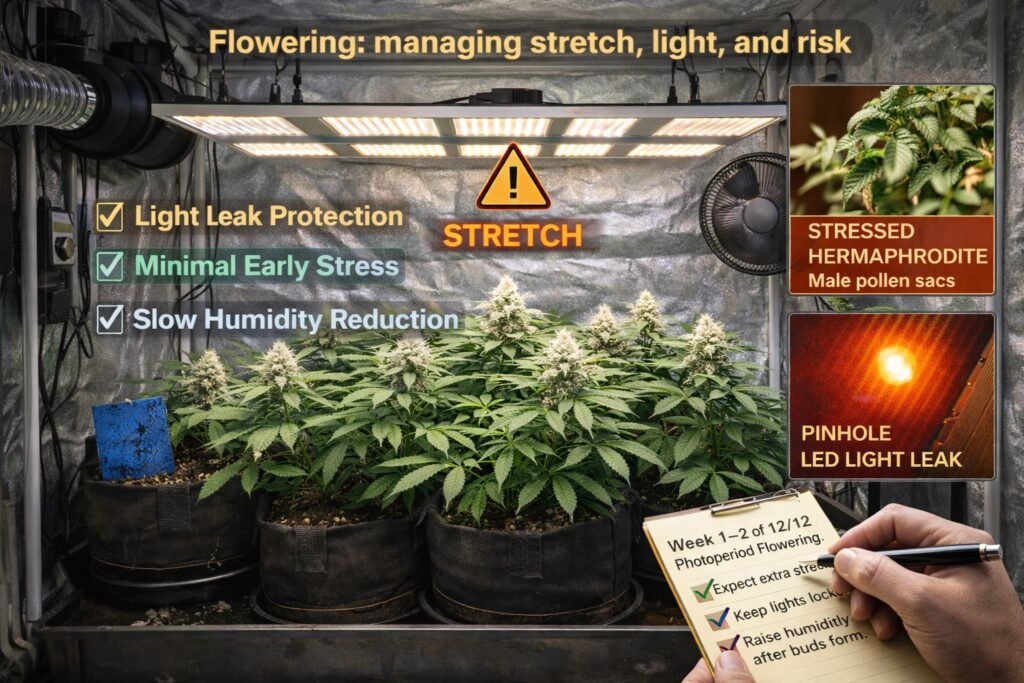
When I flip photoperiod plants to 12/12, I treat the first two weeks as a transition phase:
- I tighten the light schedule and avoid any light leaks
- I keep training minimal and avoid major stress
- I slowly lower humidity as buds begin to stack
This is where the earlier habits pay off. If my cannabis grow tent airflow plan is solid and my VPD dialing for a home grow tent is stable, the flowers come in tighter and I see fewer late surprises.
If I run multiple phenotypes, I keep notes because finish time varies. Two plants from the same pack can be a week apart in maturity, and that affects drying space and planning.
Harvest timing: I trust the plant, not the calendar
Strain descriptions can be helpful, but they are approximations. I look at the whole plant and the trichomes:
- Calyx swelling and pistil behavior
- Overall water uptake slowing down
- Trichome shift from clear to mostly cloudy with some amber
I’m honest about trade-offs. Harvesting earlier can preserve a brighter aroma profile. Harvesting later can deepen some effects. There’s no single “right” time for every person, and I don’t pretend there is.
Drying: slow down or you’ll taste it
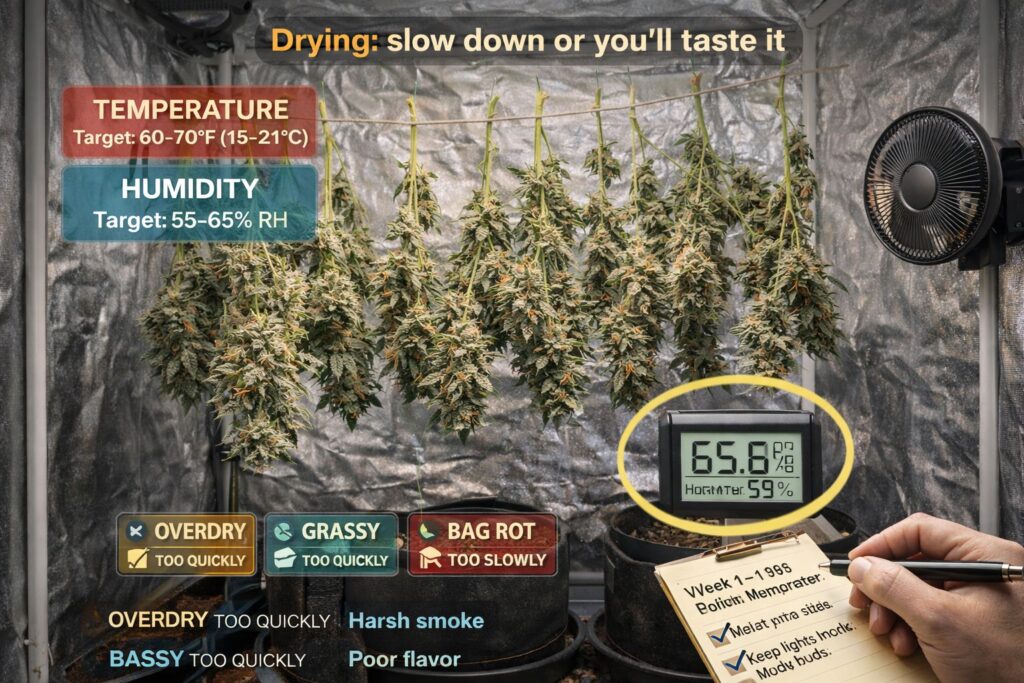
I’ve learned that the dry is where indoor weed quality is preserved or destroyed. I don’t dry in a hot closet anymore. I don’t aim a fan at buds. I try to keep conditions stable and let moisture leave gradually.
Slow-dry approach for sticky cannabis buds
Dense, resinous flowers punish fast drying. My slow-dry approach for sticky cannabis buds looks like this:
- Keep the drying space dark
- Maintain gentle air movement in the room, not on the buds
- Use moderate humidity so the outside doesn’t crisp instantly
- Hang whole branches if the room runs dry
I use the slow-dry approach for sticky cannabis buds because it preserves aroma and smoothness. When I dried too fast in the past, buds smelled good in the room but tasted harsh in the jar.
I also inspect daily. The slow-dry approach for sticky cannabis buds still requires vigilance: if humidity is too high, mold risk increases. If you smell anything “off,” act quickly.
Curing: where the jar either improves or ruins the batch
Curing is controlled equalization. If buds go into jars too wet, the smell turns sharp and unpleasant. If they go in too dry, they don’t “marry” well and the texture stays brittle.
Jar curing routine for terpene retention
I keep a simple jar curing routine for terpene retention that avoids overthinking:
- Jar only when small stems begin to snap instead of bend
- Fill jars loosely so air can move
- Check humidity with a small hygrometer in a few jars
- Burp briefly when humidity is high early on
- Burp less often as jars stabilize
My jar curing routine for terpene retention usually runs for several weeks before I judge final quality. Some cultivars transform noticeably between week 2 and week 6.
Jar curing routine for terpene retention is also about cleanliness. I use clean jars, I avoid storing near strong odors, and I keep the space cool. If the room is warm, the jar can sweat and create swings.
Seed shopping and planning: making the run fit your life

People search things like “buy cannabis seeds online,” “high-quality feminized seed options,” “autoflowering seeds for beginners,” and “seed bank shipping.” I’ll add that your best purchase is the one that matches your grow space and schedule.
If I’m running a short tent, I prioritize manageable height and predictable structure. If I’m running a fast turnaround, I might choose an auto, but I’m extra careful with seedling conditions because early stress steals yield.
When I buy, I look for:
- Clear genetic info and realistic plant structure notes
- Transparent shipping policies and tracking options
- A seed bank that answers questions clearly
I also plan for phenotypic variation. Even with feminized seeds, plants can express differences in stretch, appetite, and finish time. That’s part of the craft of Growing Cannabis Indoors: you respond to the plant you actually have, not the one you expected.
My weekly checklist when Growing Cannabis Indoors
Here’s the exact “keep me honest” list I run.
Environment and equipment
- Verify the timer and confirm there are no light leaks
- Confirm exhaust is pulling and the carbon filter is seated correctly
- Re-check the cannabis grow tent airflow plan for canopy and under-canopy movement
- Confirm VPD dialing for a home grow tent is stable day-to-night
- Scan leaves for pests and remove dead plant matter
- Note any equipment changes
Light
- Confirm LED dimming schedule for photoperiod weed matches the current stage
- Cross-check canopy PPFD targets without CO2 against plant response
- Use the LED distance guide for marijuana plants if tops look stressed
Root zone
- Lift pots before watering
- Confirm root-zone oxygen and dryback in soil is happening (not constant wet)
- Use runoff EC check in living soil if tips burn or leaves claw unexpectedly
Post-harvest
- Maintain the slow-dry approach for sticky cannabis buds
- Follow the jar curing routine for terpene retention and track jar humidity early
FAQ: quick answers to common indoor grow queries
How do I know if my light is too strong?
In my room, too much intensity shows as canoeing leaves, pale tops, or crispy edges near the canopy. I consult the LED distance guide for marijuana plants and adjust height before changing feed. If the plant is healthy but looks “washed out,” I revisit canopy PPFD targets without CO2 and ramp more slowly.
What’s the fastest way to fix drooping leaves?
First I check watering and airflow. Overwatered roots droop, and stale air makes it worse. I review root-zone oxygen and dryback in soil and confirm my cannabis grow tent airflow plan is still moving air through the center of the canopy.
Do I need to track VPD?
You don’t have to, but VPD dialing for a home grow tent makes it easier to avoid extremes. If you’re seeing rapid drybacks and tip burn, you may be too dry. If you’re battling mildew, you may be too humid. VPD gives you a clear direction to adjust.
How do I prevent odor leaks during flower?
Odor control is mostly ventilation. Carbon filter sizing for weed odor control needs to match fan strength and tent volume, and ducting should be efficient. If odor appears late in flower, the carbon may be saturated or airflow may be restricted.
What’s your simplest pest strategy?
Integrated pest prevention in a small tent: quarantine, sticky traps, weekly inspections, clean floors, and no standing runoff. I’d rather prevent than spray.
Why does my weed taste harsh?
Fast drying is the most common reason in my experience. I stick to a slow-dry approach for sticky cannabis buds and I don’t jar too early. Then I follow a jar curing routine for terpene retention for several weeks before judging the final smoke.
Closing note
If you want to improve quickly, treat Growing Cannabis Indoors like a set of repeatable systems. Build a stable indoor cannabis grow room setup, manage light with intention, keep the root zone healthy, and protect the finish with a slow dry and patient cure. That’s how I get consistent results across different cannabis cultivars, different seasons, and different rooms.