
I keep a paper notebook right by the grow room door. Before I touch a plant, I write down what I notice first: leaf posture, how the room smells, how quickly the medium dried, and whether the canopy looks even. Those quick observations prevent most “mystery problems,” because the clues show up days before the damage does.
This post is my honest, experience-driven report on Green Crack Strain and Effects, based on a full indoor cycle I ran recently. I’ll walk you through the environment, lighting, feeding, training, and post-harvest steps that shaped the final jars. I’ll also explain how the finished flower felt for me personally, without making any medical claims. Effects vary by person, tolerance, and context.
I’ll use the words cannabis, marijuana, and weed naturally because that’s how people search. I’m not giving legal advice, and I’m not encouraging anyone to break local rules. If you’re thinking about growing or buying seeds, always check regional grow laws where you live.
What this diary covers and why it’s written this way
A lot of strain pages read like advertising. I’m not interested in hype. I’m interested in what helped (and what didn’t) inside a real tent with real constraints: limited ceiling height, normal household temperature swings, and no fancy CO2 system.
For clarity, here’s my green crack indoor grow checklist for what I tracked from start to finish:
- Germination method and seedling stability
- Veg environment and canopy structure
- PPFD and heat management through flower
- EC and pH changes in coco
- Training steps and recovery time
- Weekly pest checks and prevention
- Harvest timing decisions based on the plant, not the calendar
- Drying and curing conditions that preserved aroma
That’s green crack indoor grow checklist item one. You’ll see the phrase green crack indoor grow checklist again later, because the “checklist mindset” is what kept this run clean and predictable.
Genetics expectations and seed shopping without guessing
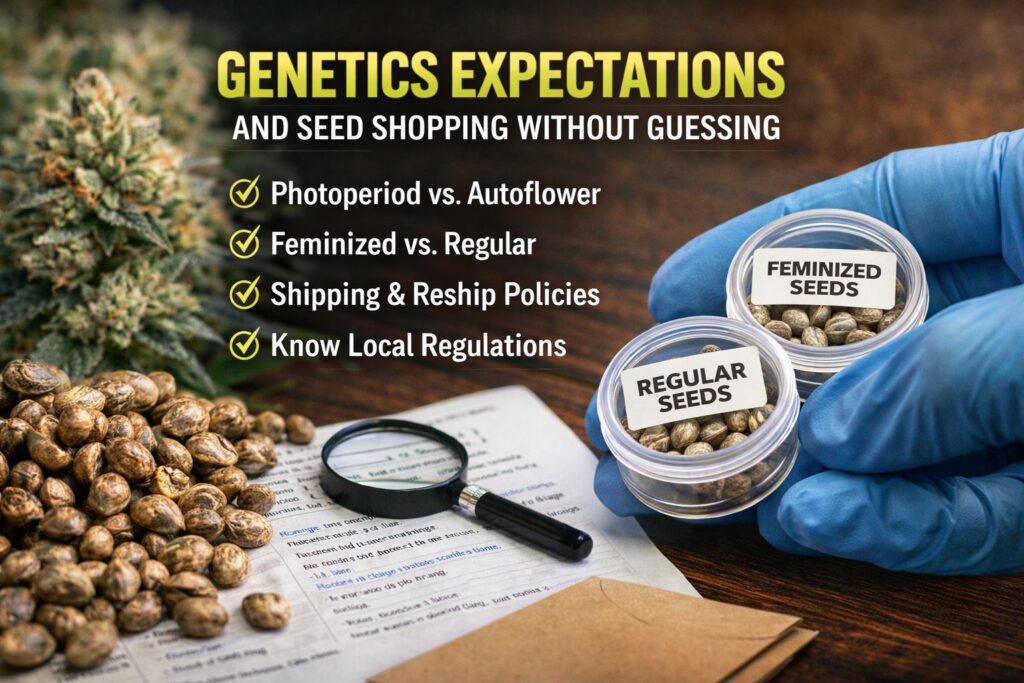
Before you even pop a seed, you’re making choices that affect the whole run: photoperiod vs autoflower, feminized vs regular, and what kind of grow style you can realistically maintain (soil vs hydro, organic vs mineral, hand-watering vs automation).
I ran photoperiod plants from seeds labeled Green Crack. I’m wording it that way on purpose because names can be messy in the cannabis world. Different breeders can use the same name for different lines, and two seeds from the same pack can still show variation.
If you’re researching where to buy cannabis seeds online safely, my practical advice is boring but useful:
- Read the product page closely for plant type (photoperiod or autoflower) and sexing (feminized or regular).
- Check the shipping and reship policy before you pay.
- Look for clear contact options and support, not just a checkout page.
- Be realistic about your local rules and risks.
That’s the first use of where to buy cannabis seeds online safely. I’ll repeat where to buy cannabis seeds online safely again in the FAQ, because it’s one of the most common questions I hear.
If your goal is consistency, a feminized cannabis seeds buying guide can help you decide whether feminized options match your priorities. In plain English: feminized seeds reduce the chance of getting male plants, which makes life simpler for most home growers. That’s the first mention of feminized cannabis seeds buying guide, and I’ll bring feminized cannabis seeds buying guide back again later with practical do’s and don’ts.
My indoor setup in plain numbers
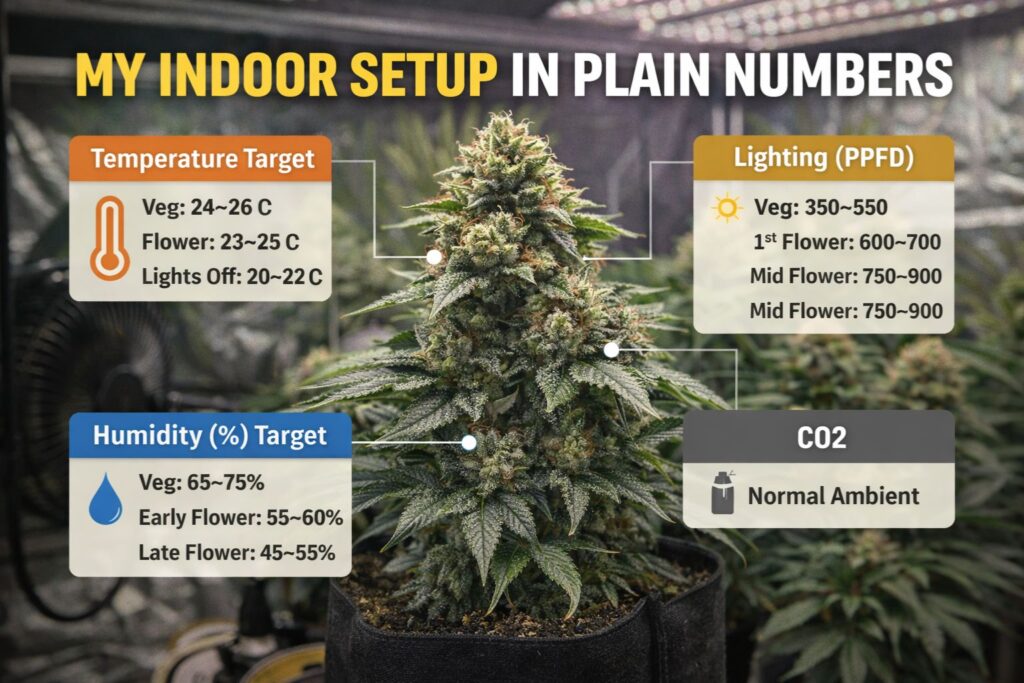
This run happened in a 4×4 tent with a modern LED fixture, carbon filtration, and normal ambient CO2. No supplements, no exotic additives. Just steady environment and consistent inputs.
Here are the green crack lighting targets I used as the plants matured:
- Seedlings: 150–220 PPFD
- Veg: 350–550 PPFD
- Flower ramp: 600–900 PPFD, increased slowly
That’s green crack lighting targets use one. I’ll repeat green crack lighting targets in the lighting section and again in the troubleshooting checklist.
For climate, I aimed for sensible green crack vpd settings rather than chasing one perfect number:
- Early veg: warm and slightly humid for fast root growth
- Late veg: a bit drier to strengthen transpiration
- Flower: steadily drier as buds thickened to lower mold risk
That’s green crack vpd settings use one. I’ll repeat green crack vpd settings in mid-flower and in the FAQ because VPD is one of the easiest ways to improve consistency.
Germination and early seedling choices
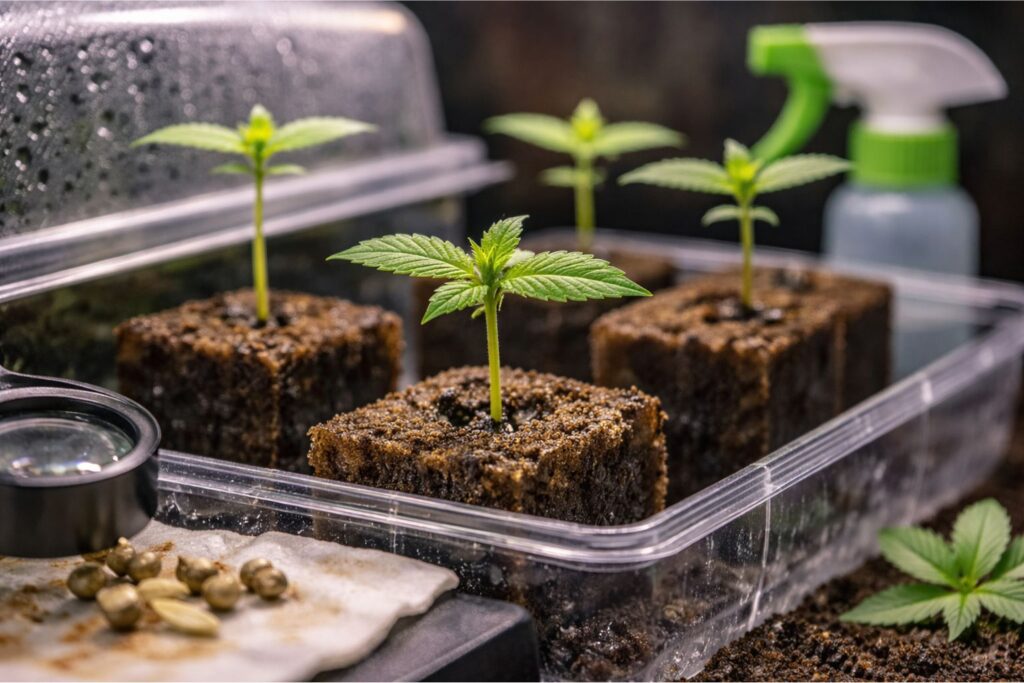
I’ve tried a dozen germination tricks over the years. The best “method” is the one you can repeat without overhandling the seed. I used a simple approach: hydrate, place in a moist starter medium, then move into the final container once the seedling was stable.
Seedling rules I follow:
- Keep the medium lightly moist, not soaked.
- Use gentle airflow, never a fan blasting the seedling.
- Start with low light and raise intensity gradually.
- Avoid heavy feeding until the plant shows active growth.
This is where many new growers lose time. Seedlings don’t need hero moves. They need stable conditions.
Medium choice: why I used coco and how I treated it
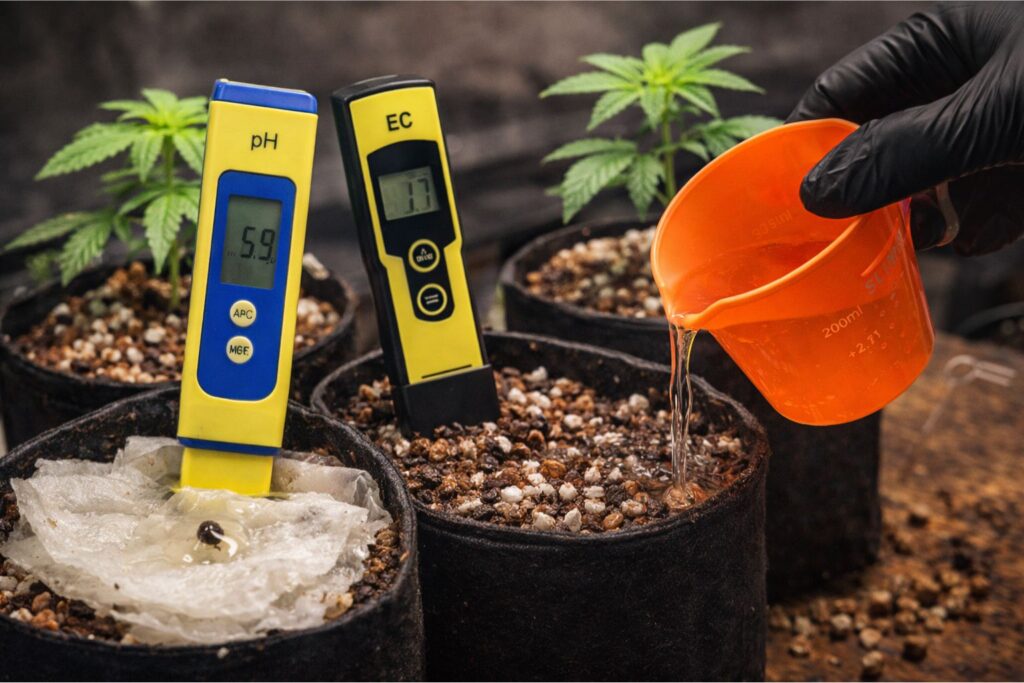
I ran coco with perlite. Coco behaves like hydro in the sense that it responds quickly to what you feed. It doesn’t buffer mistakes like a rich soil mix does.
If you’re deciding soil vs hydro, here’s how I think about it:
- Soil can be forgiving if you’re learning, but it can be slower to correct.
- Coco is fast and controllable, but it demands consistency.
- True hydro (DWC, flood and drain) can produce impressive results, but the learning curve is steeper.
Because I used coco, I relied on a measurable green crack nutrient schedule coco strategy rather than guessing.
Feeding: the green crack nutrient schedule coco that actually worked
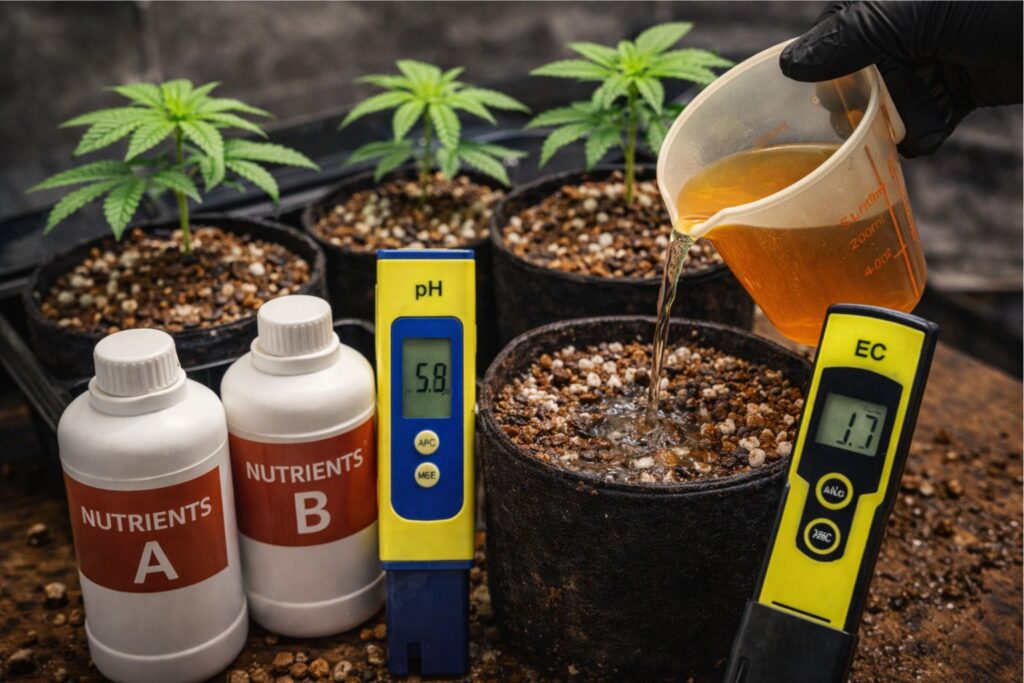
I do not follow brand charts blindly. I use EC and plant response. For this run, green crack nutrient schedule coco looked like this:
- Veg EC: 1.2–1.6 (pH 5.8–6.0)
- Early flower EC: 1.6–1.8 (pH 5.8)
- Mid flower EC: 1.8–2.0 if the leaves stayed happy (pH 5.8)
- Late flower EC: 1.6–1.8 (pH 5.9)
That’s green crack nutrient schedule coco use one. The second time I used green crack nutrient schedule coco in my notes was when one plant showed early tip burn. I didn’t panic. I lowered EC slightly and increased irrigation volume to flush excess salts. Coco punishes inconsistency more than it punishes moderate feeding.
The third time I leaned on green crack nutrient schedule coco was late flower, when I prioritized aroma and smoothness over maximum weight. I kept inputs steady and avoided dramatic last-minute changes.
If you’re new, here’s the takeaway: green crack nutrient schedule coco only works if you adjust based on what the plant shows you. EC meters and pH pens aren’t glamorous, but they save harvests.
Veg training: building structure before the stretch
Green Crack can stretch, so I treat veg like construction work. The goal is a level canopy with enough top sites to use the light efficiently.
Here are the green crack training techniques I used:
- 1) One topping after the plant was clearly growing fast
- 2) Early tie-down to spread branches outward
- 3) Light defoliation only when leaves blocked multiple sites
- 4) Keeping the center open for airflow
That’s green crack training techniques use one. I’ll repeat green crack training techniques after the flip, because training doesn’t stop the day you switch light schedules.
A note on plant variation: one plant stayed a touch shorter with tighter internodes, and another stretched harder. That’s normal in a seed run. Training is how you keep those differences from turning into an uneven canopy.
Lighting in flower: pushing intensity without cooking the tops
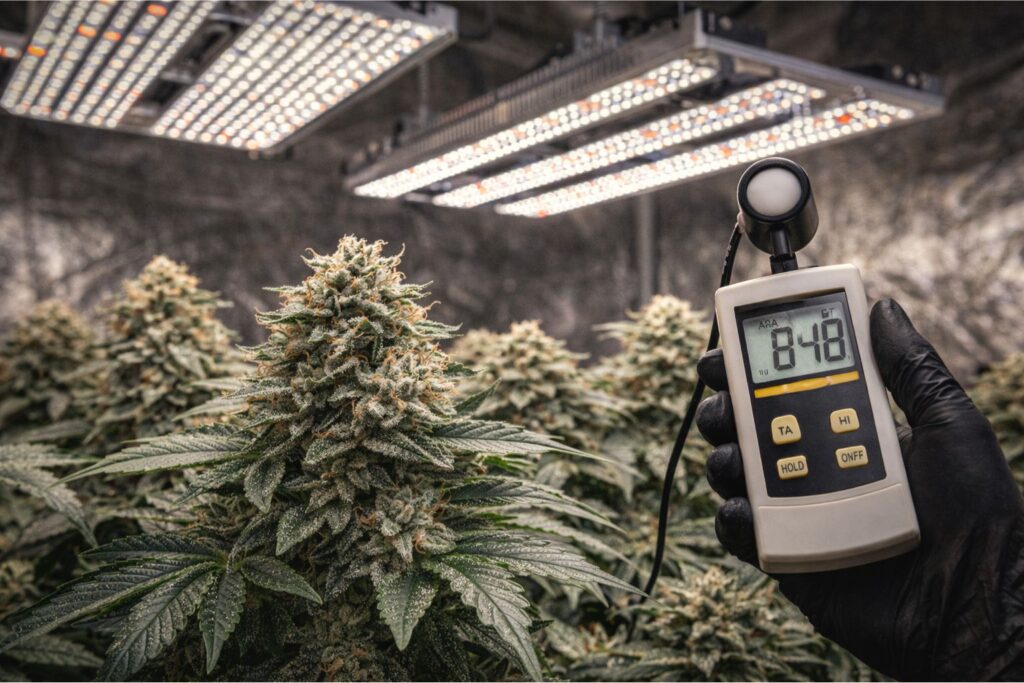
I don’t chase extreme PPFD numbers. I care about stable photosynthesis, healthy transpiration, and terpene retention. For that, you need disciplined green crack lighting targets.
Here’s how my green crack lighting targets looked during flower:
- Week 1–2: 600–700 PPFD to reduce stress during stretch
- Week 3–6: 750–900 PPFD as bud sites stacked
- Week 7–finish: held around 800–850 PPFD to avoid bleaching
That’s green crack lighting targets use two. Green crack lighting targets use three shows up in my checklist: every time I increased intensity, I watched leaf edges, canopy temperature, and drinking speed for 48 hours before adjusting again.
If you’re asking, “What PPFD should I run for weed in flower?” my honest answer is: run the highest intensity your environment can support without stress. Heat, humidity, and airflow decide what’s “safe,” not the light alone.
Environment control: green crack vpd settings that kept bud rot away
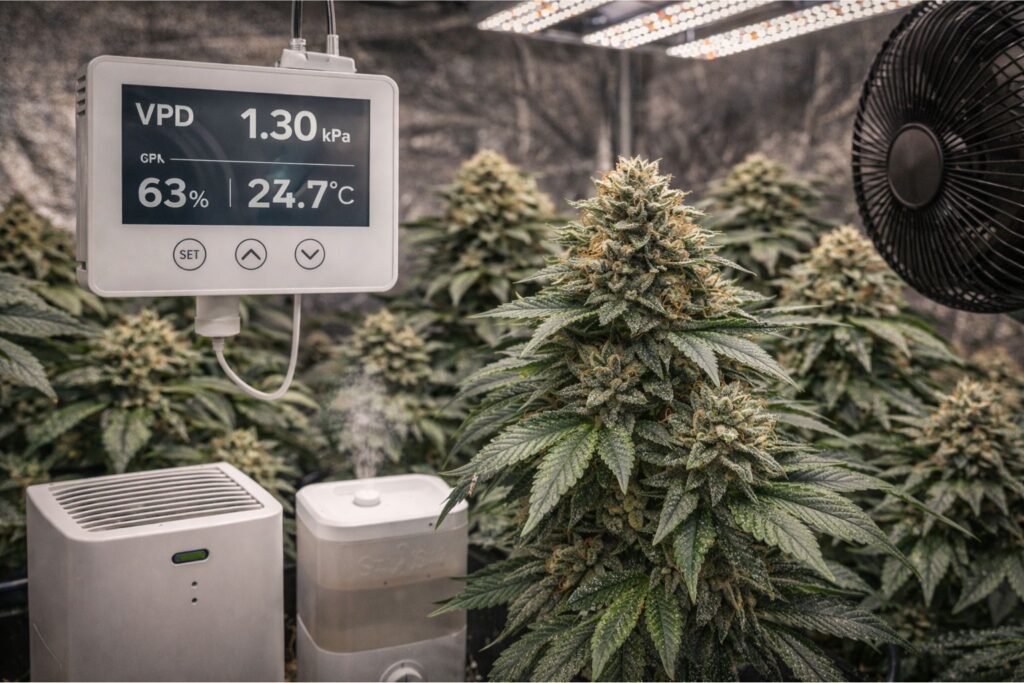
In mid and late flower, I focused heavily on green crack vpd settings, because dense flowers plus high humidity is a bad combination.
My targets:
- Early flower: 25–26 C day, 55–60% RH
- Mid flower: 24–25 C day, 50–55% RH
- Late flower: 23–24 C day, 45–50% RH
That’s green crack vpd settings use two. Green crack vpd settings use three happened when a rainy week changed my home humidity; I didn’t fight it with wishful thinking. I adjusted dehumidification and increased airflow under the canopy.
If you want one simple habit: measure room RH at canopy height, not at the floor. The canopy is where the microclimate forms.
Pest prevention: boring habits that protect quality
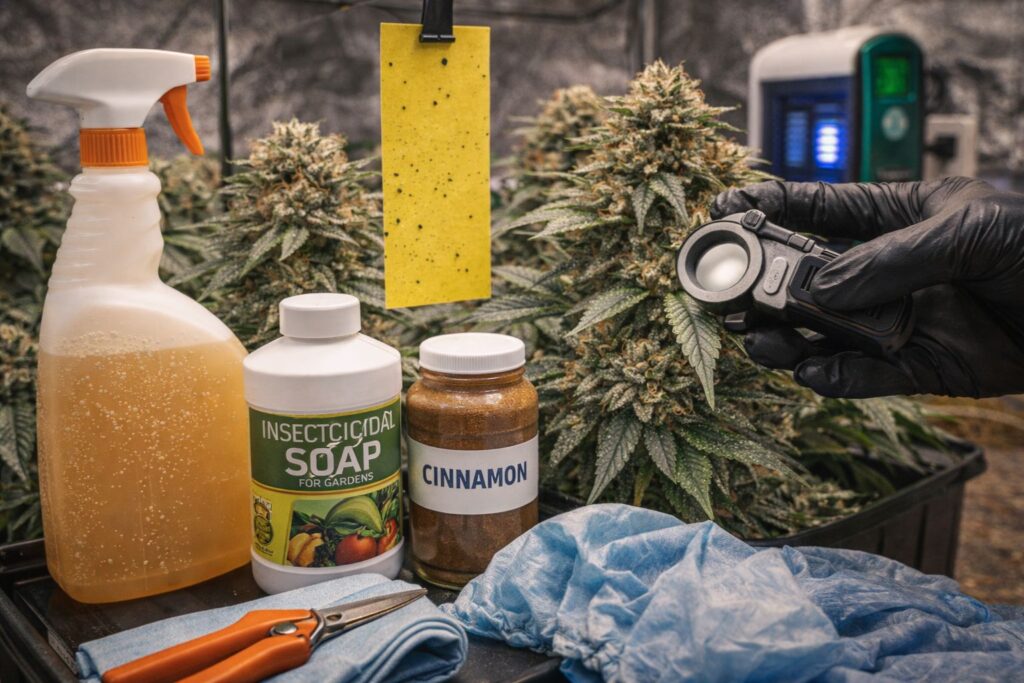
I treat pest checks like brushing teeth. Not optional. Not exciting. Just routine.
My weekly routine:
- Inspect leaf undersides with a small magnifier
- Use sticky traps to detect flyers early
- Keep the floor clean and remove dead leaves
- Avoid bringing outdoor plants into the grow area
- Quarantine anything new
I had mild fungus gnat pressure early. I reduced surface moisture and used biological controls. I avoided spraying in flower. I care more about clean, enjoyable cannabis than “doing something” that leaves residues.
Aroma development: green crack aroma and flavor notes over time
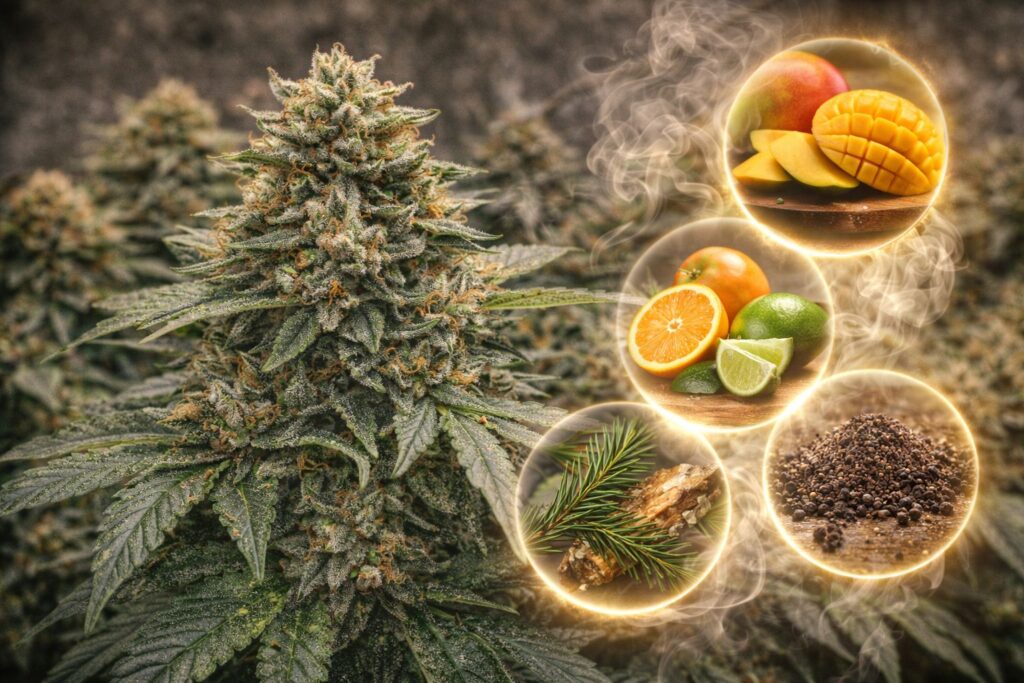
By mid flower, the tent smell shifted from plain plant matter into a sharper profile. I track green crack aroma and flavor because it changes quickly and it’s one of the best “readouts” of plant health.
My green crack aroma and flavor notes in this run leaned toward:
- Bright citrus peel
- A sweet, slightly tropical edge
- Clean herbal sharpness on stem rub
That’s green crack aroma and flavor use one. Green crack aroma and flavor use two came late flower, when the sharper plant became noticeably louder than the sweeter one. That’s a reminder that phenotypes matter.
Green crack aroma and flavor use three showed up after curing: the same jar that smelled sharp on the plant stayed sharp after cure, but only because drying was slow and controlled.
Harvest: the green crack harvest timing guide I trust
Harvest timing is where many growers either rush or overthink. I use a simple green crack harvest timing guide:
- Watch trichomes on the buds, not the sugar leaves.
- Look for calyx swelling and pistil recession.
- Pay attention to smell: loud and defined beats grassy and dull.
- Notice drinking: plants often slow down near the finish.
That’s green crack harvest timing guide use one. Green crack harvest timing guide use two happened when the plants looked “done” visually at week eight, but the aroma wasn’t fully developed. I waited.
Green crack harvest timing guide use three was my final confirmation: trichomes on the bud heads matched the maturity I wanted, and the calyxes had finished swelling.
Drying: green crack drying and curing starts with the drying room
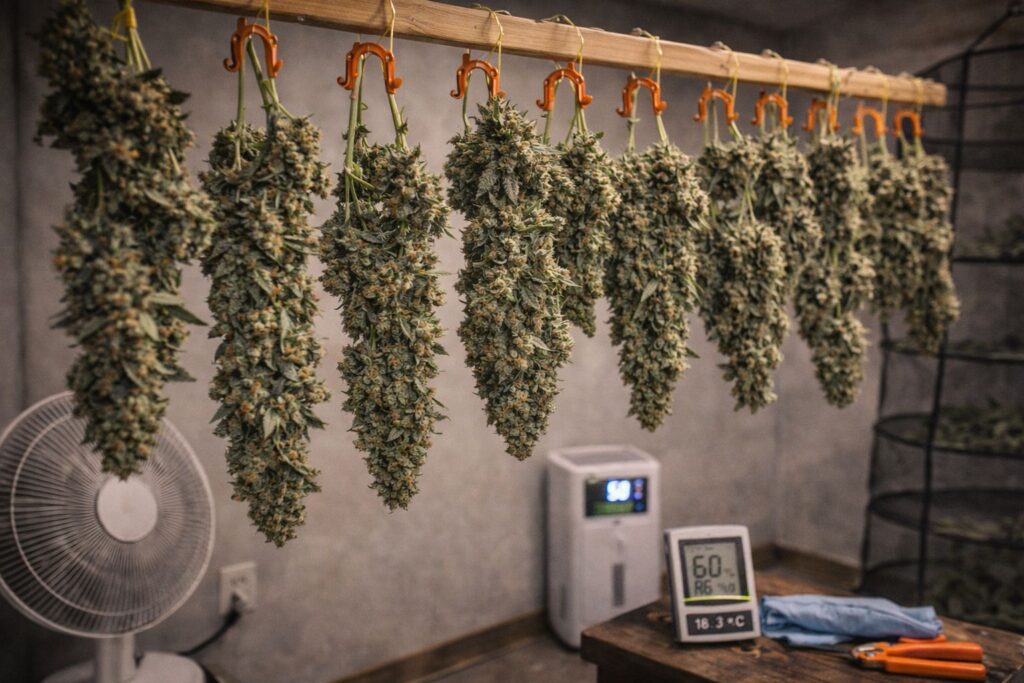
Drying is where I’ve seen more quality lost than anywhere else. Fast drying ruins aroma and smoothness. Too-wet drying invites mold.
My green crack drying and curing approach begins with a steady drying room:
- 18–20 C
- 55–60% RH
- Indirect airflow, never a fan pointed at buds
- Darkness to protect aroma and color
That’s green crack drying and curing use one. Green crack drying and curing use two is the “pace rule”: I aim for a 10–14 day dry in my conditions. If it dries in 4–6 days, it’s usually too fast.
Green crack drying and curing use three shows up in the cure section, because curing only works if the dry was correct.
Curing: the routine that turned decent buds into great jars
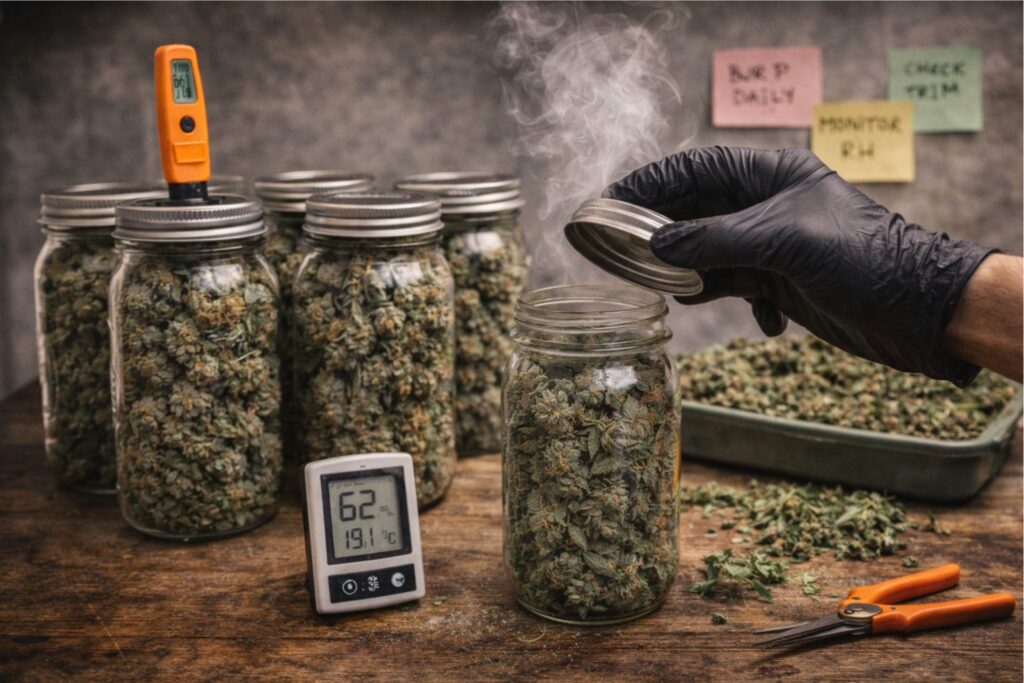
I jarred once small stems snapped and larger stems bent with a slight crack. Then I used a simple schedule:
- Week 1: open jars twice daily for a few minutes
- Week 2: open once daily
- Week 3–4: open every few days
- Long storage: cool, dark, stable
Curing is patience. The aroma got cleaner and more defined after week two, and the smoke got smoother after week three.
This is also where Green Crack Strain and Effects became more consistent. A rough cure can make any marijuana feel harsher and distract from the real profile.
Troubleshooting notes: what I would change next time
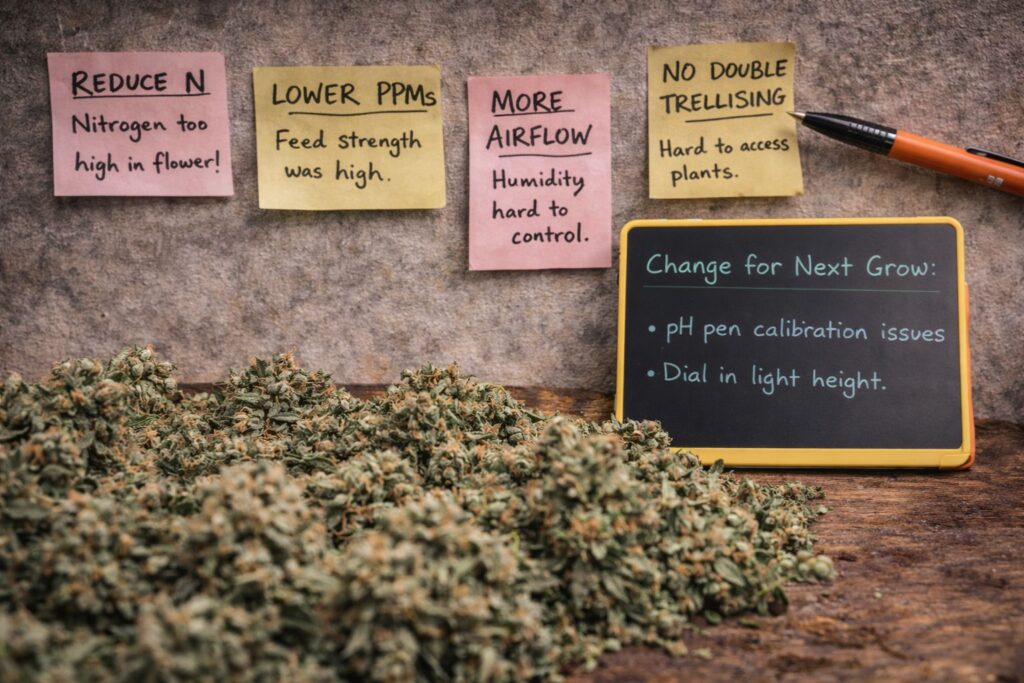
No run is perfect. Here’s what I’d tweak:
- Slightly lower mid-flower EC for the most sensitive plant
- Add branch support earlier for outward-leaning tops
- Increase under-canopy airflow before week three of flower
And I’d keep the fundamentals the same: green crack lighting targets, green crack vpd settings, and green crack nutrient schedule coco consistency did most of the heavy lifting.
Quick green crack indoor grow checklist you can copy
Here’s a simple green crack indoor grow checklist you can use as a repeatable plan:
- Confirm genetics type, then set up environment before germination.
- Start seedlings under low PPFD and stable humidity.
- Use green crack training techniques early to flatten the canopy.
- Follow green crack nutrient schedule coco ranges and adjust based on leaf response.
- Apply green crack lighting targets gradually, not in big jumps.
- Track green crack aroma and flavor changes weekly.
- Use a green crack harvest timing guide based on buds, not hype.
- Lock in green crack drying and curing conditions for smooth, aromatic jars.
That’s green crack indoor grow checklist use two. Green crack indoor grow checklist use three is what I do every run now: checklist first, tweaks second.
FAQ
How long does it take from seed to harvest indoors?
For photoperiod cannabis, I usually plan 4–6 weeks of veg and 8–10 weeks of flower, depending on space and the green crack harvest timing guide signals the plant gives. Autoflowers can be quicker overall, but you get less control over size and recovery time.
What are realistic green crack lighting targets for a home grow?
Green crack lighting targets don’t need to be extreme. I like 350–550 PPFD in veg and 750–900 PPFD in mid flower if temperature and humidity are controlled. If you can’t control climate, lower intensity and improve airflow.
What green crack vpd settings should I aim for?
Green crack vpd settings depend on temperature and RH, but the principle is steady transpiration without stressing the plant. Early flower can tolerate higher humidity. Late flower should be drier to reduce mold risk, especially with dense buds.
What does a practical green crack nutrient schedule coco look like?
Green crack nutrient schedule coco should be consistent and measurable: set EC and pH targets, water to light runoff, and adjust if tips burn or leaves pale. A chart helps, but observation matters more.
Which green crack training techniques worked best for you?
Green crack training techniques that worked best were one topping, early tie-down, and only light defoliation. I focused on an even canopy because it made lighting simpler and improved bud quality across the plant.
What’s the safest way to approach where to buy cannabis seeds online safely?
Where to buy cannabis seeds online safely comes down to research and realism: read shipping/reship policies, check support options, and understand local rules before you order. Avoid impulse purchases and store seeds properly once they arrive.
Do you recommend feminized seeds for beginners?
A feminized cannabis seeds buying guide would say yes for most beginners, because it reduces the chance of males and simplifies the run. Feminized cannabis seeds buying guide tip: buy from sources that describe their breeding work clearly, and keep your process consistent so you can judge genetics fairly.
What should I prioritize to preserve green crack aroma and flavor?
Green crack aroma and flavor are protected by slow drying and a patient cure. If you rush the dry, you lose the bright notes. If you jar too wet, you risk mold. Treat green crack drying and curing as a controlled process, not a countdown.
Final note on Green Crack Strain and Effects
If you take only one lesson from this diary, let it be this: Green Crack Strain and Effects are shaped by stability more than tricks. Keep green crack lighting targets reasonable, hold green crack vpd settings steady, stay consistent with green crack nutrient schedule coco, and give green crack drying and curing the same attention you give the grow. The jar will reflect it.