Table of Contents
When I set up a new grow space, I try to remember what it felt like the first time I grew cannabis: equal parts excitement and confusion. There are a thousand opinions online, and half of them skip the boring but important details that decide whether your first run is smooth or stressful.
This post is my personal, field-tested list of things to start growing cannabis. I’ve run small tents, a spare-room corner, and a dedicated indoor room over the years. I’ve grown marijuana in soil, coco, and simple recirculating hydro. I’ve made the classic mistakes: too much light too early, overwatering seedlings, chasing runoff numbers, and letting humidity drift during late flower. The checklist below is what I wish I had printed on day one.
You’ll see practical ranges and targets because “it depends” isn’t helpful when you’re shopping and building a plan. Still, every cultivar and phenotype can behave differently, so treat these as starting points, then adjust based on what your plants tell you.
Before you start: the non-negotiables I always check
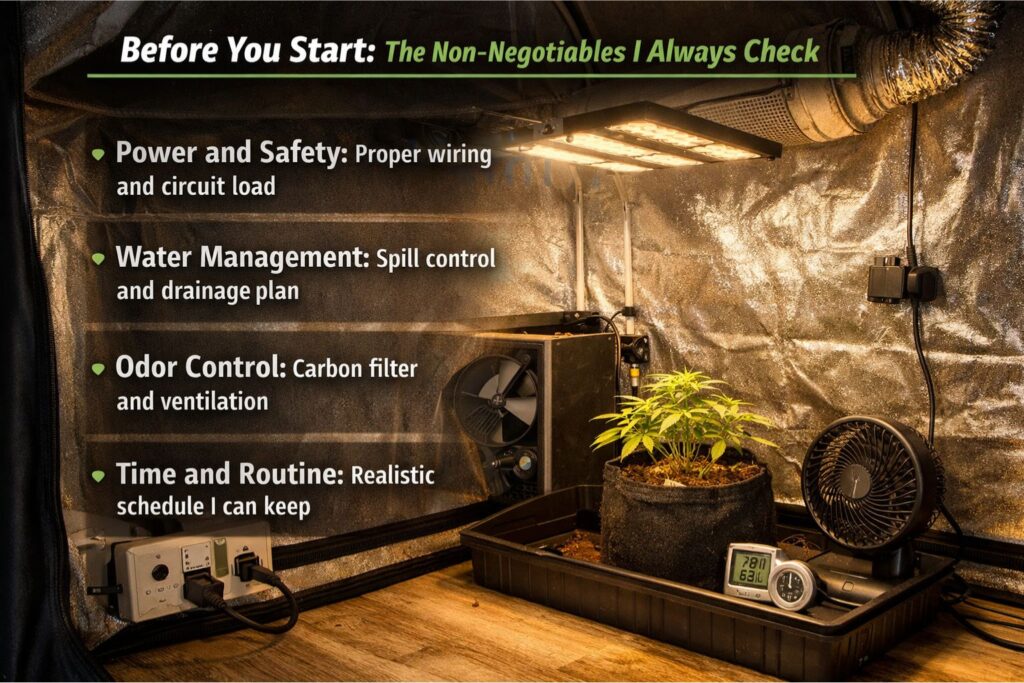
Growing weed is a hands-on hobby, but it’s still a project with safety, cost, and compliance considerations. I’m not giving legal advice here, but I will say this: it’s worth understanding the rules where you live before you spend money.
Here are the basics I check every time I build a plan:
- Power and safety: the circuit capacity, clean cable management, and a plan for heat. I use a surge protector that’s rated for the load, keep connections off the floor, and avoid daisy-chaining cheap power strips.
- Water management: where spills can go, how to protect flooring, and how I’ll drain runoff if I’m in coco or hydro.
- Odor control: if smell matters, I plan filtration and negative pressure from day one. Fixing odor after the fact is harder and more expensive.
- Time and routine: cannabis responds to consistency. I decide how often I can realistically check plants, mix feed, and do maintenance.
- A realistic goal: it’s easy to overbuild. For a first run, I focus on healthy plants and clean flower over chasing maximum yield.
The core cannabis grow room essentials list I actually use
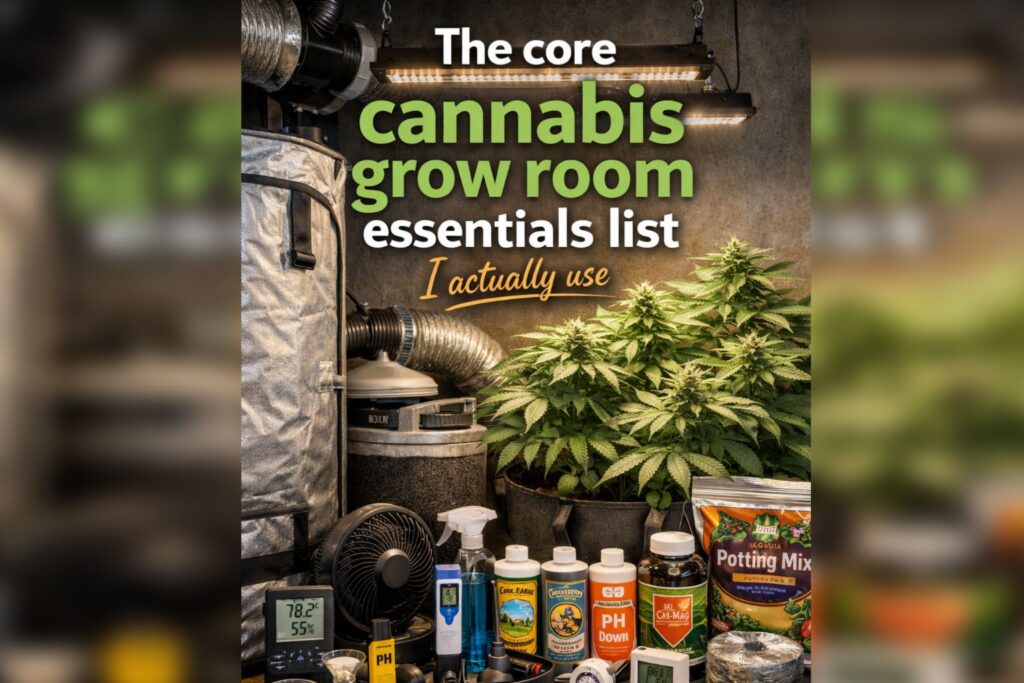
If you only remember one thing from this post, remember this: most first-time problems come from missing measurement tools, not missing “special” products. My cannabis grow room essentials list starts with the items that help me see what’s happening.
Here’s my practical list of things to start growing cannabis in categories.
Space and containment
- Grow tent or dedicated room area with reflective walls
- Light-proofing materials for photoperiod plants (simple weather-stripping can help)
- Plant trays or a waterproof floor liner
- A place to hang gear off the ground (hooks, shelves, or a small rack)
Lighting and control
- A quality LED grow light sized to the space
- Adjustable hangers and a way to measure height easily
- A timer (or controller) for consistent photoperiods
- A light meter app is better than guessing, but I prefer a PAR/PPFD meter if you can access one
Airflow and odor
- Inline fan sized to the tent/room volume
- Carbon filter if odor control matters
- Ducting and clamps
- One or two oscillating fans for canopy movement
- Intake strategy (passive intake is fine for many tents, active intake helps in hot spaces)
Climate tools (the stuff that saves a crop)
- Thermometer/hygrometer at canopy height
- A second sensor near the floor (optional but useful)
- Humidifier for dry winters
- Dehumidifier for late flower or humid climates
- A simple way to log conditions (notes app, spreadsheet, or controller history)
Water and nutrition tools
- pH meter (calibrated) and calibration solution
- EC/TDS meter for coco/hydro (optional for soil, but still helpful)
- Measuring syringes or graduated cylinders
- A clean mixing bucket, stir stick, and dedicated feed containers
- Watering can or pump sprayer depending on your routine
Medium and containers
- Pots appropriate for your medium (fabric pots for soil/coco are forgiving)
- Quality medium (soil, coco, or a hydro substrate)
- Perlite or aeration component if your soil is heavy
- Saucer/trays to catch runoff
Plant work and finishing
- Clean pruning shears and isopropyl alcohol for sanitizing
- Trellis netting or soft plant ties
- A loupe (30–60x) for checking trichomes and pest scouting
- Sticky traps for monitoring
- Drying lines or a rack, plus small hygrometers for the drying space
- Airtight containers for curing
I call this the backbone of my cannabis grow room essentials. You can spend more, but I wouldn’t spend less.
Choosing genetics for new growers without the overwhelm
Choosing seeds is where most beginners get sold a fantasy. The truth is simpler: choose genetics that match your environment and your patience.
In my experience, choosing genetics for new growers comes down to three decisions.
- Photoperiod or auto
- Photoperiod cannabis gives you control over vegetative time and training. You flip to flower when the plant is ready.
- Autoflowering plants run on their own internal clock, which is convenient, but they punish early mistakes because you can’t extend veg to recover.
- Plant structure and tolerance
- For a first run, I prefer plants that stay manageable in height, branch predictably, and tolerate minor feeding errors.
- Seed type
- Feminized seeds reduce the chance of males, which simplifies a first grow.
- Regular seeds are great for breeding projects and pheno hunts, but they add steps beginners may not want.
If you’re searching phrases like “best genetics for a first indoor run” or “seeds that handle beginner mistakes,” that’s the frame I use: stable structure, moderate feeding demands, and realistic size. That’s my honest approach to choosing genetics for new growers.
Planning a first indoor cannabis setup that fits your space
A first indoor cannabis setup doesn’t need to be complicated, but it does need to be balanced. When growers struggle, it’s often because one part of the system is oversized (usually light) while another part is undersized (usually airflow and dehumidification).
Tent sizing the way I think about it
- 2×2 or 60×60 cm: ideal for learning with 1 small-to-medium plant
- 2×4 or 60×120 cm: a sweet spot for 2 plants with room to train
- 4×4 or 120×120 cm: enough canopy to justify serious climate control planning
In a small tent, I prioritize easy access and tidy routing for cables and hoses. In a larger tent, I prioritize redundancy: a spare clip fan, extra ducting tape, and sensors I can trust.
Air exchange and circulation
For most small grows, the goal is steady leaf movement, not a hurricane. I run an inline fan to keep air fresh and to maintain negative pressure if I’m filtering odor. Then I add oscillating fans to break up microclimates inside the canopy.
If you’re trying to troubleshoot “why my tent feels humid even with a fan,” the answer is usually not more airflow alone. It’s dehumidification or lowering leaf-level transpiration by adjusting VPD. Which brings me to the next sections.
Light setup with a real PPFD map for cannabis approach
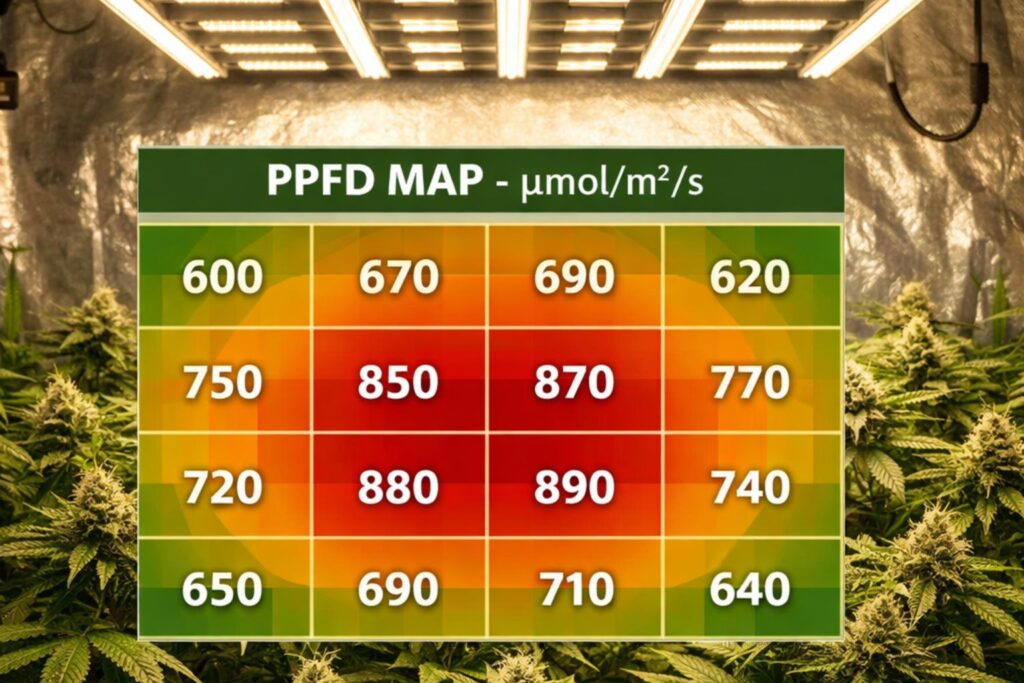
I used to hang a light, eyeball distance, and hope. Once I started thinking in PPFD and daily light integral (DLI), my grows got more repeatable.
A PPFD map for cannabis doesn’t have to be fancy. The goal is to know whether the corners and edges are dramatically dimmer than the center, and to adjust hanging height and dimmer settings accordingly.
Practical PPFD starting points (indoor, no supplemental CO2)
These are ranges I’ve used successfully as a baseline:
- Seedlings and early rooters: 100–200 µmol/m²/s
- Early veg: 250–400 µmol/m²/s
- Late veg: 400–600 µmol/m²/s
- Flower: 700–900 µmol/m²/s
I treat 900 as an upper baseline for many home setups, because higher light usually demands tighter control over CO2, temperature, and nutrition. If your leaves are “canoeing” upward or bleaching near the tops, that’s often too much intensity or too much heat at the canopy.
Photoperiod schedules that keep things simple
- Vegetative: 18 hours on / 6 hours off is my default
- Flowering: 12 hours on / 12 hours off for photoperiod plants
- Autos: 18/6 or 20/4, depending on heat and energy costs
If someone asks me for a one-line answer, I say: be consistent. Timing drift can stress plants, especially during flower.
That’s why the list of things to start growing cannabis always includes a reliable timer and a plan for light leaks.
Dialing climate with VPD targets for cannabis instead of guessing
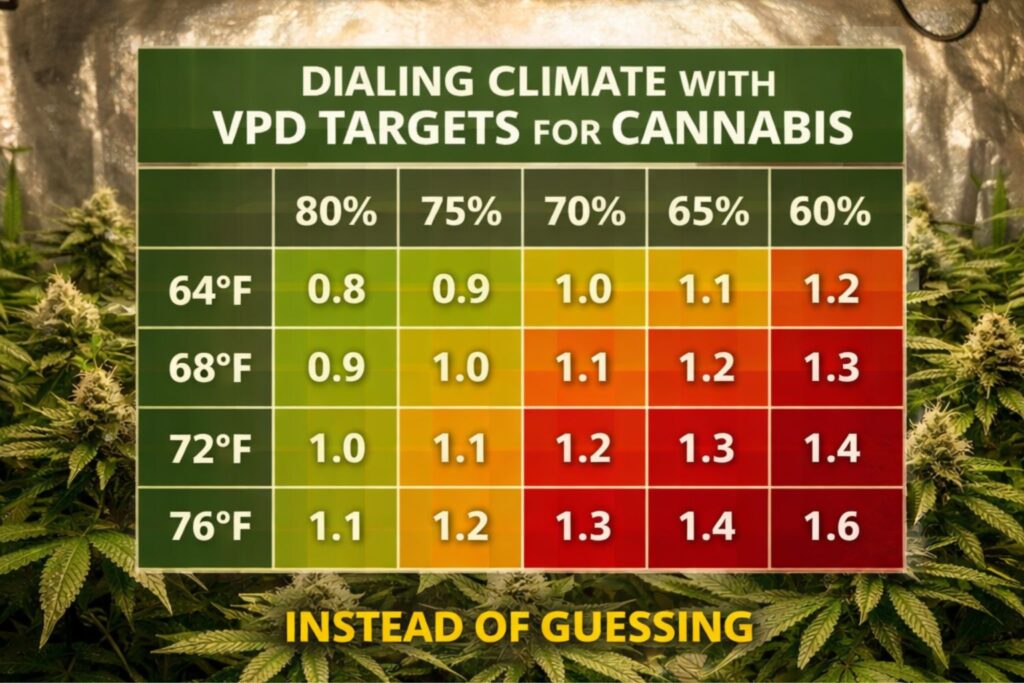
Humidity advice online is often too broad. I prefer thinking in VPD targets for cannabis because it connects temperature and relative humidity to what the plant actually experiences.
Here are VPD bands I’ve used as safe starting points:
- Seedlings/clones: 0.6–0.9 kPa
- Vegetative growth: 0.9–1.2 kPa
- Early flower: 1.1–1.3 kPa
- Late flower: 1.2–1.5 kPa
If you don’t want to calculate VPD, you can still use a simple temperature/RH framework:
- Seedlings: 24–26°C with 65–75% RH
- Veg: 24–28°C with 55–65% RH
- Flower: 22–26°C with 45–55% RH
- Late flower: 20–24°C with 40–50% RH
When I hear “my buds got fluffy” or “my weed smells muted,” climate is one of the first things I review. Too much heat can drive terpene loss, and too much humidity late in flower increases mold risk. I’d rather slow growth slightly than gamble with wet flowers.
This is also where I remind beginners: climate control is part of the cannabis grow room essentials list, not an optional upgrade.
Watering and feeding: EC and pH starting ranges I start with
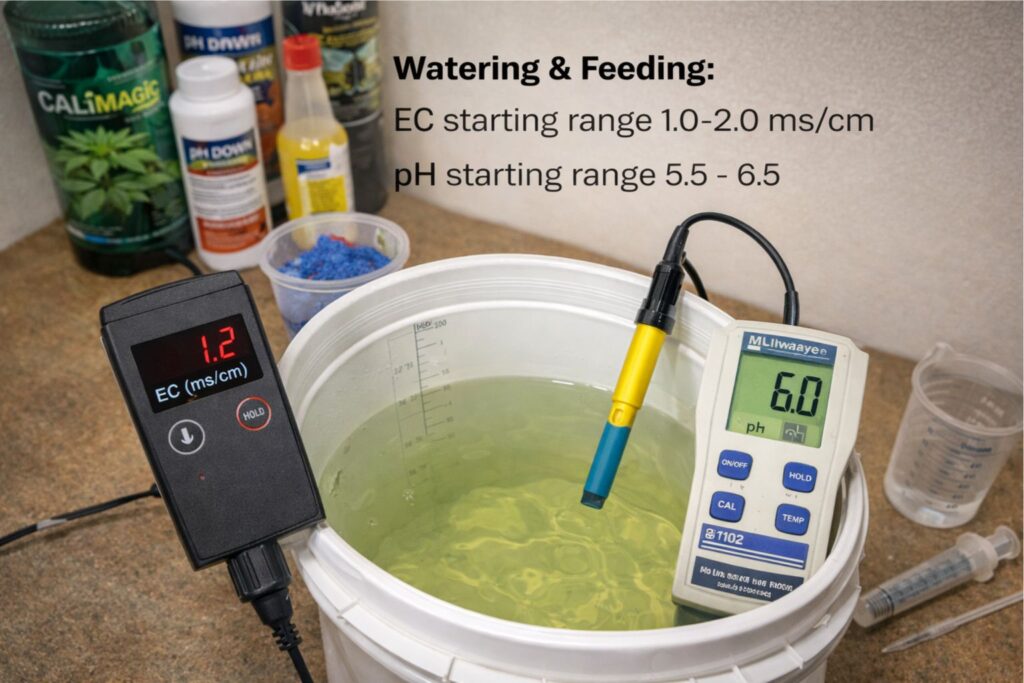
Most new growers either underfeed and chase deficiencies, or overfeed and burn plants. My goal early on is stability. I pick a medium, pick a nutrient line, then aim for conservative EC and pH starting ranges.
pH starting targets by medium
- Soil: 6.2–6.8
- Coco: 5.8–6.2
- Hydro: 5.6–6.0
I calibrate my pH pen regularly. A drifting meter is an invisible problem, and it can make a healthy plant look “mysteriously deficient.”
EC/PPM starting ranges (general guidance)
Exact numbers depend on cultivar, water hardness, and the nutrient brand, but these are ranges I’ve used as a starting point:
- Seedlings in coco/hydro: EC 0.4–0.8
- Veg: EC 1.0–1.6
- Early flower: EC 1.4–1.8
- Mid flower: EC 1.6–2.0
In soil, I typically feed lighter and rely more on the medium’s buffer, especially in the first few weeks. Overwatering is a bigger enemy in soil than underfeeding.
A simple note from my own runs: when leaves claw downward and look dark green, I back off nitrogen and check my dryback timing. When the leaf tips are crisping and margins are burning, I check EC and runoff.
This is why the list of things to start growing cannabis always includes pH tools and a plan for mixing feed consistently.
Medium choices: soil, coco, and simple hydro in real life
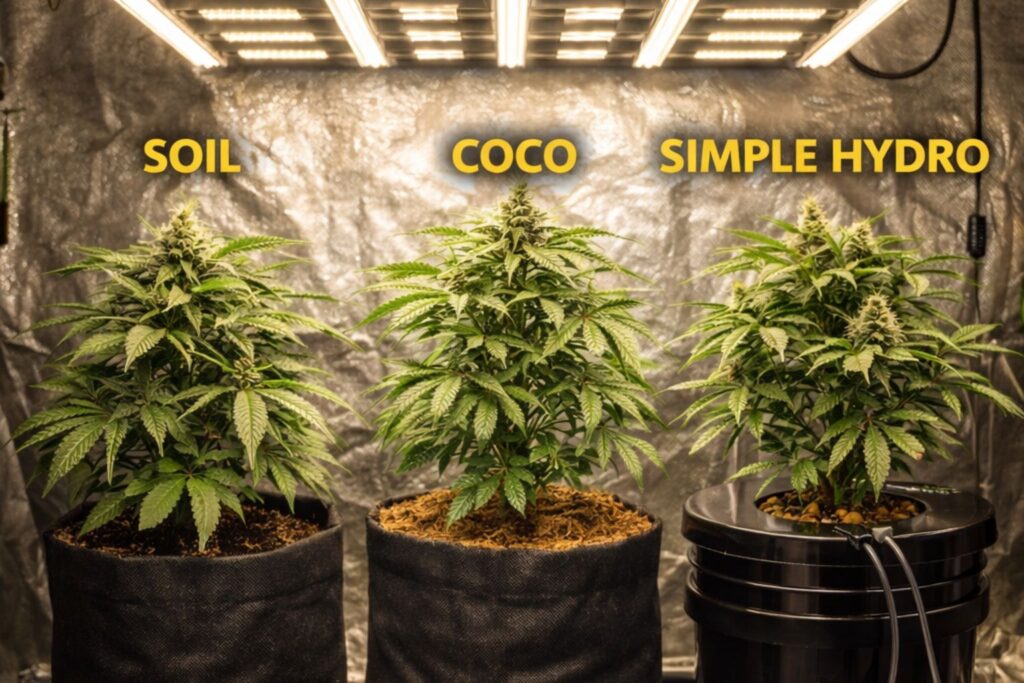
I’ve had great results with all three, but they teach different lessons.
Soil
Soil is forgiving if it’s airy and well-draining. It’s great for beginners because it buffers pH and nutrient swings, but it can also hide overwatering for a while. If you’re running soil, I recommend:
- A light, aerated mix
- Fabric pots for better oxygen
- A watering routine that allows the pot to dry back gradually
Coco
Coco is my favorite “training wheels” medium for controlled feeding. It’s harder to overwater than soil because it holds air well, but it does require attention to pH and EC. If you want repeatability, coco plus EC and pH starting ranges is a solid approach.
Simple hydro
Hydro can grow very fast, but the margin for error is smaller. Temperature swings, pump failures, and reservoir cleanliness all matter. If you’re brand new, I’d only recommend hydro if you enjoy monitoring and you can keep the room stable.
No matter which you choose, the most useful thing is to pick one method for the first run and learn it. Switching mid-run is how beginners get lost.
A routine that matches a real schedule: my beginner weed grow checklist
A beginner weed grow checklist is less about doing more and more about doing the same few things consistently. Here’s what I do.
Daily (5–10 minutes)
- Check canopy temperature and RH (or VPD)
- Look at leaves: posture, color, and any new spots
- Confirm fans are running and timers are correct
- Water only if the pot weight and dryback timing call for it
Every feeding/watering
- Mix nutrients in a consistent order
- Verify pH after nutrients are mixed
- Note EC if you’re in coco/hydro
- Avoid splashing nutrient solution onto leaves under strong light
Weekly (20–40 minutes)
- Clean up dead leaves and debris (pest prevention)
- Inspect undersides of leaves with a loupe
- Replace or reposition sticky traps
- Lightly adjust training ties and canopy spacing
- Review notes: are you trending hotter, drier, or more humid than last week?
That’s my realistic beginner weed grow checklist. When I skip the basics, my plants remind me.
Training and canopy work I trust for beginners
You don’t have to train to grow marijuana, but training helps you use your light efficiently and keeps airflow moving through the canopy.
These are the techniques I’ve had the best beginner success with:
- Low-stress training (LST): gentle bending and tying to open the canopy
- Topping (photoperiod only): creating multiple main colas and controlling height
- Simple trellis netting: keeping tops even without constant tying
- Light defoliation: removing leaves that block airflow or shade key sites
A caution from my own garden: heavy defoliation right before flip can slow growth. I prefer small, repeated adjustments rather than one aggressive “strip.”
If you’re running autos, I avoid topping unless I know the genetics well and the plant is extremely vigorous. Autos have limited time to recover.
Integrated pest management for cannabis that keeps problems small
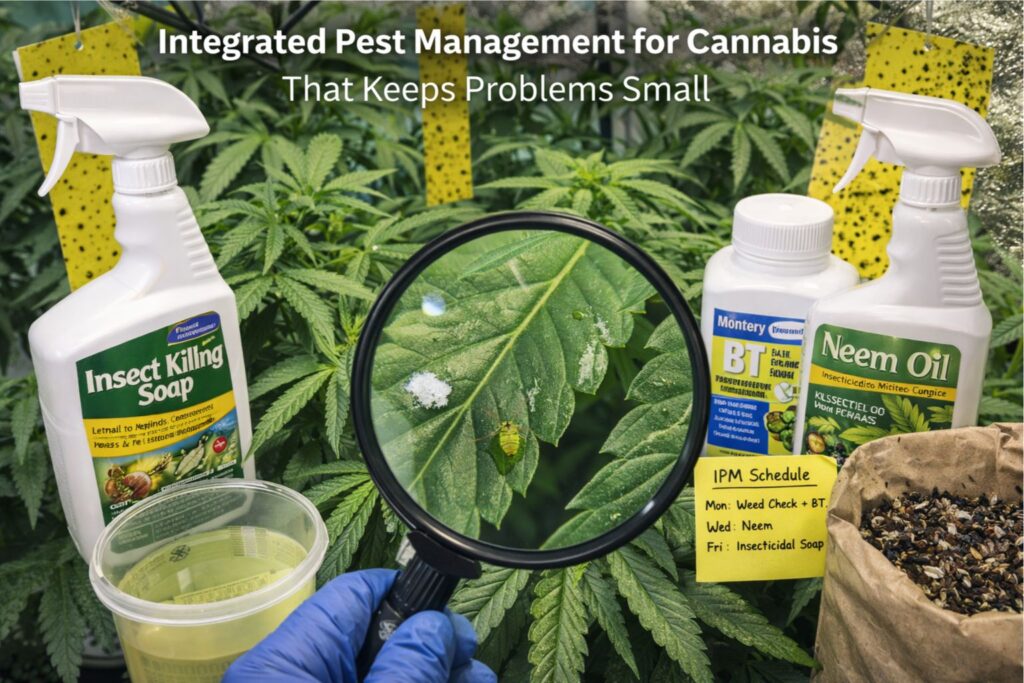
I treat integrated pest management for cannabis as a system, not a single product. The goal is to prevent pests and disease pressure from building, and to catch issues early.
Here’s my practical plan.
Prevention habits
- Quarantine new plants and clones if you bring them in
- Keep the floor clean and dry; don’t leave runoff sitting
- Remove dead leaves promptly
- Keep intake air clean (a simple pre-filter helps)
Monitoring
- Sticky traps at canopy and pot level
- Leaf inspections under bright light
- A loupe check during weekly maintenance
Response options I’ve used
- Mechanical removal (wipe, prune, isolate)
- Environmental adjustments (reduce humidity, increase airflow)
- Biological controls where appropriate (predatory mites and beneficial insects can be effective in the right conditions)
- Targeted sprays as a last resort, used cautiously and never late in flower
I’m careful about spraying anything on flowers. It can affect aroma, residue, and burn risk under strong light. If you’re searching “how do I control pests without ruining buds,” the honest answer is: start early, monitor often, and avoid letting populations explode. That’s the reality of integrated pest management for cannabis.
Harvesting, drying, and the drying and curing basics that protect quality
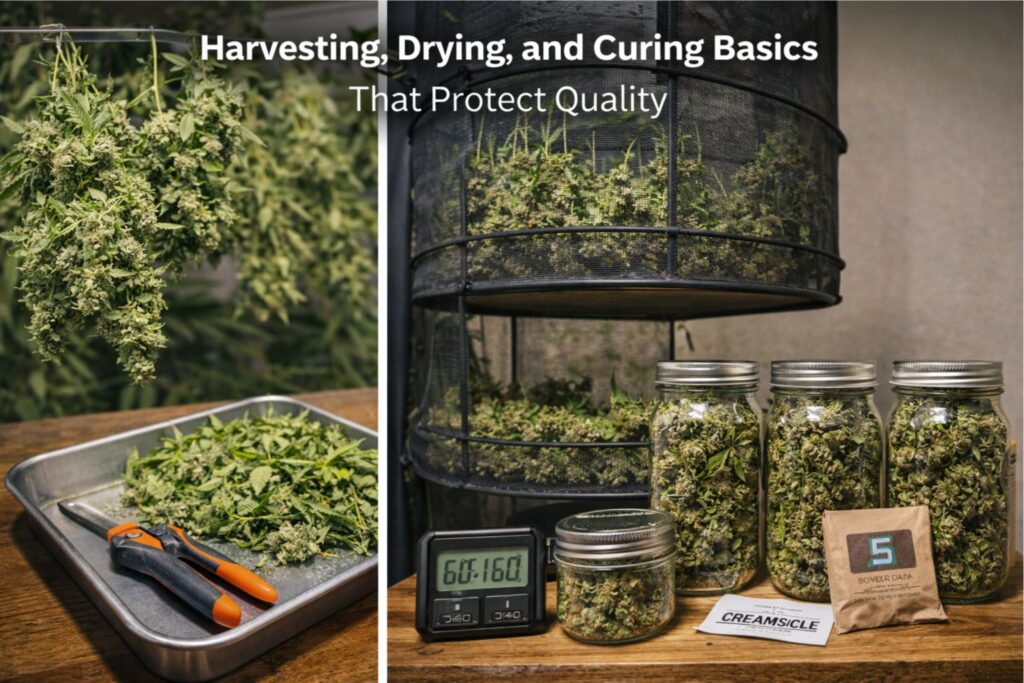
I used to think the grow ended at harvest. Now I treat post-harvest as half the job. A healthy plant can still turn into harsh, grassy weed if drying is rushed or too warm.
How I decide harvest timing
I look at trichomes, but I also consider the overall plant:
- Pistil behavior and calyx swelling (not a calendar date)
- The way the plant drinks near the end
- Trichomes on the actual buds, not just sugar leaves
I aim for a balance of mostly cloudy with some clear and a small amount amber, but I don’t pretend it’s a perfect science. Different cultivars express maturity differently.
My drying conditions
My drying and curing basics target is a slow, controlled dry:
- 18–20°C if possible
- 55–60% RH
- Gentle airflow, not blowing directly at buds
- Darkness or very low light
If the room is too dry, I’ll hang whole plants or larger branches to slow the process. If it’s too humid, I increase dehumidification and keep air moving.
Curing the way I do it
Once stems snap and the outer bud feels dry but not brittle, I move to airtight containers and burp them as needed. I keep a small hygrometer in the container and aim to hold the internal humidity around the low 60s early, then stabilize slightly lower over time.
This is the part beginners skip, and it’s why I always include drying and curing basics in the list of things to start growing cannabis. It’s not glamorous, but it’s where flavor and smoothness are protected.
Building a seed-to-harvest starter kit on different budgets

A seed-to-harvest starter kit can be simple or advanced. Here’s how I think about it in tiers.
Lean starter (learn the process)
- Small tent or a clean closet space with reflective surfaces
- LED light sized correctly for the footprint
- Inline fan and a clip fan
- Basic soil, fabric pots, and a simple nutrient plan
- Thermometer/hygrometer, timer, and pH tools
This tier can grow great cannabis if you control watering and keep climate in check.
Balanced starter (my recommended baseline)
- Tent with enough height for training
- Dimmable LED plus a basic way to check PPFD
- Carbon filtration if odor matters
- Humidifier and/or dehumidifier depending on your climate
- pH and EC tools if you run coco
- Trellis netting and plant ties
This is the tier where a seed-to-harvest starter kit starts to feel stable and repeatable.
Comfort tier (for growers who like automation)
- Controller for lights, fans, and climate logging
- Additional sensors at canopy and root zone
- Backup fan and spare parts
- A dedicated drying area with its own dehumidification
Automation doesn’t replace observation, but it does reduce human error.
Common first-grow problems and what I do about them
I’ve seen these patterns repeatedly in my own tents and in friends’ gardens.
- Seedlings stretch and fall over: light is too weak or too far away. Bring intensity up gently and keep airflow light.
- Leaves curl up at the edges: often too much light or heat. Confirm canopy temperature and adjust height or dimmer.
- Yellowing lower leaves in veg: could be underfeeding, pH drift, or simply the plant reallocating resources. Check EC and pH starting ranges and watering habits before throwing more nutrients at it.
- Brown tips and crispy margins: common signs of excess EC, salt buildup, or inconsistent watering. Reduce strength and improve consistency.
- Powdery mildew risk: improve airflow and keep humidity controlled, especially late in flower. Prevention is easier than rescue.
- Slow growth in soil: overwatering is the most common culprit. Let the pot dry back, and don’t keep the medium constantly wet.
If you’re searching “drooping leaves on weed plants,” start with roots and watering. If you’re searching “why is my cannabis not flowering,” confirm your timer and light leaks.
FAQ: long-tail questions I hear from new growers
What is the minimum list of things to start growing cannabis for an indoor grow?
At minimum, you need a contained space, a reliable grow light, airflow, a timer, a medium and containers, and tools to measure temperature and humidity. I also consider pH tools part of the minimum list of things to start growing cannabis because they prevent weeks of confusion.
Soil or coco for a first indoor grow?
For many beginners, soil is forgiving but easy to overwater. Coco is more “hands-on” because it rewards consistent feeding and monitoring. If you like measurable targets like EC and pH starting ranges, coco is a strong choice.
What light schedule should I run for marijuana plants?
For photoperiod plants, I use 18/6 in veg and 12/12 in flower. For autos, 18/6 or 20/4 works well. Consistency matters more than perfection.
How do I know if my plants are getting the right light?
Use a PPFD map for cannabis approach: measure or estimate PPFD across the canopy, not just in the center. Watch for bleaching at the tops or weak growth at the edges.
What are safe temperature and humidity targets for weed in late flower?
Late flower is where mold risk rises. I target 20–24°C and 40–50% RH, and I stay mindful of VPD targets for cannabis so the canopy doesn’t sit in a humid microclimate.
How can I avoid nutrient burn?
Start with conservative feed strength, increase slowly, and be consistent. Nutrient burn often comes from chasing numbers or “fixing” a plant too aggressively. Keep your EC and pH starting ranges steady, and adjust one variable at a time.
What’s the best way to prevent pests without ruining buds?
My answer is integrated pest management for cannabis: cleanliness, monitoring, and early action. Once flowers are dense, options get limited, so prevention and scouting matter.
How long should I dry weed, and what does a good dry feel like?
Most of my dries take 7–14 days depending on branch size and room conditions. Follow drying and curing basics: cool temperatures, moderate humidity, and gentle airflow.
Can I buy cannabis seeds online and still keep things discreet?
Many reputable shops offer discreet packaging and tracking options, but details vary by region and carrier. If discreet shipping matters, read the shop’s shipping and packaging notes carefully and plan for weather delays.
Should I choose feminized seeds or autos for my first grow?
If you want maximum control and training flexibility, feminized photoperiod seeds are my preference. If you want simplicity and you can accept less recovery time after mistakes, autos can work. Your environment and routine should drive the choice.
Final note from my own garden
If you take nothing else away, take this: the list of things to start growing cannabis isn’t about buying everything. It’s about building a small, measurable system you can run consistently. When you have the right measurements, a stable first indoor cannabis setup, and a routine like my beginner weed grow checklist, the plant does a lot of the work for you.
Invest in the basics, keep notes, and let your cannabis plants teach you one run at a time.