
When I started growing cannabis, I treated potency like a genetics lottery: you buy seeds, you flower the plant, and you get whatever THC shows up. After a few cycles in a small indoor tent, I changed my mind. I ran the same cultivar twice under different environments and saw two very different outcomes in aroma, smoothness, and that “fresh” edge people call potency. That’s when cannabinoids and THC chemistry stopped being an abstract topic and became a practical checklist I use in every run.
This is a hands-on guide written from the perspective of a home cultivator who measures what I can (light, temperature, humidity, EC) and then tries to make consistent decisions from germination to curing. I’ll explain how I think about resin development, how I avoid preventable losses after harvest, and what I look for when I’m seed shopping. I’ll use cannabis, marijuana, and weed interchangeably, because growers search all three.
How I picture cannabinoids and THC chemistry in the real grow room
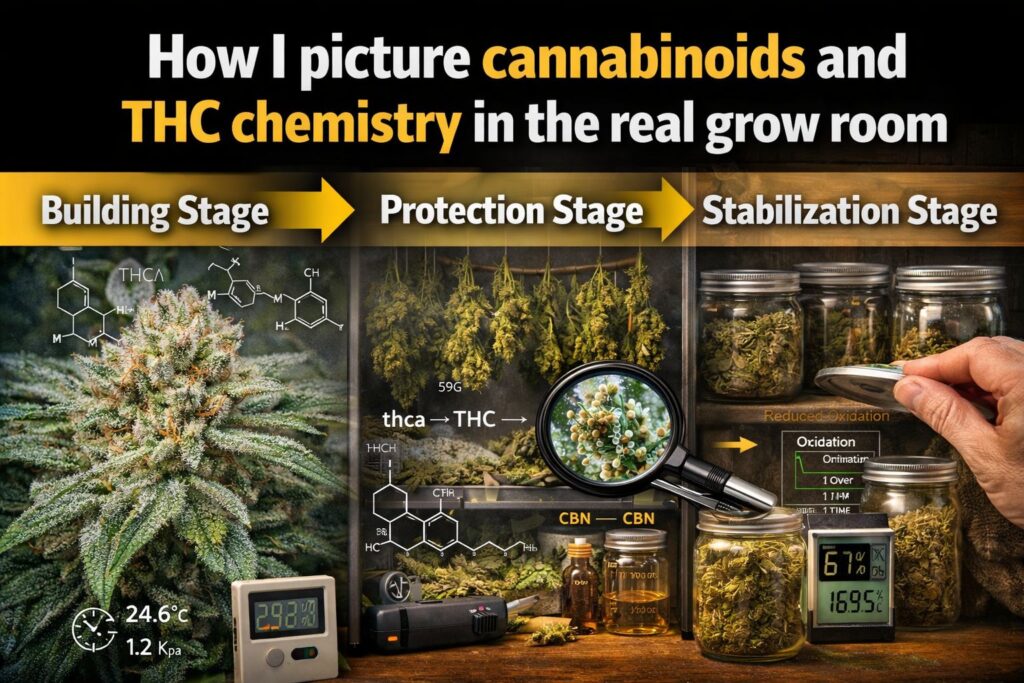
Most growers don’t need a lab to benefit from cannabinoids and THC chemistry. We need a workable map: what the plant builds, when it builds it, and what conditions speed up breakdown. My mental model has three stages.
- Building stage in late flower. Trichomes form and fill. If the plant is stressed, it may look frosty, but the overall flower development and resin quality can suffer.
- Protection stage at harvest and dry. This is where I lose quality fastest if I rush. Heat and harsh airflow can damage aroma and speed unwanted change.
- Stabilization stage in the jar. Curing is where I set myself up for better thc oxidation and shelf life, or I ruin it with warm storage and too much oxygen exchange.
When you’re learning cannabinoids and THC chemistry, it’s tempting to focus only on THC. I track THC because it’s a major cannabinoid, but I also care about the whole resin profile: terpenes, minor cannabinoids, and how the plant expresses them under my conditions.
The key reaction I plan around: thca to thc conversion timing
Inside the plant, THC largely exists as THCA until heat removes a carboxyl group. That conversion matters when you smoke or vaporize, but it also matters during harvest handling. In my experience, thca to thc conversion timing is something you influence indirectly by controlling temperature and time. I want most conversion to happen when the flower is used, not during a hot, fast dry.
I keep thca to thc conversion timing in mind whenever I’m tempted to dry in a warm closet or leave trimmed buds sitting under bright light. The more I protect the resin during dry and cure, the more consistent my cannabinoids and THC chemistry outcomes are.
Lighting decisions that support resin without cooking it
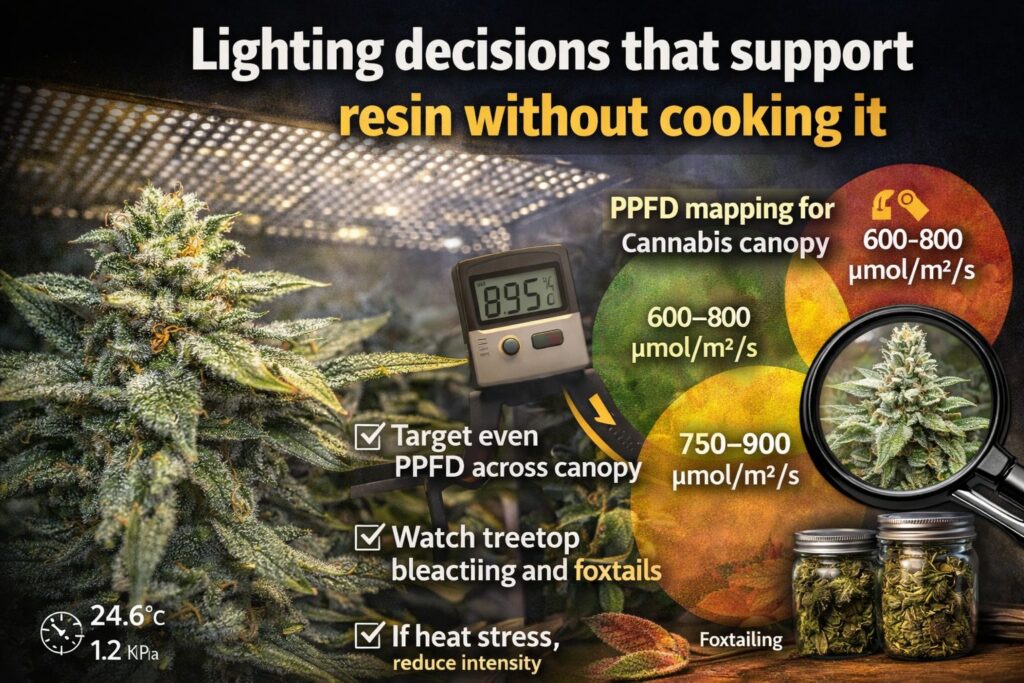
I can’t talk about cannabinoids and THC chemistry without talking about light. In my tent, light intensity is a performance lever and a stress lever at the same time. The best gains I’ve seen came from being deliberate about ppfd mapping for cannabis canopy rather than just hanging a stronger fixture.
PPFD targets and ppfd mapping for cannabis canopy
I use a light meter and do ppfd mapping for cannabis canopy at several points: early flower, mid flower, and once again late flower after training settles. I’m not chasing a single number; I’m trying to avoid hot spots that bleach tops and cold spots that under-develop lowers.
Typical indoor targets I use without added CO2:
- Early flower: 600–800 µmol/m²/s at canopy
- Mid flower: 800–950 µmol/m²/s if the plant is thriving
- Late flower: 750–900 µmol/m²/s, adjusted down if the room runs warm
These ranges only work if ppfd mapping for cannabis canopy shows even distribution. When I skip mapping, I usually end up with a few tops that are overdriven and a mid-canopy that never catches up. That unevenness shows up later when I’m trying to time harvest and cure.
I repeat ppfd mapping for cannabis canopy after defoliation or heavy training because the canopy shape changes how light lands. It’s a small task that pays off all the way to the jar.
Recognizing late flower light stress symptoms before they cost quality
The moment my buds start stacking, I watch for late flower light stress symptoms: bleaching on the highest tips, foxtailing that looks like the plant is trying to outrun the light, burnt sugar-leaf edges, and a sharp “dry” aroma when I brush the canopy. Those late flower light stress symptoms tell me the plant is spending energy coping rather than finishing cleanly.
When I see late flower light stress symptoms, I do one of three things:
- Raise the fixture or dim slightly.
- Improve canopy airflow and reduce leaf temperature.
- Confirm my environment, especially VPD, so transpiration stays steady.
Late flower light stress symptoms can also mask maturity. A stressed top can amber early while the rest of the plant is still developing. That’s why I don’t harvest from the calendar.
Environment control: vpd targets for resin production
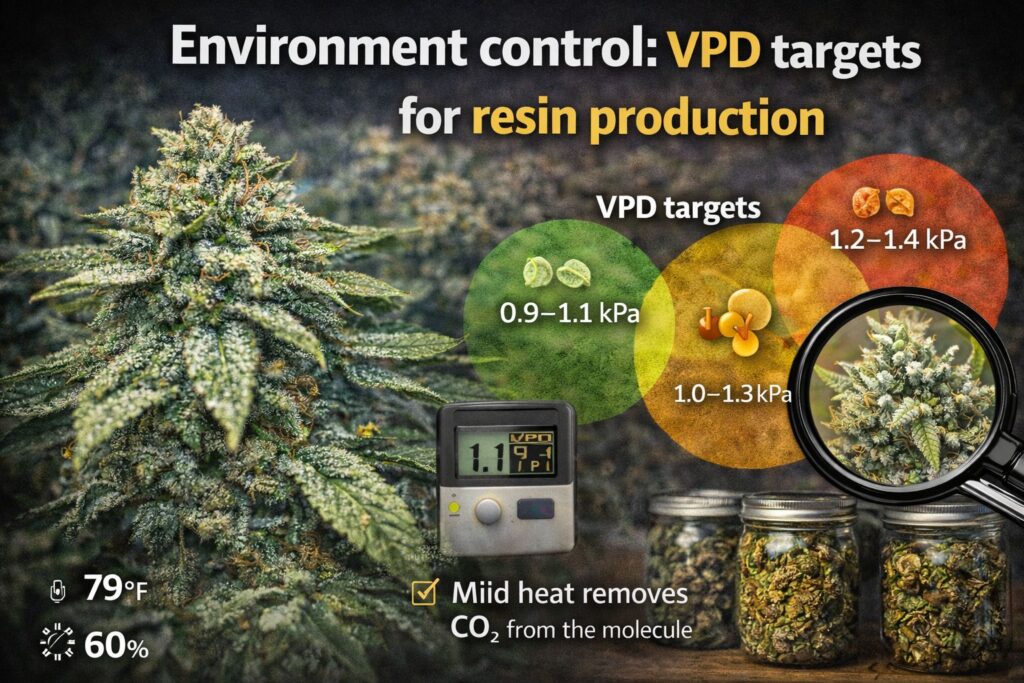
If I had to pick one non-light variable that changes outcomes, it’s the environment. I use vpd targets for resin production as a guide because it keeps me focused on a relationship: temperature and humidity together, not separately.
My working range:
- Veg: 0.8–1.1 kPa
- Early flower: 1.0–1.2 kPa
- Mid to late flower: 1.1–1.4 kPa, while keeping humidity low enough to discourage mold
I don’t hit those numbers perfectly every hour, but I try to avoid extremes. When vpd targets for resin production are too low (too humid), I fight slow growth and a higher disease risk. When vpd targets for resin production are too high (too dry), leaves claw and flowers feel like they’re drying on the plant.
To maintain vpd targets for resin production in a small room, I focus on:
- Stable exhaust and intake so humidity doesn’t spike at lights off
- A dehumidifier sized for the space (critical in late flower)
- Gentle, indirect airflow so buds don’t desiccate unevenly
Good environment control supports cannabinoids and THC chemistry because the plant can keep building resin without constant stress signals.
Feeding and the root zone: soil microbiome and cannabinoid expression
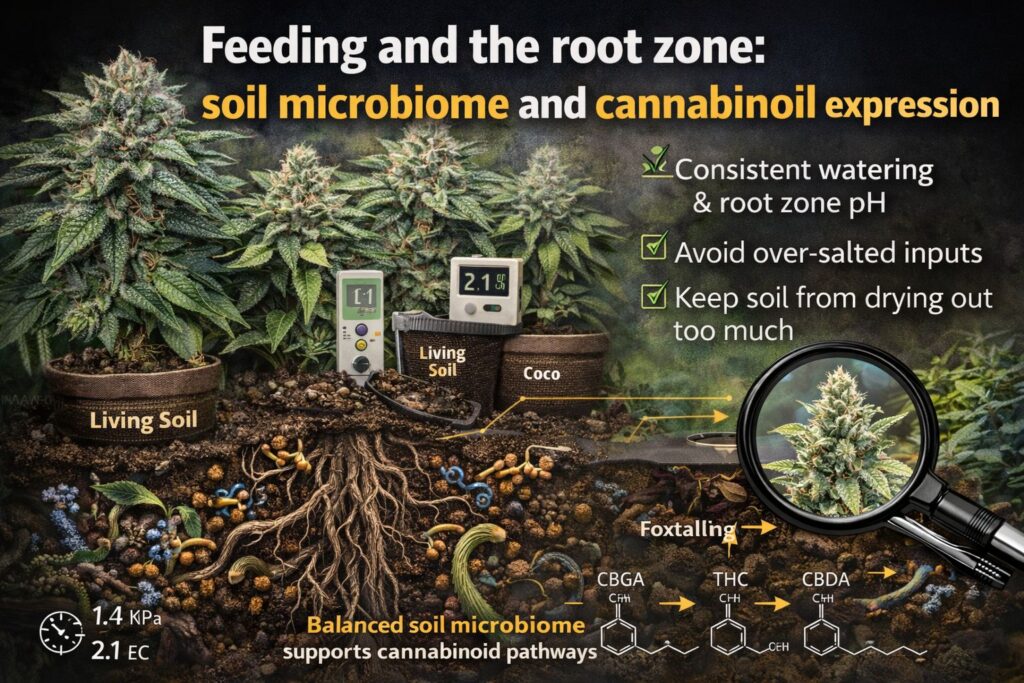
I grow in both coco and living soil depending on the season and how much time I have. I like the steering speed of coco, but I’ve had some of my best-tasting weed from runs where soil microbiome and cannabinoid expression were clearly working in my favor.
Soil vs hydro, with chemistry as the scoreboard
Debates about soil versus hydroponics can get loud. My approach is quieter: I ask which system lets me keep the plant stable in late flower. Stability supports consistent resin formation and cleaner ripening, which is what I notice most when I compare jars.
In living soil, I pay attention to soil microbiome and cannabinoid expression by keeping the container from drying too hard, avoiding over-salted inputs, and using a consistent watering rhythm. When I neglect that, I see dull leaf color swings and uneven finish.
In coco or hydro, I watch EC, pH, and runoff. When I’m dialed, I can push growth, but mistakes show up fast. If the root zone is unstable, the plant reacts, and I often see late flower light stress symptoms sooner because the plant can’t manage the intensity.
I bring up soil microbiome and cannabinoid expression again at the end of the run because it also affects how the plant senesces. A smooth, natural fade is often a sign my root zone stayed balanced.
Harvest timing: using a trichome head cloudiness guide
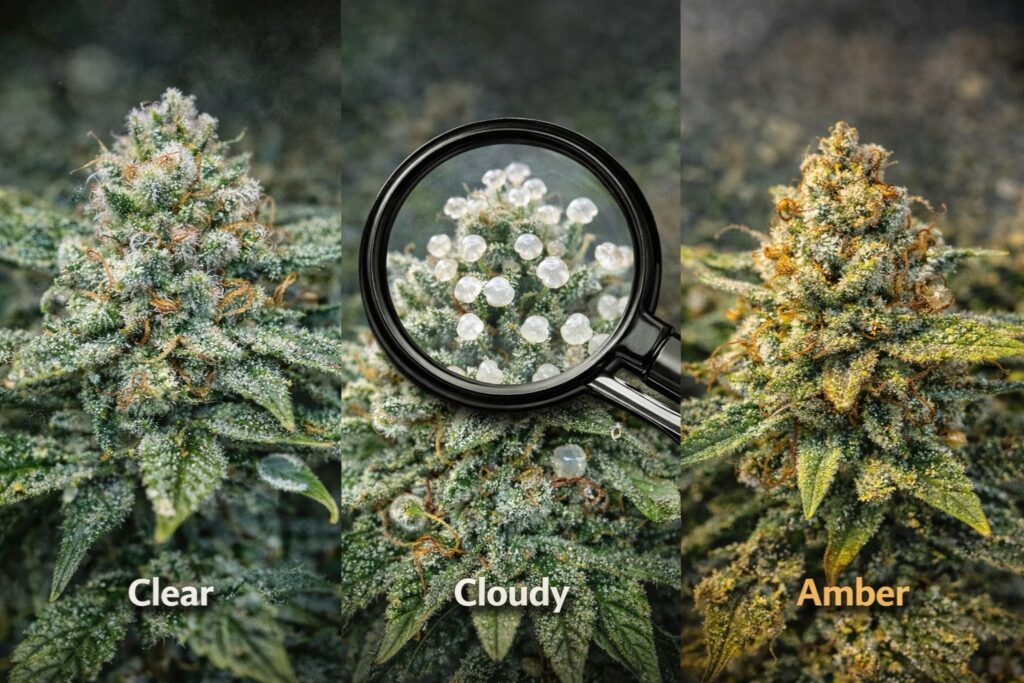
Harvest is where my understanding of cannabinoids and THC chemistry turns into a decision. I don’t harvest for a calendar week count. I harvest by looking at resin and how the plant is finishing. My main tool is a simple trichome head cloudiness guide.
What I check across the plant
A reliable trichome head cloudiness guide requires sampling more than the top cola. I check:
- A top bud that gets the most light
- A mid-canopy bud
- A lower bud that’s fully formed but shaded
I’m looking for a majority of cloudy heads, a smaller fraction of clear, and some amber depending on the effect I want. Using a trichome head cloudiness guide also protects me from stress artifacts. If a top is stressed and ambers early, I don’t let it force an early harvest for the whole plant.
I write notes after each run so my trichome head cloudiness guide gets sharper with my own genetics and environment.
Autoflowers and why they tighten the decision window
Autoflowers can produce excellent marijuana when dialed, but they remove one control: you can’t extend veg to recover from mistakes. I treat autos like a schedule discipline test. If I’m running autos, I keep light and environment steady, and I start checking resin earlier with the same trichome head cloudiness guide.
Drying: humidity control during hang drying to protect aroma
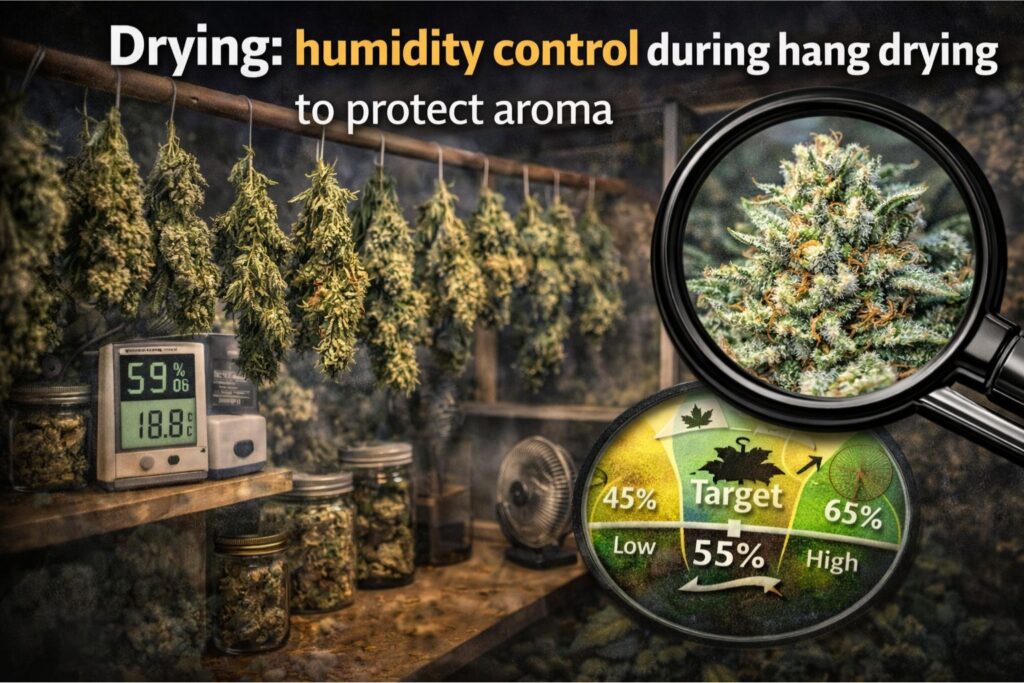
Most quality losses I’ve had happened after harvest, not during flower. That’s why I treat drying as a chemistry step. I use humidity control during hang drying as a core rule, not an optional improvement.
My target dry space:
- Temperature: 16–20°C
- Relative humidity: 55–60%
- Darkness: as close to total as possible
- Airflow: indirect, moving air around the room, not blasting buds
Humidity control during hang drying is the difference between a slow, even dry and a rushed dry that makes the outside crisp while the inside stays wet. When humidity control during hang drying fails, I see two problems: the smell collapses early, and the cure never really recovers the texture.
To improve humidity control during hang drying, I do these practical things:
- Hang whole branches rather than small nugs when possible
- Use a dehumidifier with a drain line so it can run steadily
- Avoid open doors and temperature swings that spike VPD
- Keep fans off the buds and pointed at a wall for circulation
Humidity control during hang drying also connects to thca to thc conversion timing. Heat and fast drying can push changes I don’t want.
Curing: curing jars oxygen management and thc oxidation and shelf life
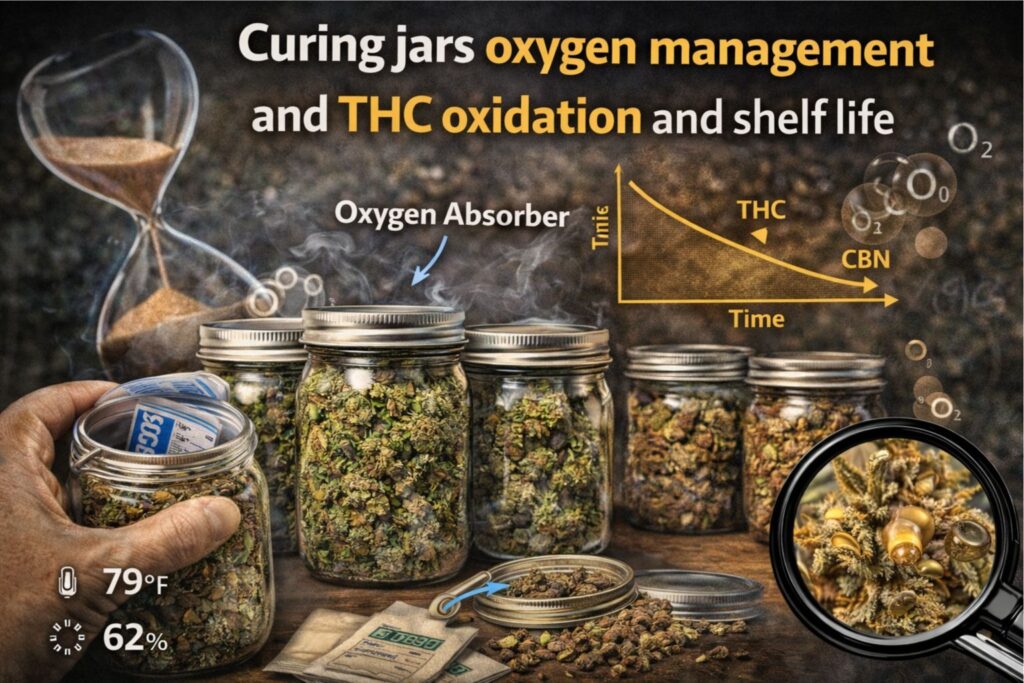
Once buds are dry enough to jar, my goal shifts from removing moisture to stabilizing resin. This is where curing jars oxygen management matters. I cure in glass jars and pay attention to how often I exchange air.
My routine
- Jar when small stems snap and larger stems crack but still bend slightly.
- Fill jars about 70–80% so there is some air space.
- Burp 1–2 times per day for the first week, then taper down.
Curing jars oxygen management is not about starving buds of oxygen immediately. It’s about not constantly refreshing warm, oxygen-rich air that speeds thc oxidation and shelf life in the wrong direction. I want the cure to progress while keeping the resin protected.
If I smell ammonia or feel excessive dampness, I know my buds were too wet. I’ll spread them out briefly and reset. That’s still part of curing jars oxygen management: it’s controlled correction, not panic burping.
Storage to reduce thc oxidation and shelf life problems
The fastest way I’ve seen thc oxidation and shelf life decline is warm storage and light exposure. I keep jars cool and dark. If I’m storing longer than a few weeks, I reduce headspace and avoid opening jars just to “check.”
Thc oxidation and shelf life are also influenced by how rough the dry was. If humidity control during hang drying was poor, the product often feels older sooner. When I nail drying and curing jars oxygen management, thc oxidation and shelf life improve noticeably in my own jars: the aroma stays brighter and the smoke stays smoother.
I’m careful here because “freshness” is not only THC. It’s the whole resin profile. Still, thc oxidation and shelf life is a real factor, and I treat it as a controllable variable.
Decarboxylation in plain terms and why I don’t rush it
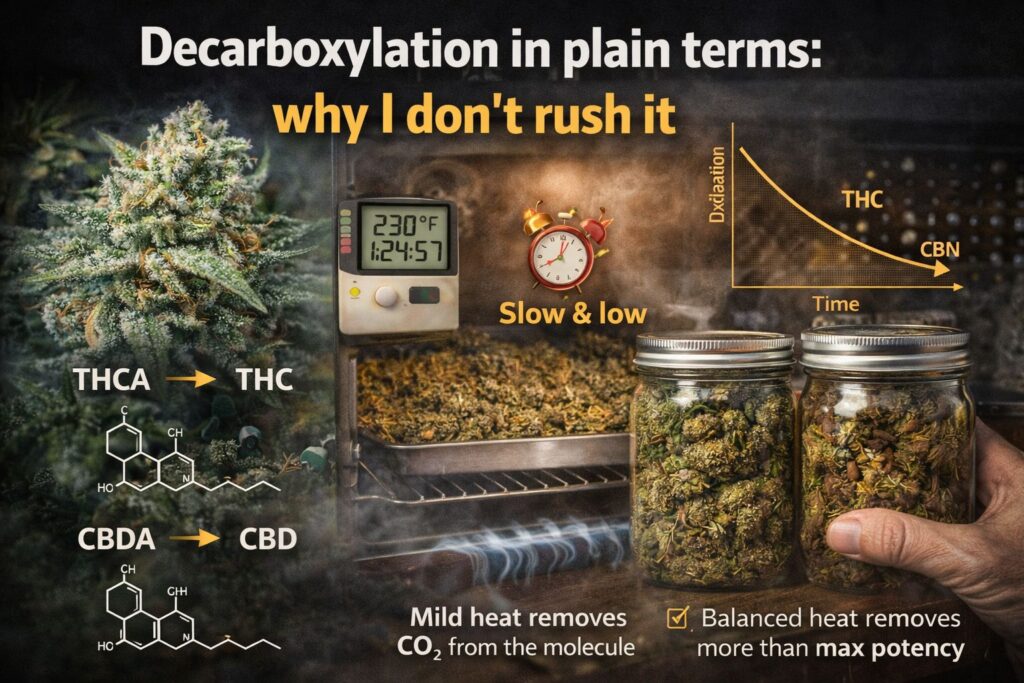
Growers hear about decarboxylation all the time, especially from edible makers. For a cultivator, the most useful takeaway is this: heat and time change cannabinoids. That’s why I keep the dry space cool.
Here’s how I connect this back to thca to thc conversion timing. I want THCA in the flower to remain largely intact until the flower is used. If I dry too hot, I’m pushing conversion and degradation earlier than I want, which can flatten the overall experience.
That’s why cannabinoids and THC chemistry isn’t a one-day lesson. It’s a chain of decisions.
Seed shopping with chemistry goals: choosing feminized seeds for phenotype hunting
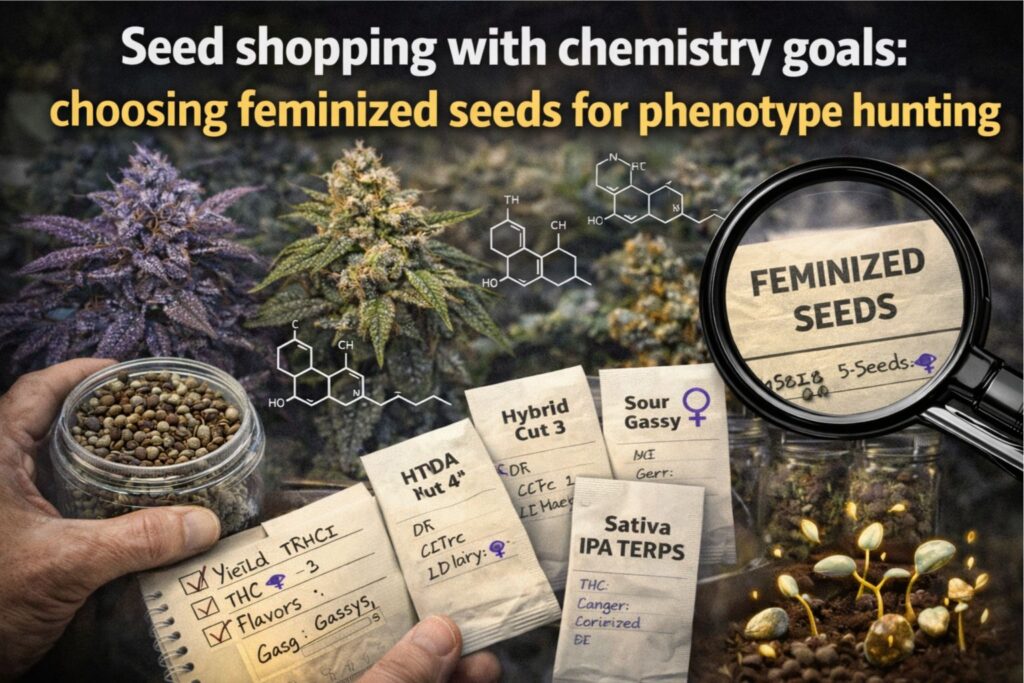
When I buy seeds, I’m not only buying a name; I’m buying variation. If I have limited space, choosing feminized seeds for phenotype hunting is usually my best route. It reduces the wasted footprint of male plants and lets me compare a few females side by side.
Choosing feminized seeds for phenotype hunting works best when I plan my run:
- Germinate a small set, label everything, and take notes early
- Track which plants handle my PPFD and VPD without stress
- Keep clones if I’m chasing a keeper phenotype
When I’m ordering marijuana seeds, I also look at support policies and shipping details. Seed banks differ widely in how they communicate delays, and shipping logistics can matter if you live where heat or cold is extreme.
I mention choosing feminized seeds for phenotype hunting a third time here because it’s not only about convenience. It’s how I build a library of plants that perform well under my specific environment, which makes cannabinoids and THC chemistry more consistent run to run.
Natural-language questions I see growers type into Google
To expand your seed-shopping research without relying on the same old phrases, here are queries I’ve personally used or heard in grow chats:
- How can I check if seeds were heat-stressed during shipping?
- What storage temperature keeps cannabis seeds viable for a year?
- How do I compare breeder descriptions to real grow traits indoors?
- What should I document when I’m choosing feminized seeds for phenotype hunting?
- Is coco easier than soil for a first indoor run, and what mistakes are most common?
Those queries lead you toward practical information: storage, documentation, and environment control.
Troubleshooting notes from my own runs
I keep a grow log. Over time, patterns repeat. Here are problems that directly affect cannabinoids and THC chemistry in my experience.
If buds feel harsh or smell flat early
- Check your drying speed. Humidity control during hang drying is usually the culprit.
- Confirm your dry room temperature. Hot rooms accelerate change.
- Review airflow. Fans on buds can strip aroma.
If tops look overcooked
- Re-check ppfd mapping for cannabis canopy. Hot spots cause uneven finish.
- Look for late flower light stress symptoms and adjust intensity.
- Confirm vpd targets for resin production so the plant can transpire normally.
If the cure feels “stuck”
- Review curing jars oxygen management. Too wet or too dry stops progress.
- Check storage temperature for thc oxidation and shelf life. Warm closets age weed fast.
FAQ: cannabinoids and THC chemistry questions growers ask
How do I know if my harvest timing is right?
Use a loupe and a trichome head cloudiness guide across multiple bud sites. If the tops are amber but the mid canopy is still mostly clear, consider whether late flower light stress symptoms are skewing the top. A trichome head cloudiness guide is more reliable than a calendar.
Is it better to dry buds fast to avoid mold?
Fast drying can avoid mold, but it often costs quality. I’d rather prevent mold by lowering humidity and improving airflow than rushing. Humidity control during hang drying lets you dry safely without turning the outside crispy in a few days.
Why do my jars smell great at first and then fade?
That’s often a storage and air exchange problem. Focus on curing jars oxygen management and keep jars cool and dark. Warm storage accelerates thc oxidation and shelf life decline.
Does light intensity directly increase THC?
Light supports photosynthesis and flower development, which can support resin production, but too much causes late flower light stress symptoms. Use ppfd mapping for cannabis canopy to keep intensity even and avoid bleaching.
Can living soil change the end result?
In my experience, yes, but only when managed well. I’ve seen soil microbiome and cannabinoid expression correlate with a smoother finish and more stable aroma, especially when the plant fades naturally and the root zone stays balanced.
What’s the simplest way to think about THCA and THC?
Treat thca to thc conversion timing as something you protect: keep harvest handling gentle, dry cool, cure properly, and let most conversion happen during use. That mindset makes cannabinoids and THC chemistry feel practical rather than theoretical.
The short version of my philosophy
I don’t chase hype. I chase repeatable outcomes. If I control light with ppfd mapping for cannabis canopy, keep vpd targets for resin production in range, manage the root zone with an eye on soil microbiome and cannabinoid expression, and protect the harvest with humidity control during hang drying plus curing jars oxygen management, I consistently get better jars with stronger thc oxidation and shelf life.
That’s why I treat cannabinoids and THC chemistry like a grower’s discipline, not a trivia topic.