When people say “buds,” they often mean one thing: the part of cannabis you trim, dry, and enjoy. But as a grower, I’ve learned that buds are also a botanical story. A bud is a plant’s growth point, and in flowering plants it can become an inflorescence packed with tiny structures that each respond to light, airflow, nutrition, and stress.
In this post I’m sharing the hands-on routine I use to shape botanical and cannabis buds indoors. I’m not talking about miracle tricks. I’m talking about the boring, repeatable stuff that consistently moves the needle: stable environment, measured light, sensible feeding, and careful finishing. I’ll also point out the trade-offs I’ve run into, because “bigger” is not always “better” if you lose aroma, invite mold, or end up with harsh smoke.
I grow weed in a small, dedicated room where I can control temperature, humidity, and airflow. I’ve run feminized seeds, autoflowers, and photoperiod cultivars across indica, sativa, and hybrid types. My goals stay the same each cycle: healthy plants, dense marijuana flowers, clean trichomes, and a cure that keeps flavor intact.
Buds as a botanical structure, not a mystery
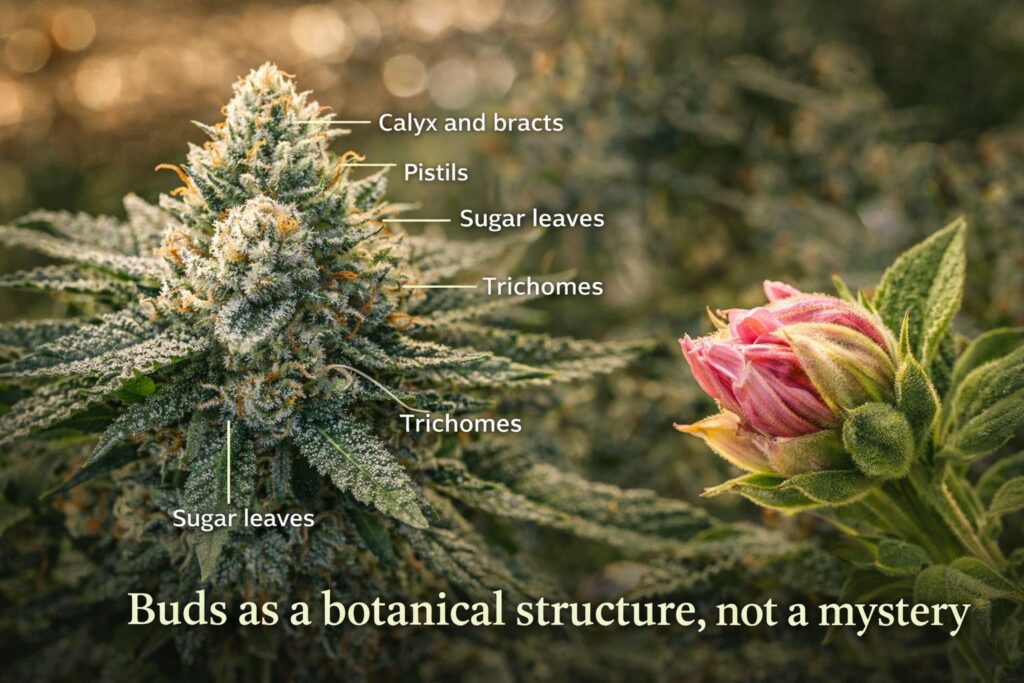
Botanically, a bud is a compact cluster of developing tissue. On cannabis, what we call a “bud” is a flower cluster made of many small floral parts. Understanding the parts helps you diagnose problems early, especially when something in the room changes.
Here’s what I pay attention to when I’m looking at botanical and cannabis buds up close:
- Calyx and bracts: The small, tear-shaped structures that stack and swell as flower matures.
- Pistils: The hair-like stigmas that start bright and gradually darken as the flower ripens.
- Sugar leaves: Small leaves near the flower. They can protect buds, but too much leaf mass can trap humidity.
- Trichomes: Resin glands that change from clear to cloudy and sometimes amber as maturity progresses.
I like to take weekly photos from the same angle and distance. Over time you build a visual library that makes it easier to spot nutrient issues, light stress, or pests before they ruin the run.
Bud set timeline indoors: how I read the first 4 weeks of flower
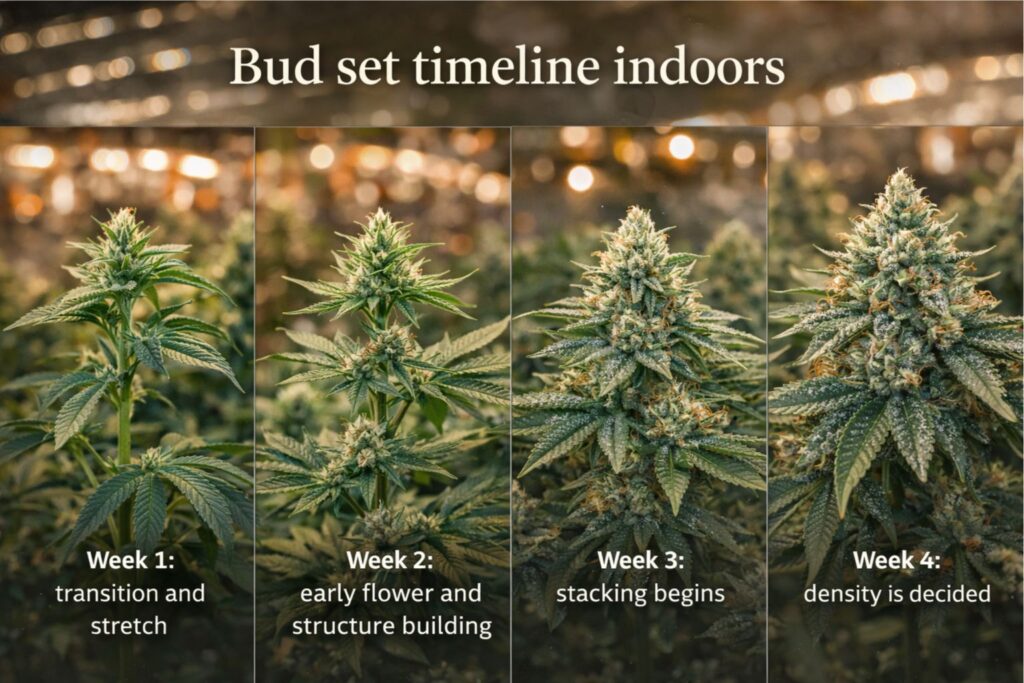
My bud set timeline indoors starts the day I flip photoperiod plants to 12/12, or when an auto clearly commits to flower. I mark it on a calendar because “Week 3” means nothing if you didn’t write down when flowering actually began.
Week 1: transition and stretch
- Photoperiod plants stretch fast. I keep canopy distance consistent and avoid major pruning.
- I lower nitrogen slightly and introduce a bloom-leaning feed, but I don’t starve the plant.
- I watch leaf posture at lights-on. If leaves taco or bleach, the light is too intense.
Week 2: early flower and structure building
- Pistils appear at most tops. This is where my bud set timeline indoors becomes visible.
- I start supporting branches early. A gentle trellis saves stems later.
- I aim for steady root-zone moisture. Big wet-dry swings can stall growth.
Week 3: stacking begins
- Bud sites start to swell and stack. This is when mistakes show up quickly.
- I confirm airflow across the canopy and through the undergrowth.
- I check runoff (in coco or hydro) to confirm the plant is eating what I think it’s eating.
Week 4: density is decided
- A lot of “bud size” is decided here. Stable conditions matter more than chasing additives.
- I keep training minimal and focus on keeping the canopy even.
- I take notes on aroma changes, because this is usually when terpene production starts to show.
If you only take one thing from this section, let it be this: use a written bud set timeline indoors. When a problem appears, you can link it back to a specific change you made.
VPD for flowering room: the simplest control that protects buds
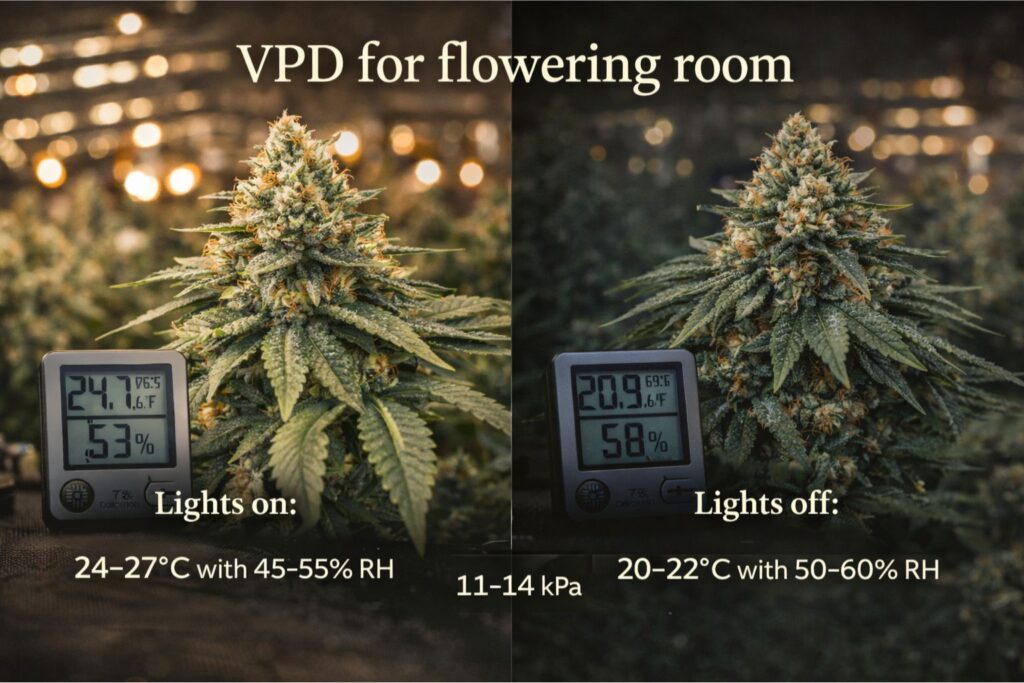
If you’ve battled fluffy buds, slow ripening, or mold scares, the environment is often the root cause. I rely on VPD for flowering room targets because it balances temperature and humidity in a way plants can “feel.”
My typical ranges for indoor flowering:
- Lights on: 24–27°C with 45–55% RH
- Lights off: 20–22°C with 50–60% RH
- VPD for flowering room: roughly 1.1–1.4 kPa for mid to late flower
I don’t chase a perfect number. I chase stability. If you swing from dry to wet every day, plants can slow down and you increase condensation risk inside the flower. When weed flowers get thick, they create their own microclimate. Your room can read 50% RH while the flower interior is much higher.
Practical things that helped me keep VPD for flowering room stable:
- Dehumidify during lights-off, not only lights-on
- Keep strong air movement above and below the canopy
- Avoid over-watering late flower, especially in dense soil mixes
- Remove leaves that block airflow but avoid stripping the plant bare
PPFD mapping for buds: why my light meter paid for itself
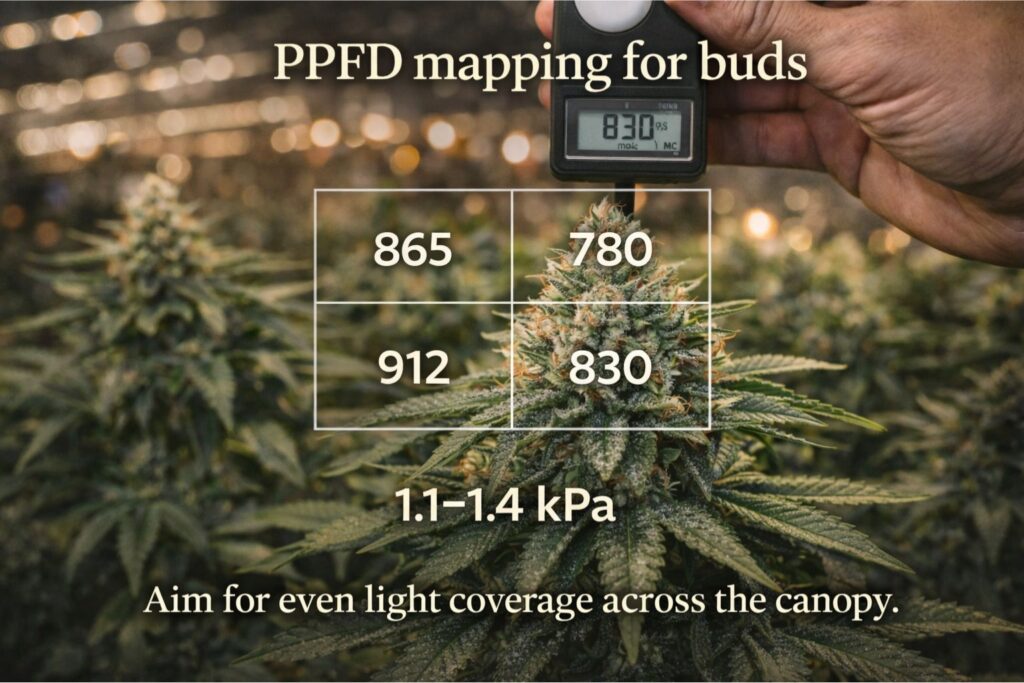
I used to hang a light, eyeball the canopy, and hope for the best. It worked, but not consistently. When I started using a meter and doing ppfd mapping for buds, my results became repeatable.
My indoor flowering PPFD approach:
- Early flower: 650–800 PPFD at the canopy
- Mid flower: 800–950 PPFD if the plant is healthy and CO2 is normal room air
- Late flower: I usually hold steady, because pushing higher can bleach tops or reduce terpene expression
I do ppfd mapping for buds in a simple grid. I measure the center and corners, then adjust light height and dimming to even things out. Uneven PPFD creates uneven maturation, and that’s how you end up harvesting a plant in pieces.
Signs my PPFD is too high:
- Top leaves lighten or bleach
- Sugar leaves claw or curl up
- Aroma flattens, especially on sensitive sativa-leaning cultivars
If you want consistent botanical and cannabis buds, treat light like a controllable input, not a guess.
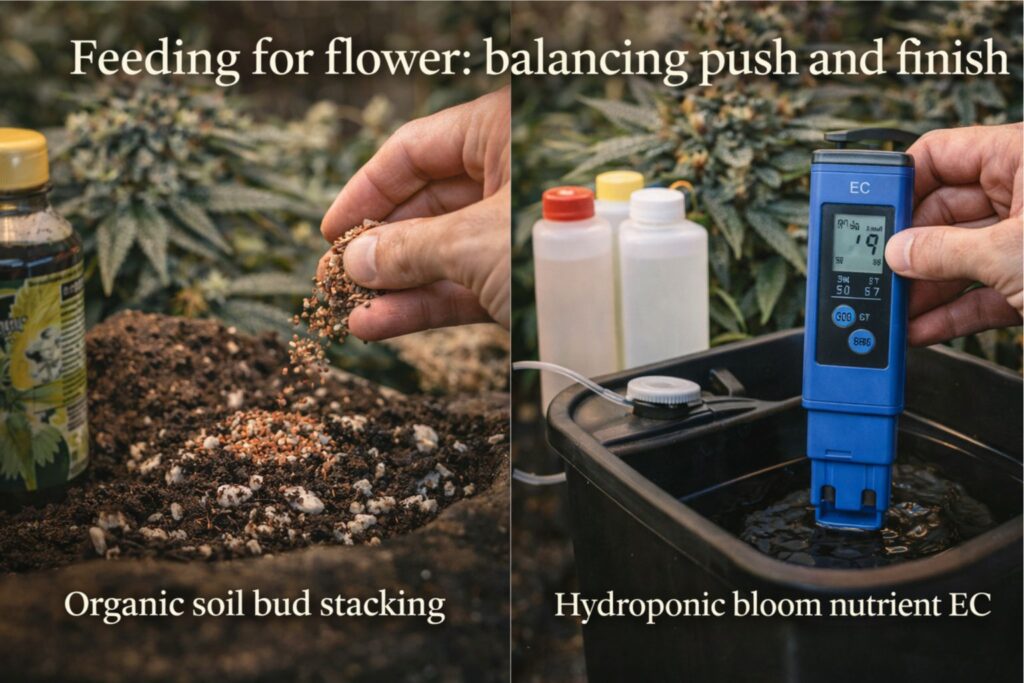
Feeding for flower: balancing push and finish
This is where I see growers get pulled into extremes. Some people underfeed because they fear harshness. Others overfeed and chase high EC until the plant burns. I try to stay in the middle and let the plant show me what it wants.
Organic soil bud stacking: what I do differently in living mixes
I’ve had great results with organic soil bud stacking, but it’s slower to correct when you’re off. My rule is to build the soil before the run and make small adjustments during flower.
My organic soil bud stacking routine:
- Start with a well-aerated mix (worm castings, compost, and plenty of perlite or pumice)
- Top-dress lightly at early flower, then again around Week 3 if the plant is hungry
- Use plain water often, and keep irrigation consistent to protect microbes
- Add silica early if you use it, because strong cell walls help with heavy flowers
When organic soil bud stacking goes wrong, it’s usually one of these:
- Overly wet soil that suffocates roots
- Too much nitrogen late flower (dark, shiny leaves and slower ripening)
- Lack of calcium and magnesium in soft water setups
Hydroponic bloom nutrient EC: my numbers for coco and recirculating
In coco or hydro I have more control, but mistakes hit faster. My hydroponic bloom nutrient ec targets are conservative, because I want clean flavor and fewer lockouts.
Typical hydroponic bloom nutrient ec ranges I use:
- Early flower: EC 1.6–1.9 (about 800–950 ppm on 500 scale)
- Mid flower: EC 1.9–2.2 (about 950–1100 ppm on 500 scale)
- Late flower: EC 1.6–1.9 as I taper and focus on ripening
I check pH daily in hydro and a few times per week in coco:
- Hydro: 5.6–6.0
- Coco: 5.8–6.2
If you’re trying hydroponic bloom nutrient ec for the first time, don’t stack too many bottles. A stable base nutrient plus a sensible calcium-magnesium supplement is usually enough. If you add boosters, add one at a time, and write it down so you can connect cause to effect.
Calyx to leaf ratio: a simple way I judge flower quality
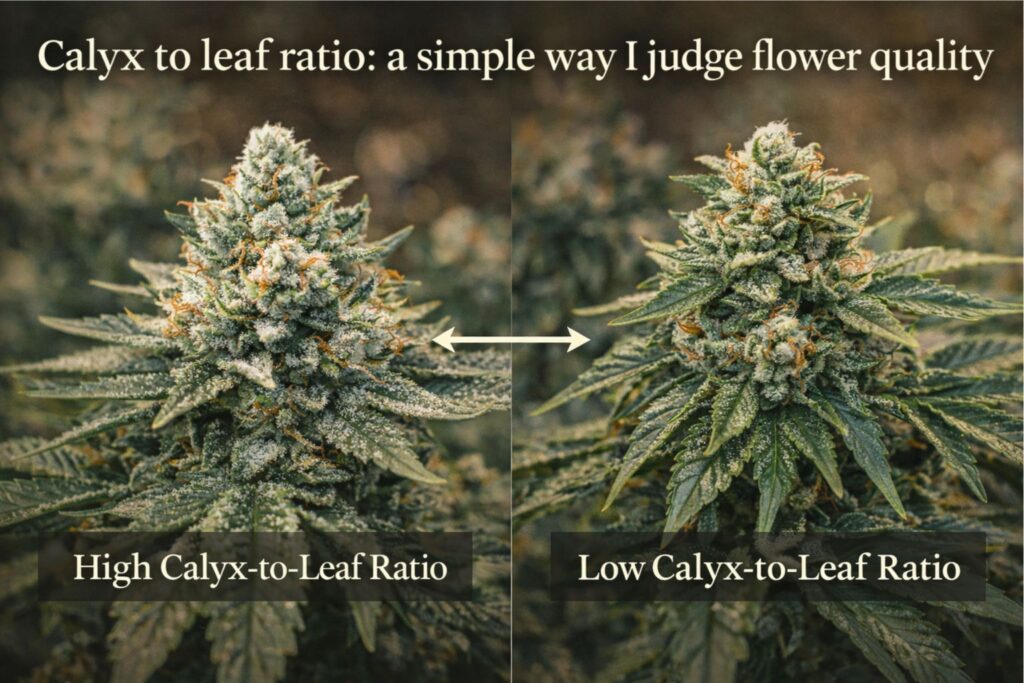
When I’m choosing which plants to keep, the calyx to leaf ratio matters a lot. A good calyx to leaf ratio means more flower mass and less leaf clutter. It also makes trimming easier and improves airflow.
Here’s how I use calyx to leaf ratio in practice:
- During mid flower, I look for plants that stack calyxes without throwing huge sugar leaves.
- Near harvest, I compare tops across phenotypes and note which ones “finish” cleanly.
- After drying, I weigh trimmed flower versus trim. A strong calyx to leaf ratio usually shows up in the jar.
Be careful, though: some genetics naturally produce more leaf, especially certain hybrids. That doesn’t automatically mean low quality. It just means you need to plan for more careful defoliation and a slower dry to prevent leaf-dominated harshness.
Low stress training in bloom: how I keep structure without stalling
Training is one of the most misunderstood parts of flower. You can absolutely ruin yield by going too hard at the wrong time. My approach to low stress training in bloom is gentle and early.
What low stress training in bloom looks like for me:
- I use soft plant ties to pull branches slightly outward during early stretch.
- I tuck leaves rather than ripping them off, especially in Week 1–2.
- I stop major bending once flowers begin to stack, because stems harden fast.
A simple low stress training in bloom checklist:
- Level the canopy during the stretch, not after it.
- Keep tops at a consistent distance from the light for even ripening.
- Don’t crush stems late flower unless you truly know why you’re doing it.
This training style supports compact tops without stressing the plant into foxtailing or delayed finish.
Pest scouting during flower: my habit that saves entire harvests
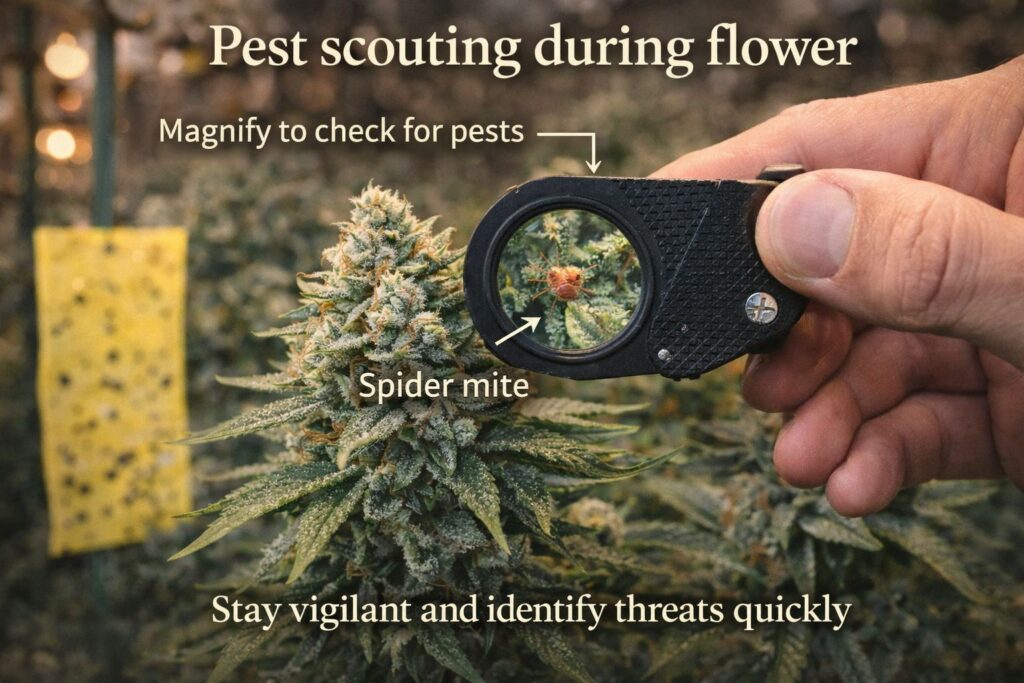
I don’t wait for a problem to become obvious. Pest scouting during flower is a routine, not a reaction. The earlier you catch issues, the fewer harsh sprays you’ll consider later.
My pest scouting during flower routine:
- Two times per week, I inspect the underside of leaves with a small flashlight.
- I check sticky traps near the soil line and canopy level.
- I look for webbing, leaf stippling, or tiny dark specks that suggest thrips or mites.
If I see something, I act with the least invasive option:
- Increase airflow and lower humidity slightly
- Remove heavily infested leaves and bag them immediately
- Use biological controls where available (predatory mites can work well if introduced early)
By late flower, I avoid anything that leaves residue on flowers. That’s why pest scouting during flower matters most in the first half of bloom, when you still have options.
Phenotype hunting for buds: how I choose keepers from a pack
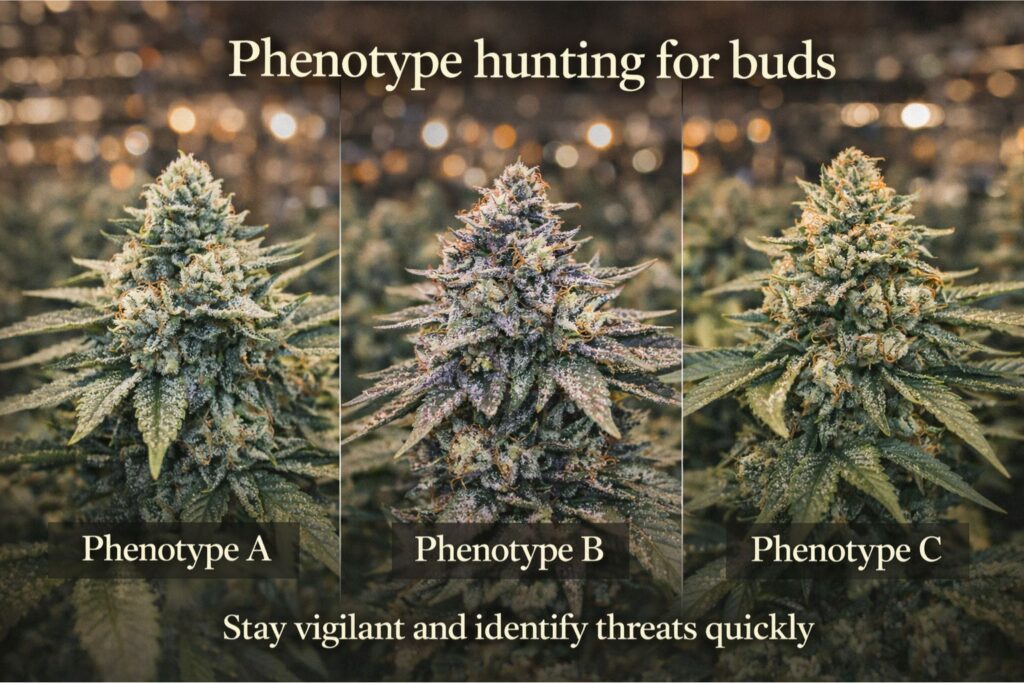
Buying seeds is easy; choosing a keeper is work. Phenotype hunting for buds is my way of turning a seed run into a long-term plan.
When I do phenotype hunting for buds, I track:
- Vigor in veg and how quickly roots establish after transplant
- Stretch and branch spacing (tight spacing helps flowers stack, but too tight can trap humidity)
- Aroma profile at mid flower and whether it holds through drying
- Calyx shape and final calyx to leaf ratio
- Finish time and how forgiving the plant is when conditions aren’t perfect
I also note whether the plant came from feminized seeds or regular seeds, and whether it’s an autoflower. Autoflowers can be fantastic for quick cycles, but they demand a stable start because you can’t extend veg to recover from early stress. Photoperiod plants give more control over size and training, which can help if you’re dialing in botanical and cannabis buds for the first time.
Harvest timing: what I look for beyond trichome color
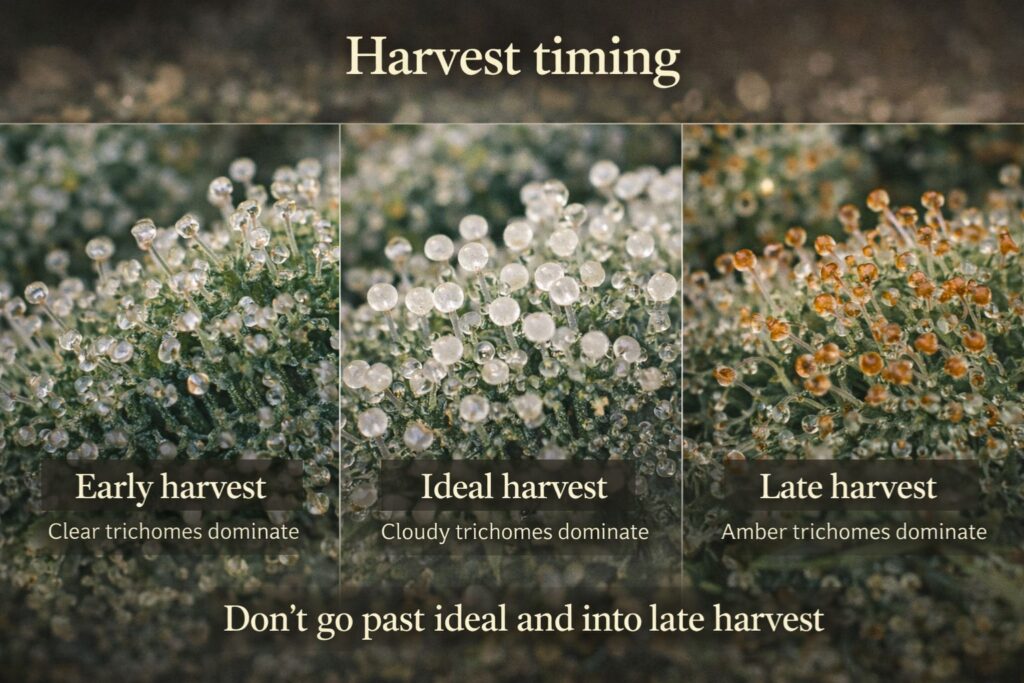
I use trichome appearance as a guide, but I don’t reduce harvest timing to a single shade. I also look at:
- Overall plant fade and how the leaves look under normal light
- Pistil change and whether new white pistils are still popping everywhere
- Flower firmness (a gentle squeeze tells you a lot)
- Aroma: sharp green smell often means the plant is still actively pushing
I harvest in a clean room and handle flowers gently. Rough handling can knock trichomes and bruise the crop, which shows up later as dull aroma.
Terpene preservation drying: my slow, steady approach
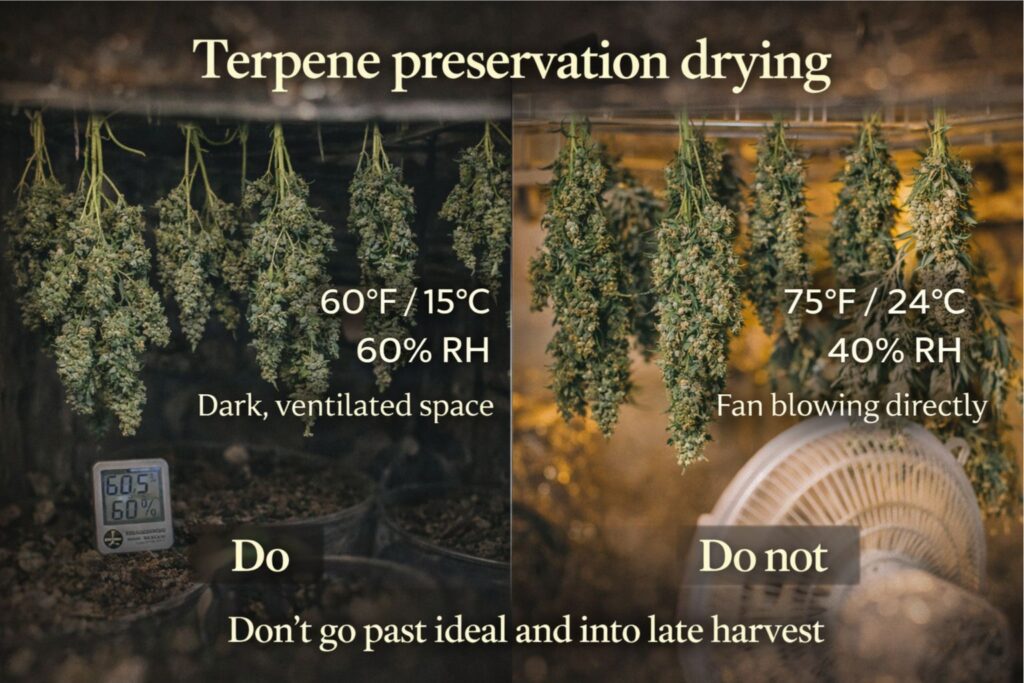
The fastest way to ruin great marijuana flowers is a bad dry. Terpene preservation drying is about controlling speed. Too fast and you lock in chlorophyll and harshness. Too slow and you risk mold.
My terpene preservation drying targets:
- 18–20°C and 55–60% RH
- Gentle air exchange, but never a fan blowing directly on hanging flowers
- 10–14 days to reach a “small stem snap” on medium branches
I keep a hygrometer in the drying space and in the curing jars. Terpene preservation drying continues into cure, so I don’t rush to jar everything at once. If the outside feels crisp but the inside is still wet, I give it another day.
Curing routine that supports terpene preservation drying:
- Jar at 58–62% RH
- Burp 1–2 times per day for the first week, then less often
- Keep jars in a cool, dark place
Seed shopping choices that affect flower quality
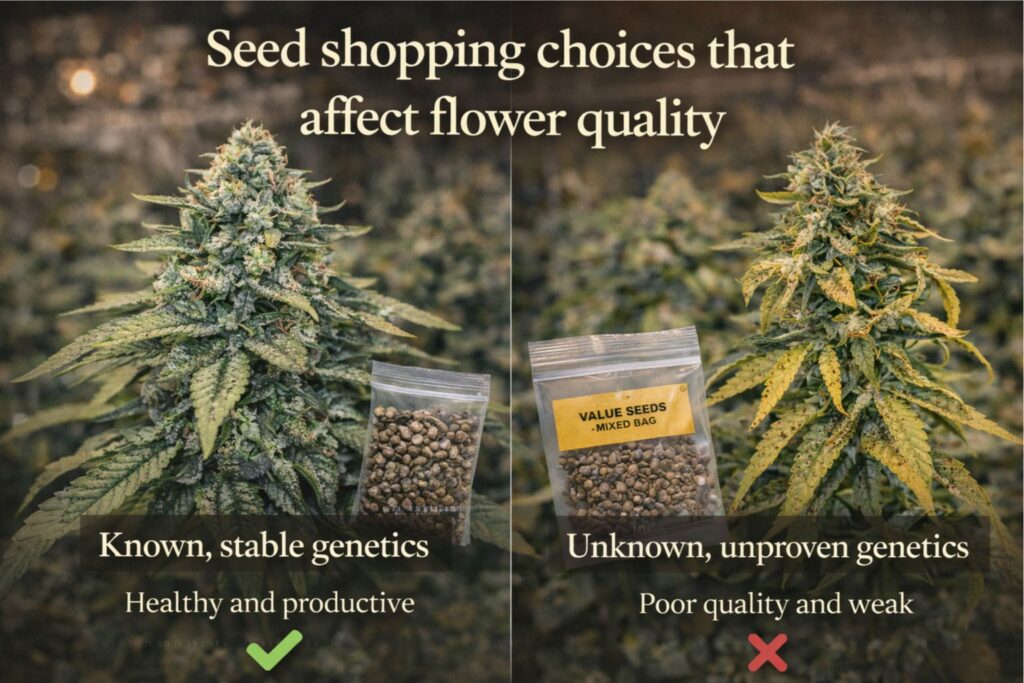
I get questions like “Which seeds should I buy?” all the time. The honest answer is: it depends on your goals, your space, and your patience.
Things I consider before I order:
- Feminized seeds for predictable flower production, especially if space is limited
- Autoflowers for speed and simplicity, especially in small tents
- Indica, sativa, or hybrid structure based on ceiling height and stretch
- Shipping reliability and discreet packaging, because delays can happen
- Storage: I store seeds cool, dry, and out of light
A quick germination method that’s worked for me:
- Soak seeds in plain water for 12–18 hours.
- Move to a damp paper towel or directly into a starter plug.
- Keep at 24–26°C with gentle moisture, not soaking wet.
- Once the taproot shows, plant carefully and avoid overwatering.
I also tell people to learn their regional grow laws before they start. Rules vary a lot, and it’s on you to stay informed.
FAQ: common questions I hear about buds, seeds, and flowering
What causes airy weed flowers even when the plant looks healthy?
In my experience it’s usually too little light at the canopy, unstable VPD for flowering room, or a plant that never built enough root mass early on. Start with ppfd mapping for buds and stable environment, then review feeding.
Can I do low stress training in bloom on an autoflower?
Yes, but keep it minimal and early. Autoflowers don’t pause to recover. I treat low stress training in bloom for autos as leaf tucking and gentle spreading during the first signs of stretch.
Should I grow in soil or hydro for compact marijuana flowers?
Both can work. Organic soil bud stacking can produce excellent flavor and forgiving growth, while hydroponic bloom nutrient ec control can drive fast, clean development if your monitoring is consistent.
How do I avoid mold in late flower?
I reduce humidity, increase airflow, and keep the canopy open. Pest scouting during flower also helps because damaged tissue can invite problems. Thick flowers need space and steady dry air, especially at night.
What’s the biggest sign a phenotype is worth keeping?
For me it’s repeatability: strong structure, stable aroma, and a good calyx to leaf ratio across the plant. Phenotype hunting for buds is about choosing the plant that performs well even when conditions aren’t perfect.
Closing thoughts from my grow room
If you’re chasing better flowers, focus on the basics that build botanical and cannabis buds steadily: write your bud set timeline indoors, maintain VPD for flowering room targets, do ppfd mapping for buds, and keep feeding simple and measurable. I’ve learned that great cannabis, marijuana, and weed flowers come from consistency more than intensity. Each run teaches you something, but the best lessons show up when you control the inputs and keep honest notes.