Table of Contents
I wrote this Amethyst Strain Review from grow notes, not theory. I’ve run Amethyst indoors under LED in a 4×4 tent and once in a small greenhouse. Results were consistent in the “shape” of the experience, but the details (color, density, and intensity of the smell) changed with phenotype and environment.
If you’re shopping for cannabis, marijuana, or weed seeds and want a plain-English overview, this Amethyst Strain Review covers what I noticed: genetics behavior, the jar nose, how it smoked, and the targets I used to get a clean finish.
Quick snapshot
- Plant type in my room: hybrid with sturdy branching and a moderate stretch
- Biggest grow lever: humidity and temperature balance for cannabis
- Biggest quality lever: slow drying and a patient cure
- Best training approach: simple tie-downs plus stretch control during the flip
- Best medium for speed: coco, if you can stay consistent with your coco drip schedule for cannabis
Genetics and phenotype behavior
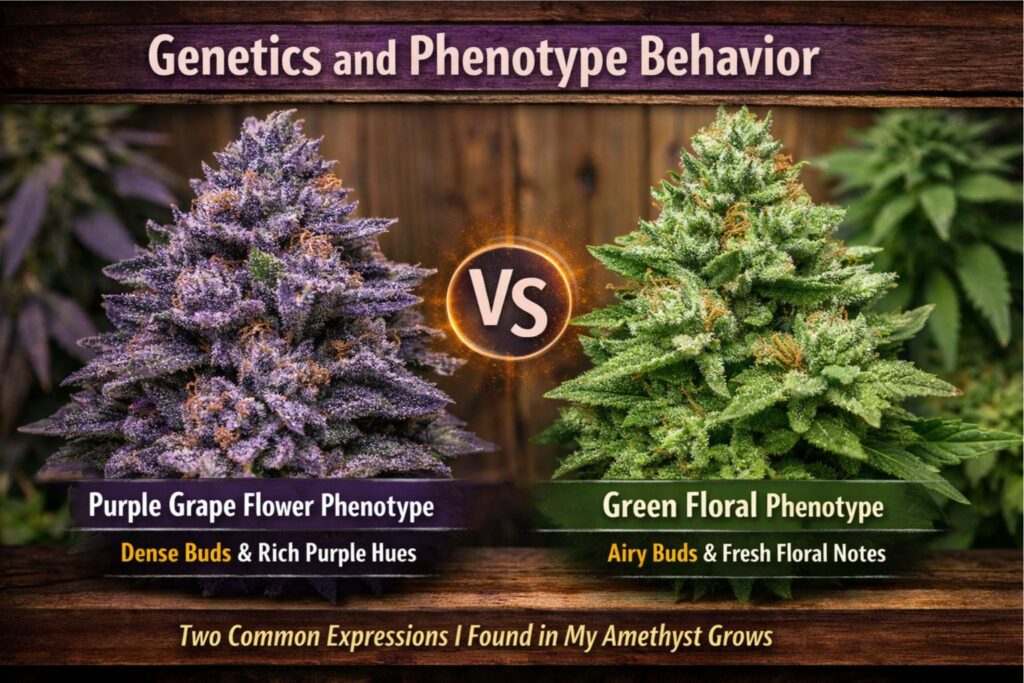
Across multiple plants, I saw two main expressions:
- A color-forward phenotype with tighter buds and a stronger purple grape flower aroma.
- A greener phenotype with slightly airier flowers and a cleaner, more floral edge.
That variation is normal when you pop seeds. Genetics set the range; phenotype selection is how you lock in the version you actually like. Treat every Amethyst Strain Review as a report, not a promise.
Aroma, flavor, and what I call the Amethyst profile
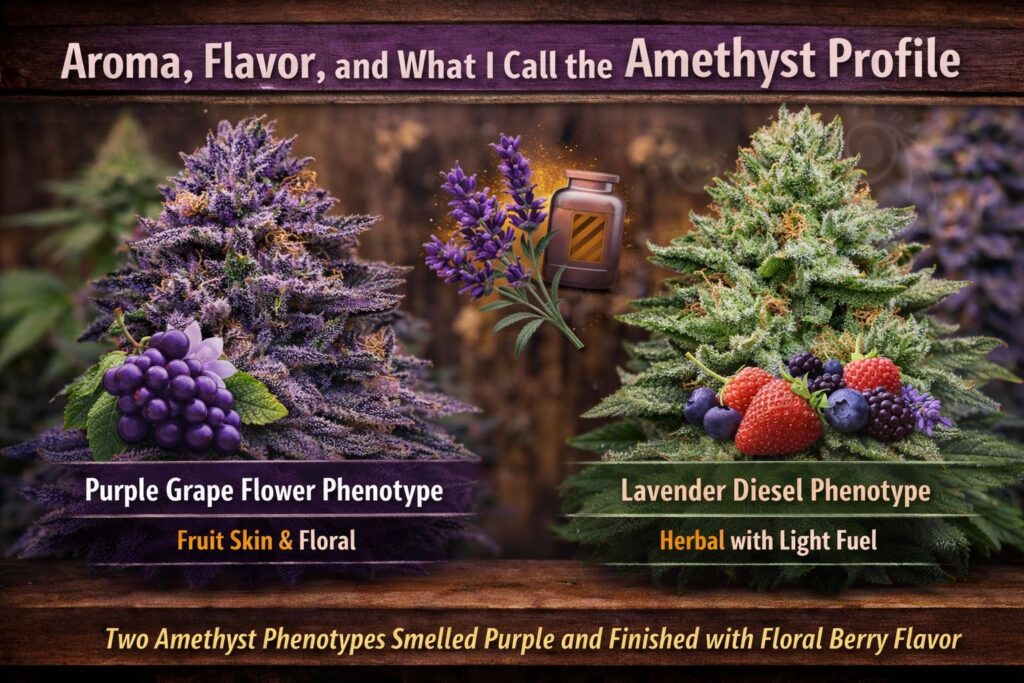
Amethyst strain terpene notes
My amethyst strain terpene notes landed in the same family each time, even when color shifted. Mid flower, I smelled fruit skin and soft florals. Late flower, the room leaned heavier and sweeter. After drying, the nose got tighter and more defined.
On my best jar, the first hit was purple grape flower aroma. Not candy, more like grape skin and purple fruit with a light floral top. When I say purple grape flower aroma, I’m describing that “purple fruit + flower” blend that shows up when the dry is slow and the room stays stable.
Flavor and finish
On a clean cure, the flavor followed the smell: fruit and floral on the inhale, then a lavender berry aftertaste on the exhale. The lavender berry aftertaste was the part that improved most with time. At two weeks, it was there but faint. At four weeks, the lavender berry aftertaste was clearer and the smoke was smoother.
If you’re writing a description, the honest combo from my jars was purple grape flower aroma plus a lingering lavender berry aftertaste, with the full character showing up after a proper cure.
Effects (personal experience, not medical advice)
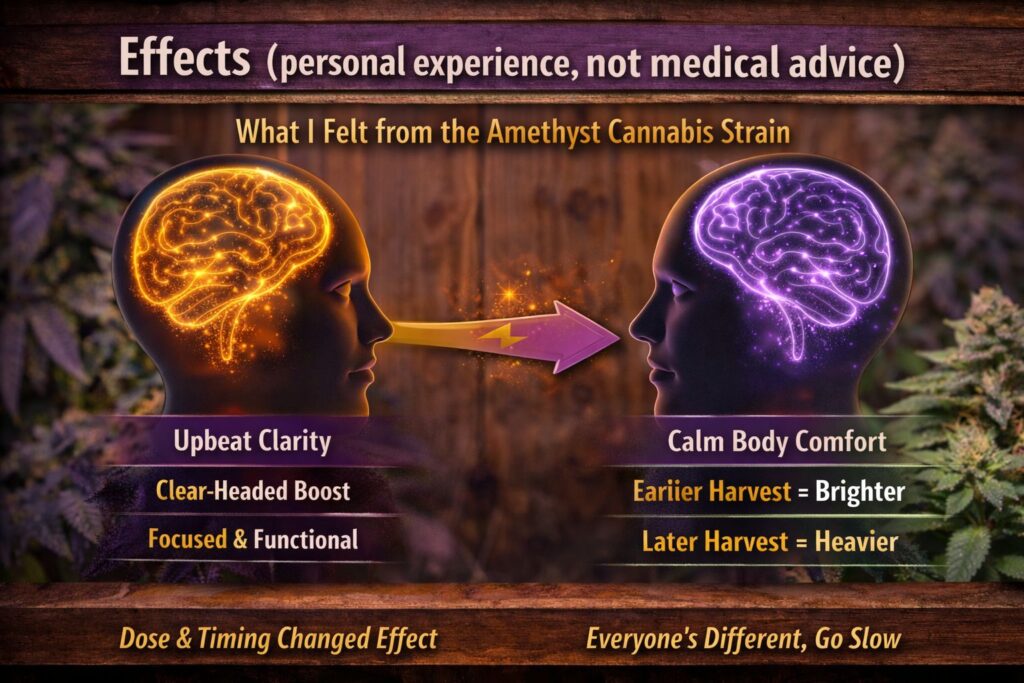
This Amethyst Strain Review reflects my experience only. Cannabis affects everyone differently, and dose changes everything.
At low to medium dose, I got an upbeat, clear-headed lift that stayed functional. After about an hour, it eased into calm body comfort. At higher dose, it leaned more evening-friendly.
What changed the “feel” most in my runs:
- Harvest timing: earlier harvest felt brighter; later harvest felt heavier
- Sleep and hydration: tired days made it feel stronger
- Finish quality: better amethyst strain terpene notes usually matched smoother, less edgy smoke
Grow info: what worked for me
I’m keeping this section practical, because the goal is repeatable home results, not lab perfection.
My baseline equipment and schedule
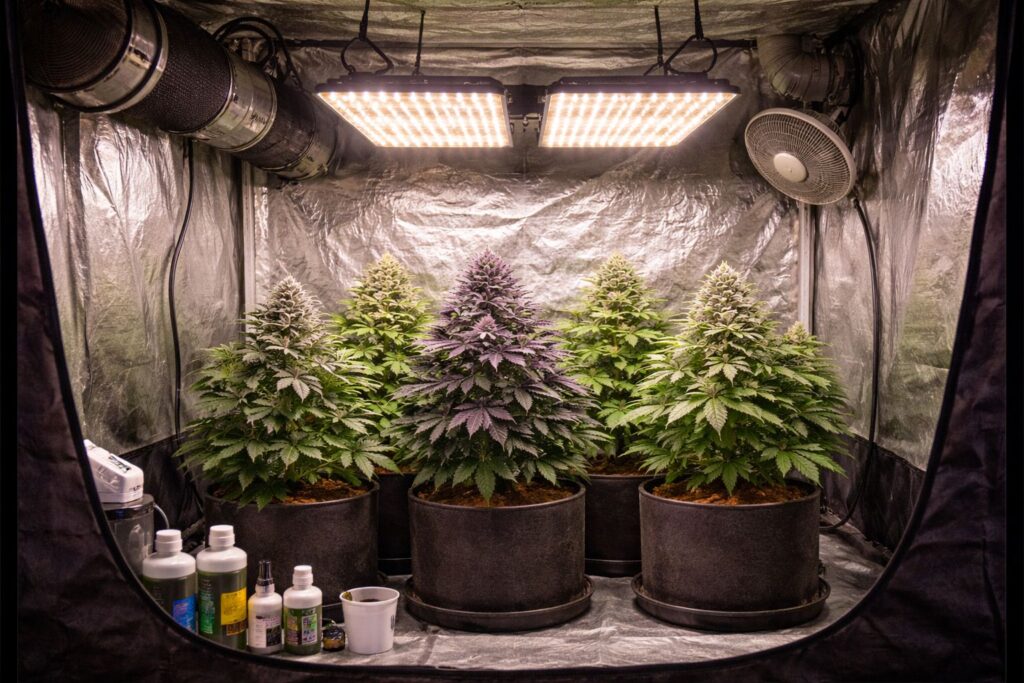
To make the numbers above more usable, here’s what I actually ran indoors.
- Tent: 4×4 with strong exhaust and constant air movement
- Pots: 3–5 gallon containers in coco, with saucers to catch runoff
- Light schedule: 18/6 in veg, then 12/12 for flower
- Canopy distance: I adjust height to stay in my flowering light intensity PPFD range without hot spots
- Water pH target: 5.8–6.2 in coco, measured after mixing nutrients
- Dry room: a separate space where I can hold humidity and temperature balance for cannabis steady
I keep notes on how the plant drinks day to day. If the pot stays heavy, I don’t force more water. If it dries too fast, I add a small irrigation rather than raising EC. That supports my coco drip schedule for cannabis consistently.
Light targets: flowering light intensity PPFD range
I ramp intensity slowly. Big jumps in light are one of the fastest ways to get stressed tops and confusing leaf symptoms.
My flowering light intensity PPFD range for an indoor tent without added CO2:
- Seedlings: 150–250 PPFD
- Veg: 300–550 PPFD
- Early flower: 600–750 PPFD
- Mid flower: 750–900 PPFD
- Late flower: 650–850 PPFD if tops look stressed
That flowering light intensity PPFD range is a band I adjust by plant response. If leaves taco, tips bleach, or buds foxtail, I reduce intensity and check canopy temperature. Staying inside a reasonable flowering light intensity PPFD range kept this cultivar predictable.
Climate: humidity and temperature balance for cannabis
The best improvement I made was dialing humidity and temperature balance for cannabis, especially late flower.
The bands I aim for:
- Veg: 24–28°C with 55–70% RH
- Early flower: 24–27°C with 50–60% RH
- Mid/late flower: 22–26°C with 45–55% RH
When humidity and temperature balance for cannabis stayed steady, I saw fewer issues and stronger jar smell. When the room got hot and dry, the amethyst strain terpene notes flattened and the burn got harsher. For me, humidity and temperature balance for cannabis mattered more than any “secret” nutrient.
Feeding in coco: coco drip schedule for cannabis
I’ve grown this in soil and coco. Soil is more forgiving. Coco is faster, but only if you can stay consistent.
My coco drip schedule for cannabis:
- Water daily once roots fill the pot.
- In peak flower, water 1–3 times per day depending on pot size and room conditions.
- Aim for light runoff so salts don’t creep up.
Typical EC targets I used (adjust to your water and nutrient line):
- Veg: 1.2–1.6 EC
- Early flower: 1.6–2.0 EC
- Mid flower: 1.7–2.2 EC if the plant stays green and hungry
- Late flower: 1.4–1.8 EC for a cleaner finish
A stable coco drip schedule for cannabis prevents the “random deficiency” look that is usually just uneven feeding. If you follow a consistent coco drip schedule for cannabis, the plant stays easier to read.
Training and canopy management
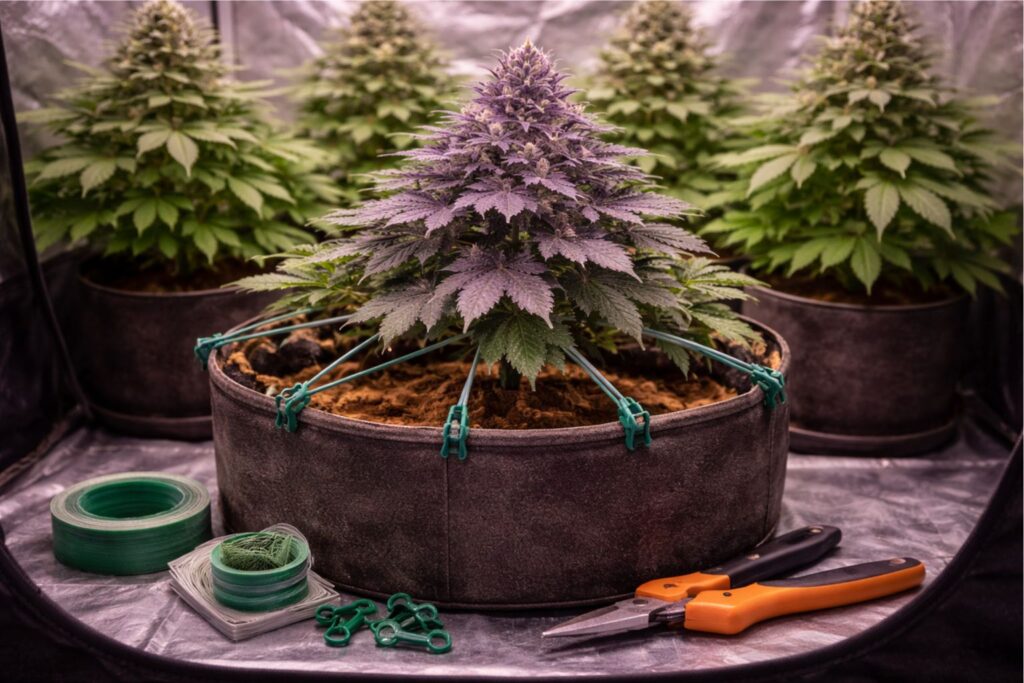
This cultivar rewards simple structure work. My goal is an even canopy so the flowering light intensity PPFD range is similar across tops.
My routine:
- Top once above the 4th–6th node (only if the plant is healthy).
- Spread branches early with gentle tie-downs.
- Clean the bottom third before flower to reduce larf and improve airflow.
- Remove a small amount of leaf around week 3 of flower to open bud sites.
Stretch control during the flip is the main timing point. I keep ties in place while the stretch accelerates, then stop messing with it once bud set is obvious. Stretch control during the flip works best when you start shaping before the flip, not after.
Common issues I’ve seen and how I handled them
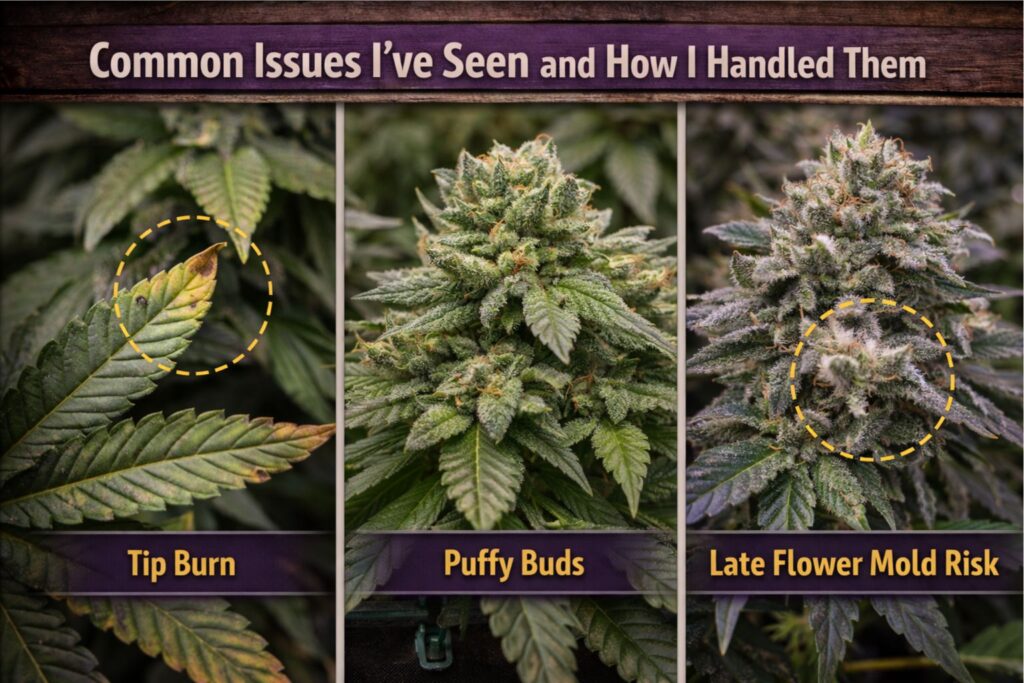
- Tip burn in coco: I reduced EC slightly and increased irrigation frequency. I kept the coco drip schedule for cannabis steady instead of doing a harsh flush.
- Puffy buds and weak smell: I checked climate first. Fixing humidity and temperature balance for cannabis brought the smell back.
- Late flower mold risk: I improved airflow and avoided letting RH sit high at night. Dense tops plus wet nights is the danger zone.
Harvest timing
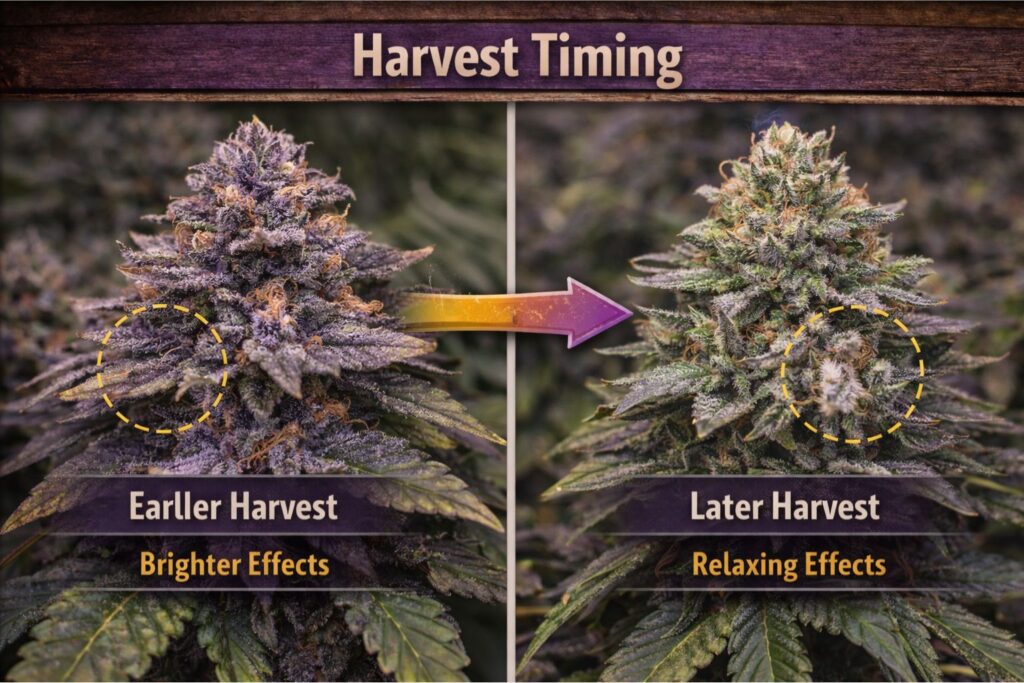
I use trichomes as a guide, but I also watch bud swell and smell. If the room is humid and the buds are dense, I don’t gamble on pushing extra days.
For my preference:
- Earlier harvest gave a brighter, more functional effect.
- Later harvest leaned heavier and more relaxing.
Drying and curing for flavor
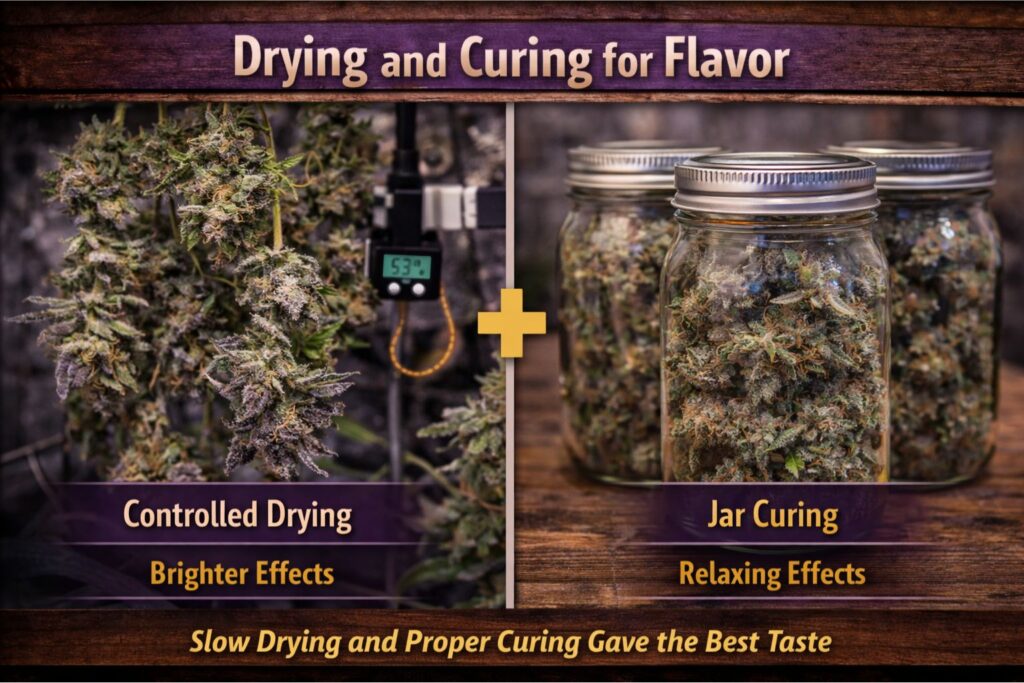
Slow dry method for weed buds
The slow dry method for weed buds is where this cultivar earned its reputation in my jars. When I dried too fast, the purple grape flower aroma faded and the lavender berry aftertaste got muted.
My slow dry method for weed buds targets:
- 18–21°C if possible
- 55–62% RH
- Gentle airflow, never blasting buds
- Often 10–14 days, depending on bud size and room conditions
If you want the best expression of the amethyst strain terpene notes, the slow dry method for weed buds is worth the patience. I’ll say it again: slow dry method for weed buds first, fancy additives later.
Sealed jar burping routine
Once small stems snap and buds feel dry on the outside, I jar them and follow a sealed jar burping routine.
My sealed jar burping routine:
- Days 1–7: open jars once daily for 5–15 minutes
- Days 8–21: open every 2–3 days
- Weeks 4–6: open once a week or only when checking
If jars smell sharp or like ammonia, buds are too wet. Pull them out and dry longer. A sealed jar burping routine should keep moisture stable, not swingy. When my sealed jar burping routine was consistent, the lavender berry aftertaste cleaned up and the smoke smoothed out.
One last detail: I keep buds out of direct light during drying and curing, and I avoid strong odors nearby, because flowers absorb smells.
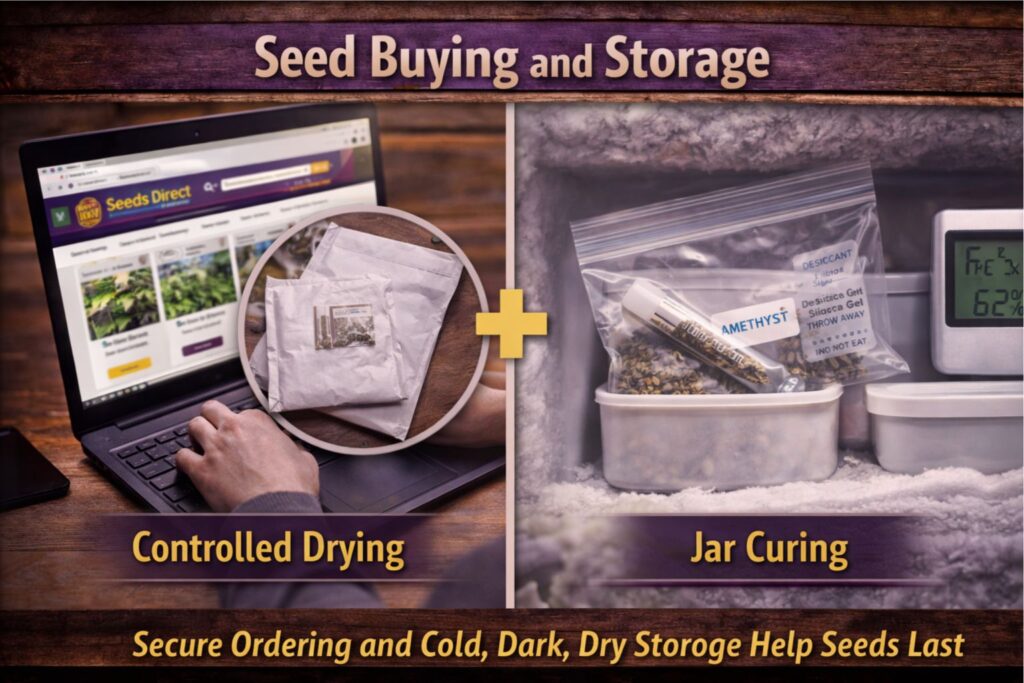
Seed buying and storage
If you plan to buy seeds, pick genetics that match your space and climate. For feminized seeds, confirm the source is reputable. For autoflowering lines, remember early stress can permanently reduce size.
Seed viability storage method
My seed viability storage method is boring, and that’s why it works:
- Seeds in original packaging inside an airtight container
- A small desiccant pack
- Cool, dark storage with minimal temperature swings
- Labels with date and cultivar
The seed viability storage method matters because moisture and heat reduce germination rates over time. Keep the seed viability storage method stable, and avoid moving seeds between warm rooms and cold storage where condensation can form. Consistent seed viability storage method beats fancy gear.
FAQ
What’s the simplest way to protect the smell?
Control climate first. Strong humidity and temperature balance for cannabis is what kept my amethyst strain terpene notes loud and my purple grape flower aroma intact.
What flowering light intensity PPFD range should I aim for?
For most home tents, a flowering light intensity PPFD range of 600–900 through mid flower is a solid start, with small adjustments based on leaf posture and canopy temperature.
Does coco make it harder?
Coco isn’t harder, it’s less forgiving. Follow a steady coco drip schedule for cannabis and avoid big EC swings. A consistent coco drip schedule for cannabis is the difference between “easy mode” and constant troubleshooting.
How do I manage stretch?
Plan stretch control during the flip with early tie-downs and an even canopy. Stretch control during the flip is mostly done before buds set.
How long should I cure?
At least 3–4 weeks is where the lavender berry aftertaste becomes clear. Use a sealed jar burping routine and don’t rush it.
Any final drying advice?
If you want flavor, commit to the slow dry method for weed buds. That slow dry method for weed buds preserved my purple grape flower aroma and improved the lavender berry aftertaste.
Final thoughts
This Amethyst Strain Review comes down to fundamentals. Keep a sensible flowering light intensity PPFD range, commit to humidity and temperature balance for cannabis, and stay consistent with your coco drip schedule for cannabis if you run coco. If you do those things and finish with a slow dry method for weed buds plus a steady sealed jar burping routine, you’re giving the cultivar the best chance to show its amethyst strain terpene notes, purple grape flower aroma, and that clean lavender berry aftertaste.
For a complete directory of cultivars, visit our Cannabis Strain Reviews.