Table of Contents
Introduction
This Alice In Wonderland Strain Review is written the way I keep notes for myself: what I observed in the tent, what targets worked, what didn’t, and what I’d change if I ran it again. I’m not here to sell you a fantasy. Every cannabis plant has trade-offs, and even the same name can show different expressions depending on the seed source, environment, and how hard you push the grow.
If you’re shopping for marijuana genetics online or planning a weed run with limited space, the details that matter are usually practical. How much does it stretch? Does it stack tight? How touchy is it with feed strength? Does it keep aroma through dry and cure? I’ll cover all of that, in plain English, with numbers where they’re helpful.
You’ll also see me repeat a few grow terms on purpose, because they’re the levers I actually use: canopy light levels, air-to-leaf balance, and finishing correctly after harvest.
Genetics and what I think the plant “wants”

Alice in Wonderland is commonly described as sativa-leaning. In my garden, it behaved like a sativa-leaning hybrid: noticeable stretch after the flip, longer branch structure, and a preference for good airflow. That said, I’ve seen “Alice” cuts and seed runs that finish denser and calmer, so I treat the name as a starting point, not a guarantee.
Here’s how I approach genetics with any cannabis seed purchase:
- Expect variation in seed-grown plants. Two seeds from the same pack can finish differently.
- The same plant can express different aroma and bud structure under different temperatures and light intensity.
- If you want repeatability, plan to keep a mother or take clones once you find the keeper phenotype (where legal).
If you’re deciding whether this is right for you, assume a lively, uplifting lean, and plan your training early so the structure stays manageable.
My Alice In Wonderland grow diary: what I noticed week to week
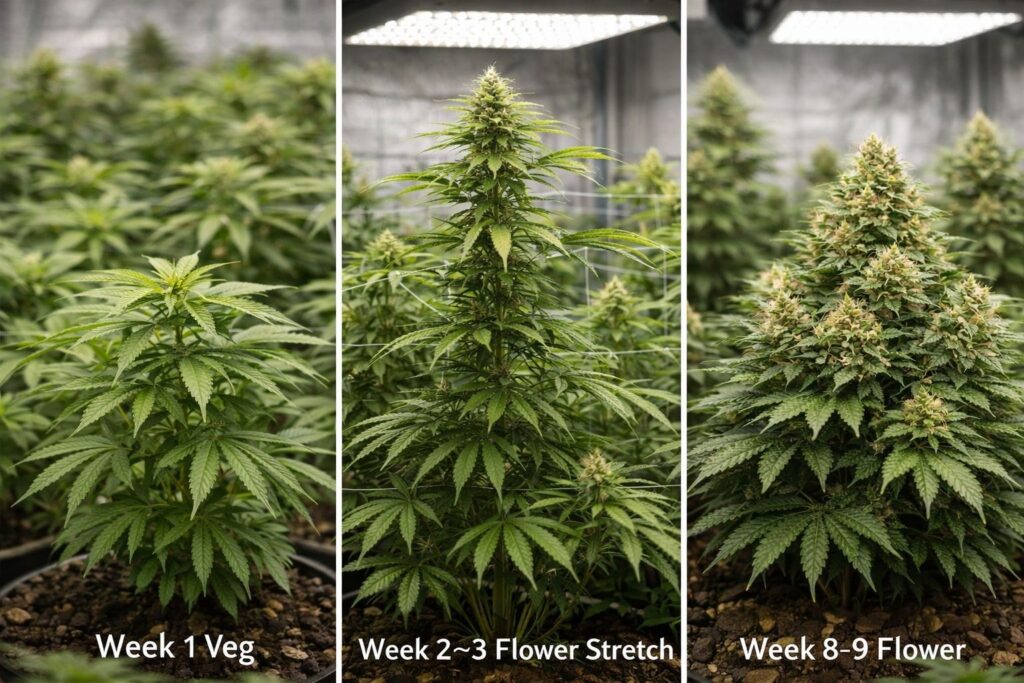
I’m including this Alice In Wonderland grow diary because most strain writeups skip the messy reality. I want you to know what it looked like as a living plant, not just a final jar photo.
In veg, the plants built lateral branching quickly once they had a healthy root zone. Internodes weren’t tiny, so I didn’t let them “free grow” tall. When I shaped the canopy early, they rewarded me with even tops.
After the flip to flower, the stretch was real. The main lesson from my Alice In Wonderland grow diary is simple: if you wait until week 2 of flower to train, you’re already behind. I’ll share the specific training I used in the grow section.
In late flower, resin coverage was good on calyxes and sugar leaf, and aroma improved when I kept the plant steady rather than chasing last-minute changes.
Appearance: buds, leaves, and trimming reality
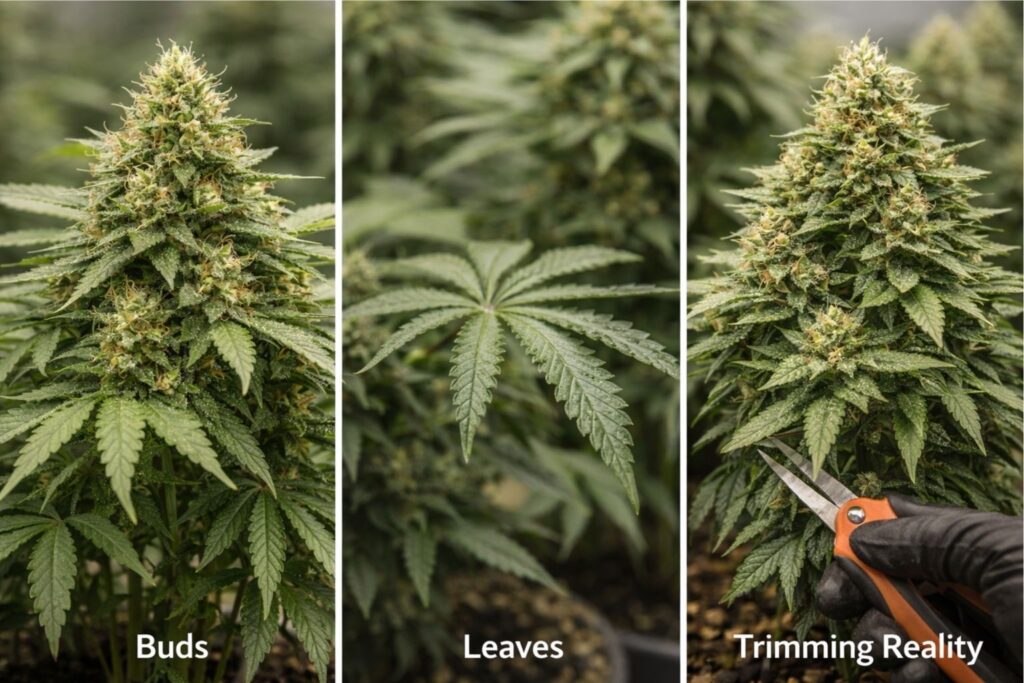
Buds showed a bright green base with orange pistils as they matured. Trichome coverage looked strong when the plant was not overfed. I saw two trim experiences depending on phenotype:
- One plant had a cleaner leaf-to-bud ratio and trimmed fast.
- Another had tighter sugar leaf growth and took longer to manicure.
If you’re growing for personal stash, that’s not a deal-breaker. If you’re trying to process a lot of plants, phenotype selection matters.
Aroma and flavor: what carried through after cure
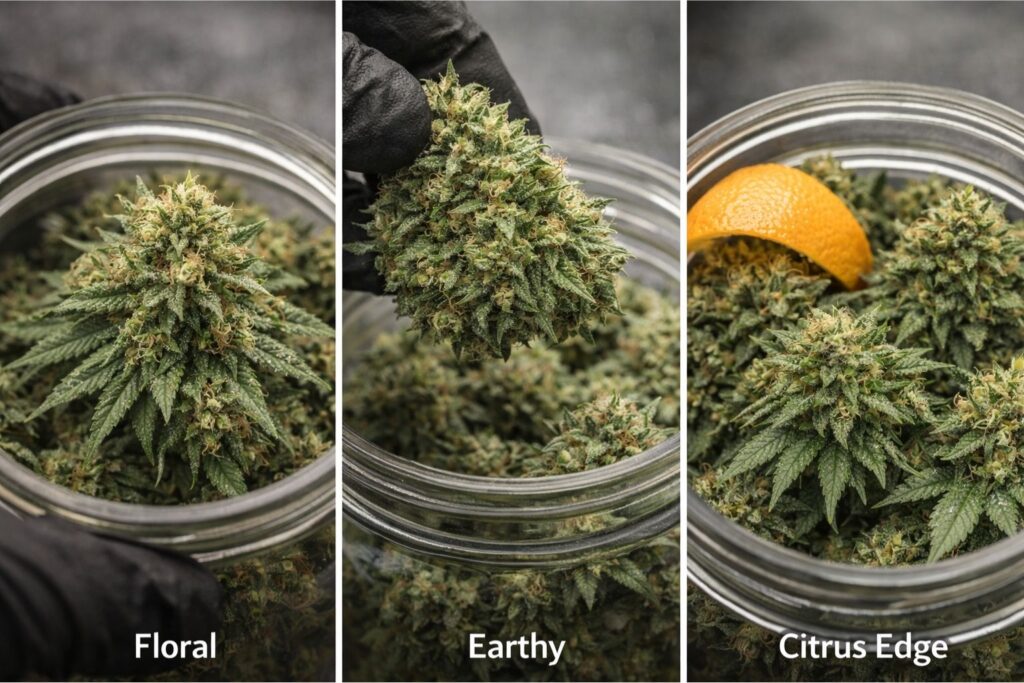
When grown and finished properly, the aroma leaned floral with an earthy base, then a brighter edge that reminded me of citrus peel. In the smoke and vapor, the flavor stayed cleaner when I avoided heavy late-flower feeding and when I gave it a slow, controlled dry.
If I dried too warm or too fast, the top notes disappeared quickly and the jar smelled flatter. That’s why I’m going to spend real space on finishing. The grow is only half the job; the post-harvest work decides whether the flavor stays.
Effects: what I experienced and the trade-offs
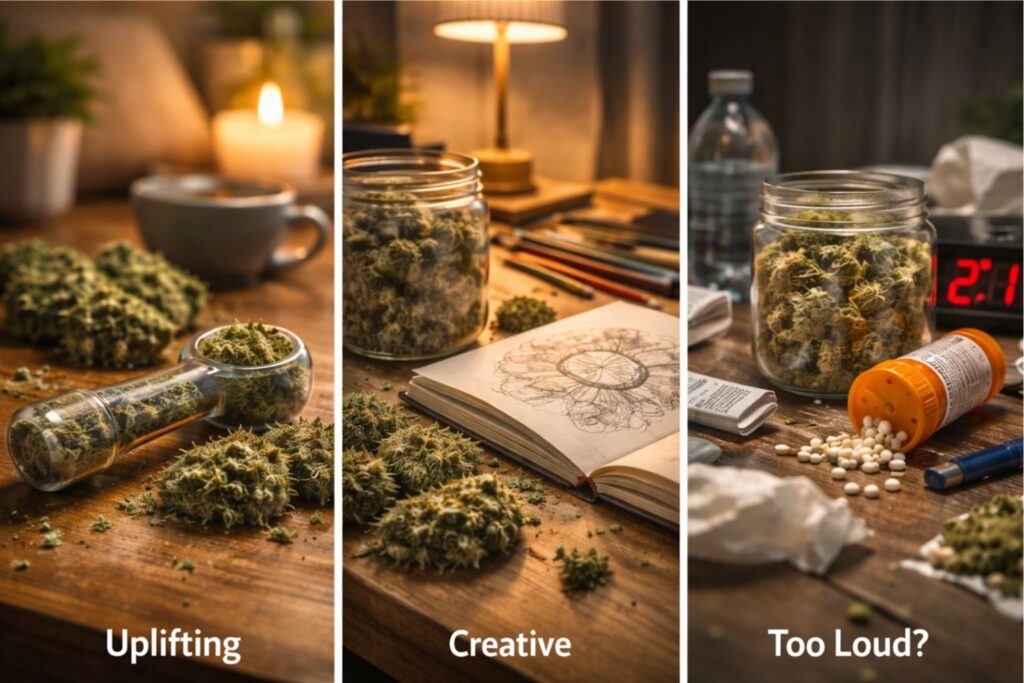
In this Alice In Wonderland Strain Review, I’m keeping effects honest. Effects vary by person, dose, tolerance, and phenotype.
For me, the first phase was mentally uplifting and social. I could stay engaged in a conversation or do a creative task. Later, it settled into a calmer, more grounded feeling. The main trade-off: if I used too much, especially early in the day, it could feel “too loud” mentally. That’s common with more energetic cultivars.
This is not medical advice. I’m not making health claims. If you’re sensitive to stimulating weed, start low and pay attention to your own response.
Alice In Wonderland seedling to harvest timeline: realistic expectations
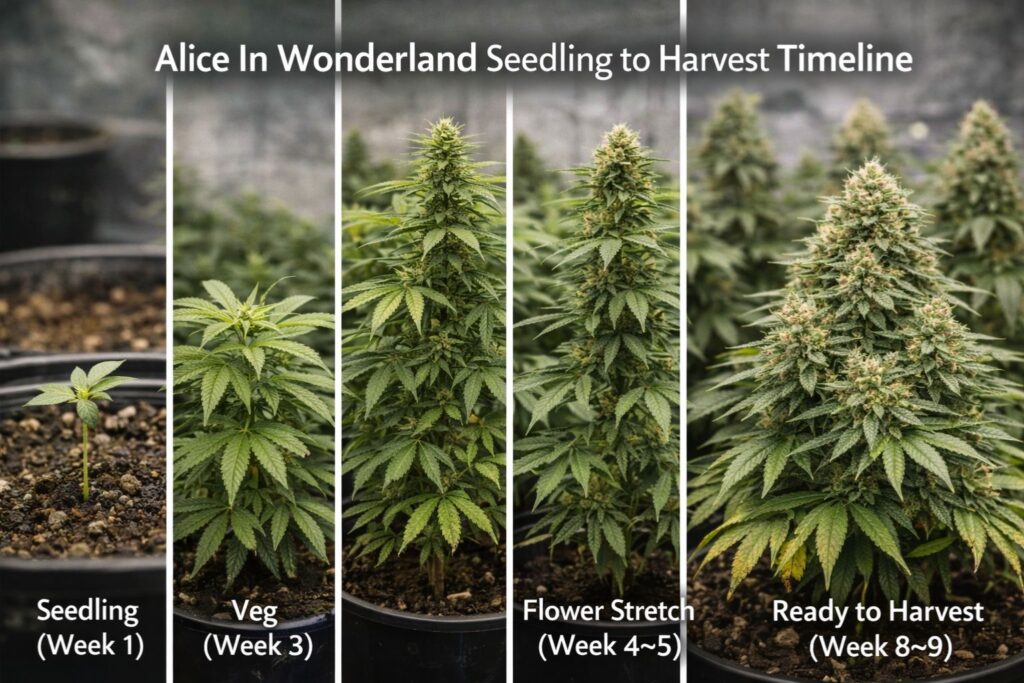
People ask about timing constantly, so here’s the practical version. This Alice In Wonderland seedling to harvest timeline is based on what I ran indoors, plus what I usually see from similar sativa-leaning hybrids.
General timeline notes:
- Seedling phase: about 10–14 days (until the plant is established and roots are moving)
- Vegetative phase: commonly 3–6 weeks depending on your space, training, and desired plant size
- Flowering phase: often 9–11 weeks for many sativa-leaning hybrids, but watch the plant, not the calendar
- Dry + cure: minimum 2 weeks to get smokeable; 4–6 weeks to get the best flavor, sometimes longer
I’m repeating it because it matters: the Alice In Wonderland seedling to harvest timeline is not just about harvest day. The cure is where the final quality shows up.
If your goal is a faster run, you can shorten veg with smaller containers and tighter training, but don’t rush the finish.
Grow info: the targets I use indoors (and why)
I’ll break this into the pieces that actually move the needle: environment, light, feed, and training.
Environment targets: temperature, humidity, and airflow
I aim for stable bands rather than perfect numbers.
Typical indoor ranges I use:
- Veg: 24–28°C lights on, RH 60–70% if airflow is strong
- Early flower: 23–27°C lights on, RH 50–60%
- Late flower: 22–26°C lights on, RH 45–55% (lower if buds stack dense)
The reason is simple: stable leaf health and steady transpiration. If you’re guessing, start by dialing airflow and humidity first.
I often reference vpd targets for indoor weed tent conditions, but I don’t chase the graph all day. The big idea behind vpd targets for indoor weed tent growing is balance: if the room is hot and too dry, plants can drink weird and show stress. If it’s cool and too humid, you invite mold and slow growth.
If you’re new, do this:
- Keep fans moving air across the canopy
- Exhaust stale air consistently
- Avoid big swings between day and night
I’ll mention vpd targets for indoor weed tent setups again later in the troubleshooting section, because it’s also tied to nutrient problems.
Light: intensity, schedule, and avoiding stress
I use 18/6 in veg and 12/12 in flower for photoperiod cannabis. The biggest mistake I see is cranking intensity too fast after the flip.
Instead, I ramp up and verify with the plant’s response. The skill that helped me most is light intensity mapping for cannabis canopy. That means checking multiple spots, not just the center top, because corners and lower tops often get far less light than you think.
If you’re using LED, a practical approach:
- Start moderate and increase weekly
- Watch leaf posture and color
- Avoid bleaching and canoeing at the top
If you don’t have a meter, you can still do light intensity mapping for cannabis canopy by observing consistent signs: tops too close to the light show paling, crispy edges, and stressed posture before lower areas do. A meter just makes it faster.
I keep repeating light intensity mapping for cannabis canopy because it’s the difference between “okay buds” and “even buds.”
Feeding: soil vs coco and keeping the plant clean
I’ve run this type of cultivar in both soil-style mixes and coco-based blends. The biggest differences are speed and margin for error:
- Soil mixes can buffer mistakes but can also slow you down if the root zone stays too wet.
- Coco can grow fast but demands consistent watering and careful strength control.
That’s where coco coir runoff ec in bloom becomes useful. In coco, I track what I feed and what comes out. If runoff climbs steadily, salts are building. If runoff drops too low, the plant may be underfed or watering inconsistently.
A practical starting range in mid flower (general, not a promise):
- pH: commonly around 5.8–6.2 in coco; slightly higher in many soil-style grows
- EC: increase gradually based on plant demand and cultivar tolerance
The key is trend, not a single reading. I’ve saved multiple runs by watching coco coir runoff ec in bloom and correcting early instead of waiting until leaves look damaged.
If you don’t run coco, the concept still applies: don’t keep stacking strength “just in case.” Clean, steady feeding usually preserves flavor better.
I’ll say it one more time for the people who like to push hard: coco coir runoff ec in bloom is a warning system. Use it.
Training: keeping a stretchy plant under control
For Alice in Wonderland type growth, training isn’t optional if you want an even canopy indoors.
What worked best for me:
- Early topping once the plant is healthy (don’t top weak seedlings)
- Gentle branch bending to widen the plant
- Strategic defoliation to improve airflow and light penetration
If the plant is stretchier than expected, trellis netting for stretchy cultivars can be a lifesaver. I use a trellis to keep tops spaced and prevent one branch from racing above the canopy.
Simple trellis tips:
- Install before the stretch gets wild
- Spread branches outward, not just downward
- Keep airflow in mind; a dense net with poor ventilation can trap humidity
I’ve used trellis netting for stretchy cultivars on multiple sativa-leaning runs, and it consistently improves canopy uniformity. If you’ve struggled with tall plants, trellis netting for stretchy cultivars is one of the most practical tools you can add.
Troubleshooting: what I watch for and how I respond
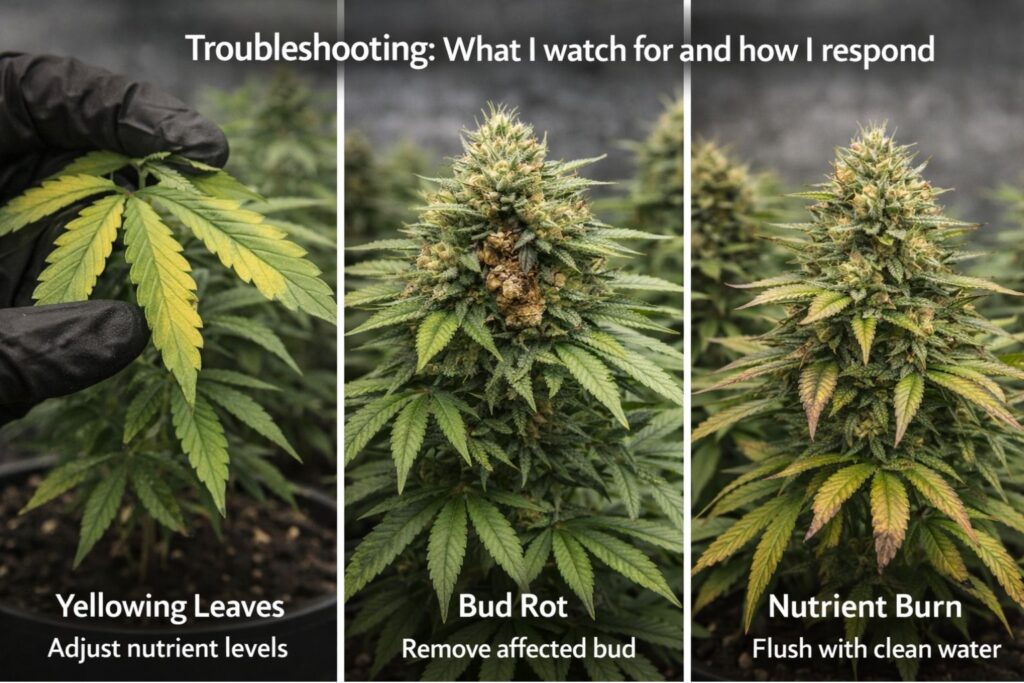
Most issues are predictable if you watch early signals.
Leaf tip burn troubleshooting in flower
If you’re seeing bright tips and darker, shiny leaves in mid flower, it’s often a sign you’re pushing too hard. Leaf tip burn troubleshooting in flower is mostly about backing off early and restoring balance, not panicking.
My step-by-step when tips start burning:
- Confirm environment is stable (heat + low humidity can mimic overfeed)
- Reduce feed strength slightly and watch new growth
- In coco, verify runoff trends and adjust watering frequency
- Avoid big swings; gradual changes are safer
If you correct early, the plant can still finish strong. Leaf tip burn troubleshooting in flower is a normal part of learning, but repeated burn usually costs aroma and smoothness.
I’m repeating leaf tip burn troubleshooting in flower because it’s common with sativa-leaning plants that look hungry but don’t like heavy salts late.
Humidity and mold risk
This ties directly to dry room humidity targets for marijuana later on. If you’re finishing in higher humidity, keep buds opened up and airflow consistent. Dense colas plus humid nights is a bad combination.
Harvest timing: what I look at
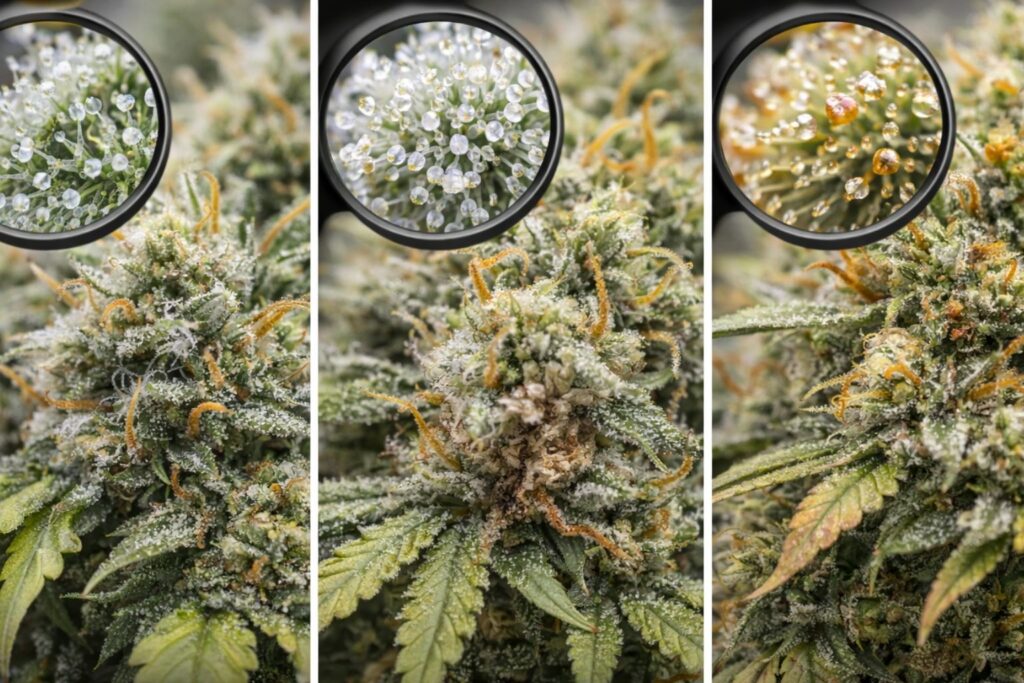
I don’t harvest by the calendar alone. I look at:
- Trichomes on calyxes (not just sugar leaf)
- Overall bud swelling
- Pistil maturity in context (some plants keep throwing pistils late)
- Plant fade and water use
If you’re unsure, take notes and sample a small lower bud. Over time you’ll learn your preference for “earlier” vs “later” finishes.
Drying and curing: where the real quality is made
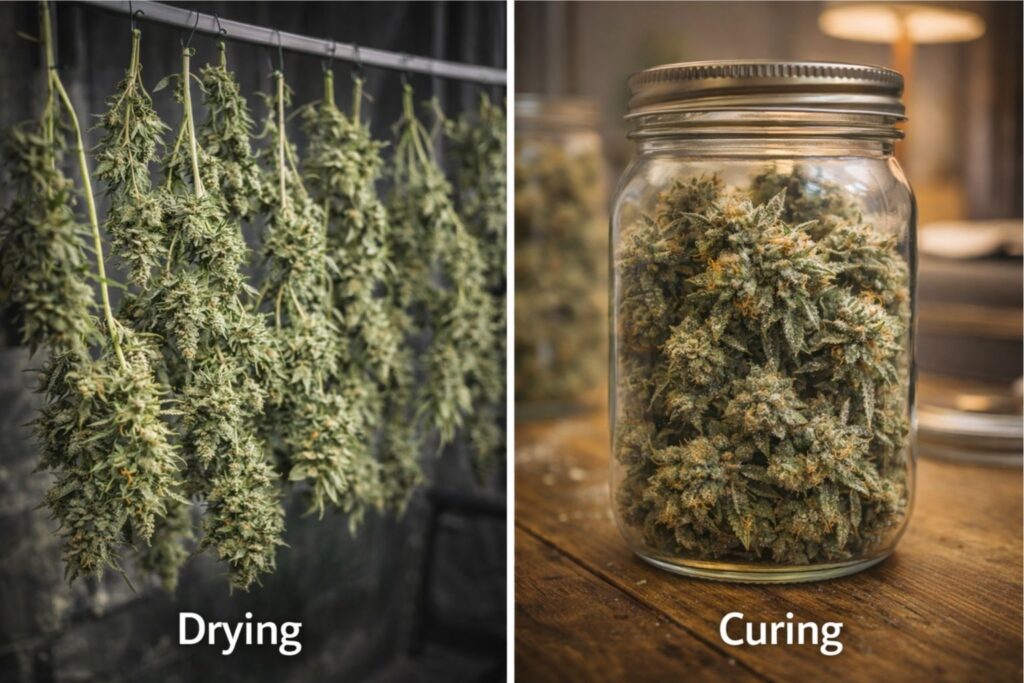
This is where many grows lose their best traits. If you want flavor, treat drying like part of cultivation.
Dry room humidity targets for marijuana
My goal is a slow dry that avoids crisping the outside while the inside stays wet. As a practical band, I aim for dry room humidity targets for marijuana that are moderate and stable, with good air exchange but no direct fan blasting the buds.
Drying basics that help:
- Keep the space dark
- Maintain gentle airflow around, not onto, hanging branches
- Use a steady temperature (avoid hot drying)
If you dry too fast, you often lose aroma. If you dry too slow in a damp room, you risk mold. That’s why dry room humidity targets for marijuana are not just theory; they’re risk control.
I track dry room humidity targets for marijuana every day until stems snap and smaller branches feel dry.
Post harvest jar burping schedule
Once buds are trimmed and jarred, the goal is to let moisture equalize and let chlorophyll break down without trapping damp air.
Here’s the post harvest jar burping schedule that’s worked for me:
- Days 1–7: open jars 1–2 times per day for 5–15 minutes (more if buds feel too moist)
- Days 8–14: open once per day or every other day
- Weeks 3–6: open 1–2 times per week as needed
The post harvest jar burping schedule changes with how well you dried. If buds were jarred too wet, you need more frequent burps and possibly to re-dry slightly. If they were too dry, burping won’t bring back lost aroma, so slow drying is still the priority.
I keep a simple rule: if the jar smells like wet grass, the post harvest jar burping schedule needs more air exchange. If it smells clean and floral, I slow down the burps and let it age.
I’m including the post harvest jar burping schedule because it’s one of the fastest ways to improve smoke quality without changing anything in the grow.
Seed shopping notes: practical questions people actually ask
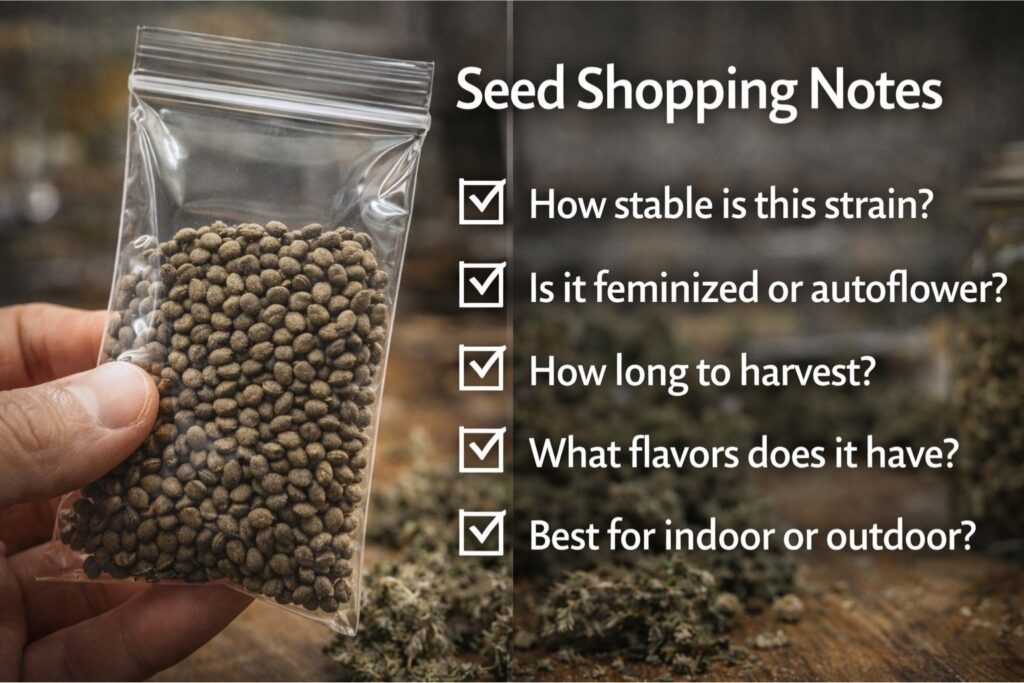
I’m not giving legal advice, and I’m not telling anyone what to do in their region. I’ll stick to practical consumer questions I see all the time.
If you’re comparing sources, think about:
- Are the genetics described clearly, with realistic expectations?
- Is there a way to contact support if there’s an issue?
- Do they provide tracking options and clear delivery information?
A common concern is ordering cannabis seeds discreet shipping. In my experience, discreet packaging and clear order updates reduce stress for buyers. If you care about privacy, ask customer service what “discreet” means in practice, and whether you can choose delivery options.
Another common question is what happens if the package is delayed. For ordering cannabis seeds discreet shipping, I recommend choosing a method with tracking and keeping your confirmation details organized, especially during holiday seasons when carriers slow down.
I’ll repeat it because people search it constantly: ordering cannabis seeds discreet shipping is about clear packaging, predictable updates, and support if something goes wrong.
FAQ: quick answers to long-tail grow questions
What’s the biggest mistake people make with sativa-leaning plants indoors?
Waiting too long to train. Once stretch starts, you’re reacting instead of controlling structure. Use early canopy shaping and consider trellis netting for stretchy cultivars if your space is limited.
How do I prevent harsh smoke in my finished weed?
Don’t rush drying. Use stable dry room humidity targets for marijuana, then follow a sensible post harvest jar burping schedule. Harshness is often a finish problem, not a genetics problem.
How can I tell if I’m overfeeding in flower?
Look for tip burn, dark glossy leaves, and stalled aroma development. Start with leaf tip burn troubleshooting in flower: check environment, then reduce strength slightly and watch the new growth.
Is this cultivar better in soil-style mixes or coco?
Both can work. Soil mixes can be forgiving; coco can be faster and more dialed if you track inputs and outputs. If you run coco, coco coir runoff ec in bloom helps you keep the root zone clean and avoid surprise salt buildup.
How can I improve bud consistency across the canopy?
Do light intensity mapping for cannabis canopy so your corners and side tops aren’t starving for light. Even bud quality comes from even light and airflow, not just a strong center hotspot.
Final notes from my run
To wrap this Alice In Wonderland Strain Review up in a practical way: this is a cannabis cultivar that can reward you with bright aroma, energetic lean, and solid resin, but it wants structure and stability. If you train early, keep the room steady, and finish slowly, the flavor holds far better than if you rush.
If you’re planning your own run, treat this as a starting point. Keep your own notes, because your tent, your nutrients, your water, and your phenotype will write the final version of the story.
And yes, I’ll say it one last time so it’s easy to find later: this Alice In Wonderland Strain Review is based on what I grew and finished myself, with an emphasis on repeatable targets instead of hype.
For a complete directory of cultivars, visit our Cannabis Strain Reviews.