Table of Contents
I’m writing this Alaskan Ice Strain Review the same way I keep my grow notes: what I observed, what worked, what I’d change next time, and what can go wrong if you try to “set and forget” the environment.
Alaskan Ice has a reputation for frost and intensity. In my room, the frost is real when the basics are dialed in, but it’s not a lazy plant. It stretches, it can be picky when pushed too hard, and it rewards growers who pay attention to airflow, humidity, and canopy control. If you’re looking at this as a cannabis, marijuana, or weed option for a focused, energetic vibe, the grown result depends heavily on harvest timing and a slow finish.
This Alaskan Ice Strain Review covers effects, flavor, genetics, and how I approach cultivation indoors and outdoors.
Genetics and what that means in the grow
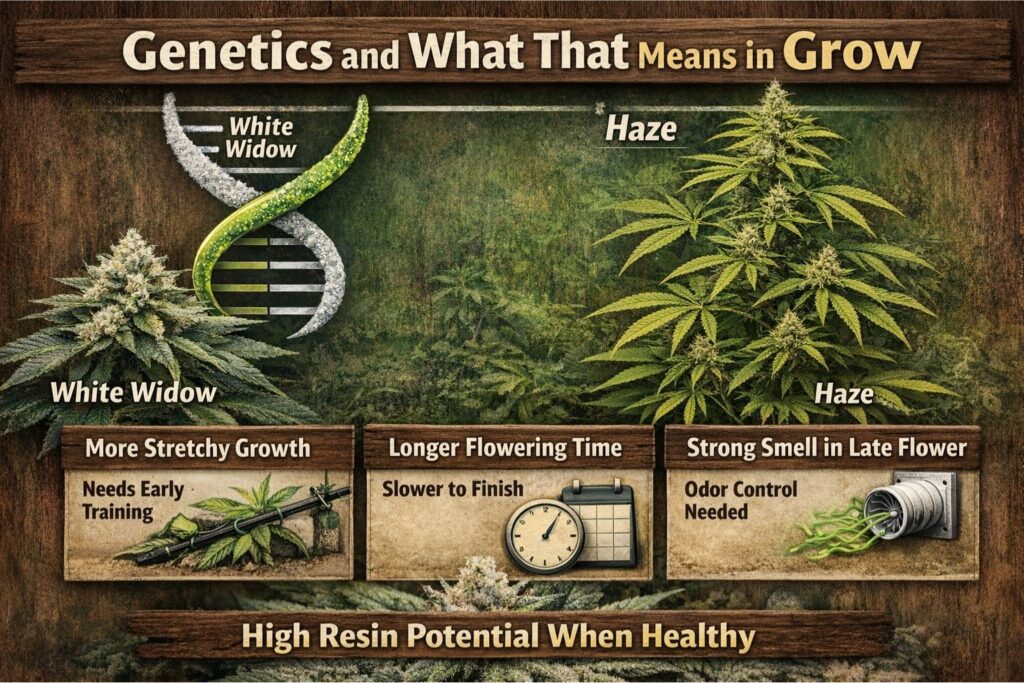
You’ll commonly see this cultivar described as White Widow and Haze in the family tree. In practical terms, that usually translates to:
- More stretch than many “chunky” types
- A longer flowering window than fast finishers
- Higher resin potential if the plant stays healthy and unstressed
I like to call this section White Widow Haze genetics in plain English: it can combine a sharp, bright head effect with a plant structure that wants training, not neglect. White Widow Haze genetics is also why I plan for strong odor control late flower and extra support, because heavy resin plus long branches equals flop risk.
I’ve run it from seed more than once, and I’ve seen phenotype variation:
- One pheno stays a bit shorter with tighter spacing.
- Another pheno stretches hard and needs early training.
- Aroma can lean more mint-forward in one plant and more spice-forward in another.
That variability is normal for seed-grown cannabis. If you need uniformity, the safe move is to pop more seeds than you think you need, then keep notes and select the keeper.
(That’s the first time I’ll say it, and I’ll repeat it because it matters for SEO and clarity: this is an Alaskan Ice Strain Review based on hands-on growing, not a copy-paste strain description.)
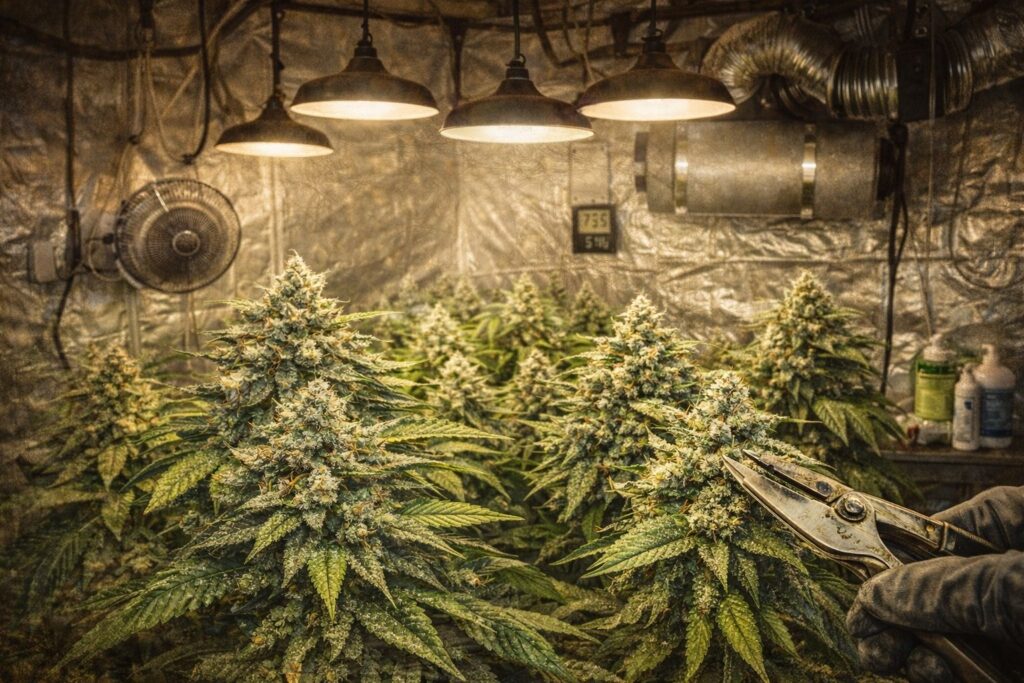
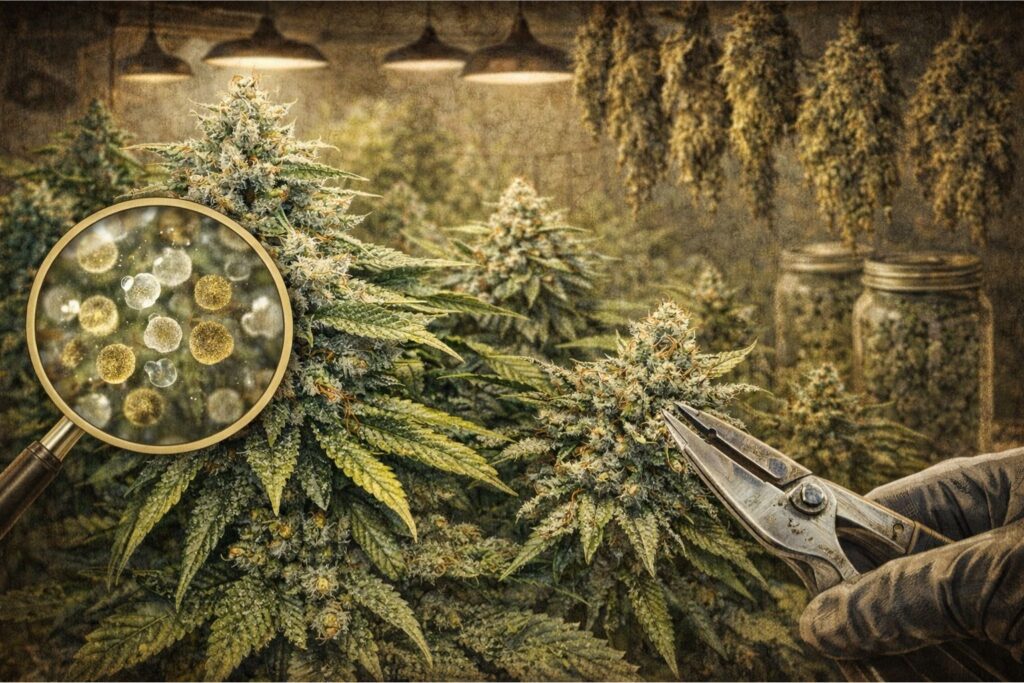
What the buds look like when it’s done right
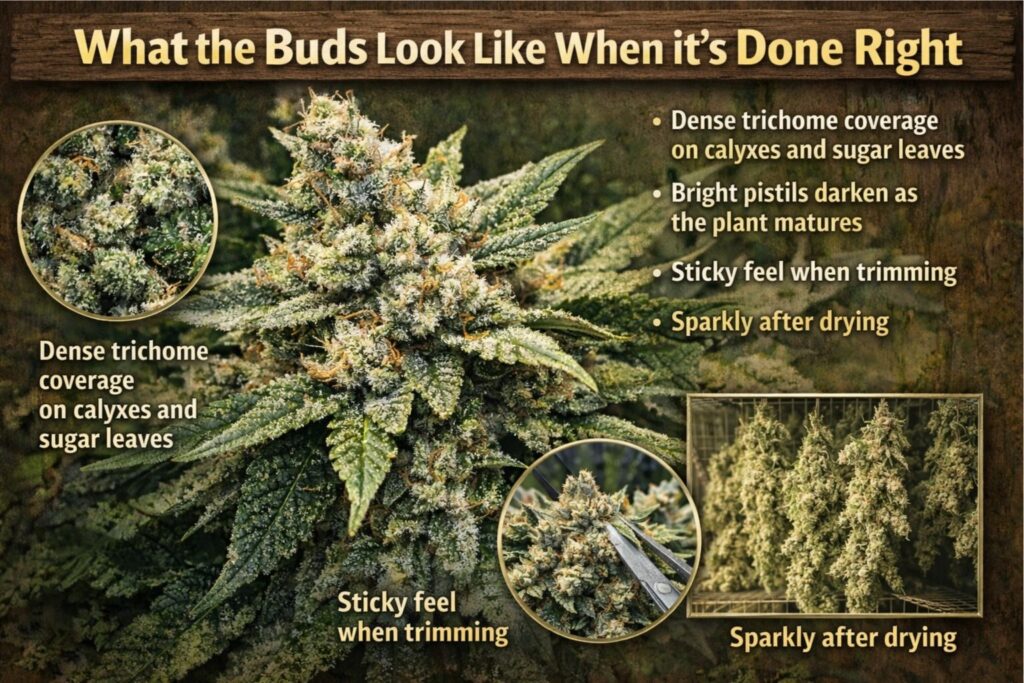
When Alaskan Ice is happy, the buds can look like they’ve been dusted with sugar. The goal is high trichome density buds without stressing the plant into weird leaf damage or stalled growth.
Here’s what I see at harvest on the better runs:
- Dense trichome coverage on calyxes and sugar leaves
- Bright pistils that darken as the plant matures
- A sticky feel that makes trimming slower than average
- A more “sparkly” look after 10–14 days of a controlled dry
If you’re chasing high trichome density buds, your biggest lever is stable environment plus a clean finish. Pushing nutrients too hard can backfire and mute the final smell and taste. High trichome density buds are earned by consistency, not by last-minute boosters.
Aroma and flavor: what I actually get
I separate smell into two phases: during flower, and after drying/curing. In late flower, the room smell can be sharp and loud. After a proper finish, the jar smell is more refined.
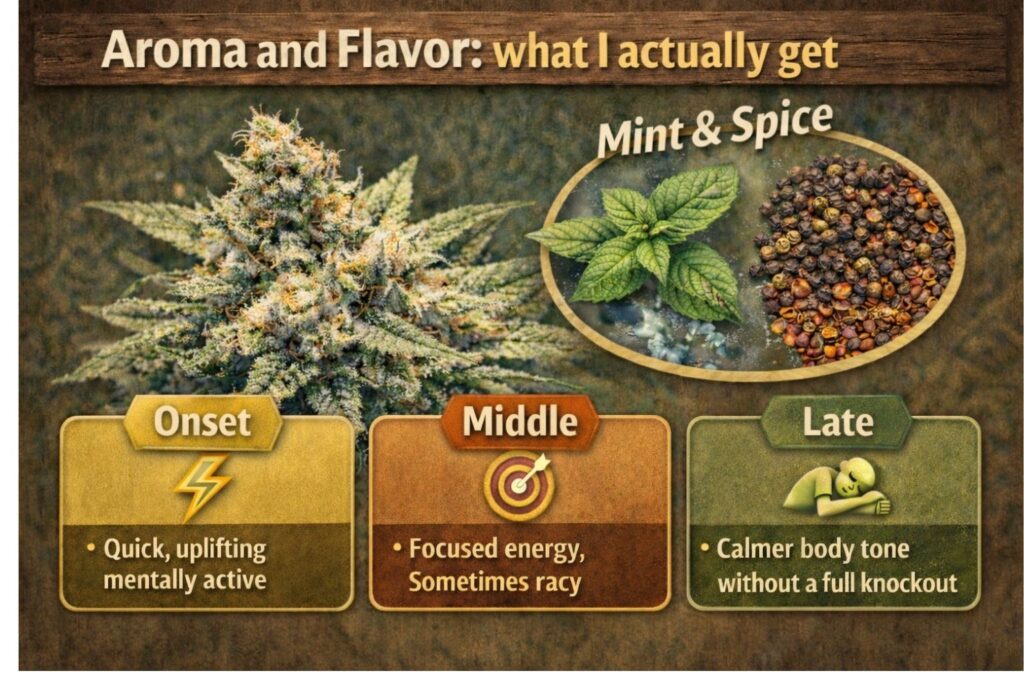
In my notes, the best batches land on mint and spice flavor notes, plus a darker, earthy base. When it’s rushed or overfed, it turns flatter and more generic.
I’ll break it down like this, since people search in plain language:
- First hit: cool edge, almost minty
- Mid palate: peppery spice and a “bright” bite
- Aftertaste: earthy and slightly floral
That’s consistent with how I describe an Alaskan Ice terpene breakdown to friends: cooling top notes, spicy middle, and a grounded base. Alaskan Ice terpene breakdown can shift plant to plant, but the “cool + spice” theme shows up often for me. When the cure is done right, Alaskan Ice terpene breakdown reads cleaner and more layered.
If you want mint and spice flavor notes to survive the process, your dry and cure checklist matters more than your brand of nutrients. Mint and spice flavor notes are fragile if you dry too warm, too fast, or in a low-humidity space.
Effects: what to expect, and what can vary
I’m careful with effects talk, because cannabis, marijuana, and weed all hit differently depending on tolerance, set/setting, and the specific harvest window.
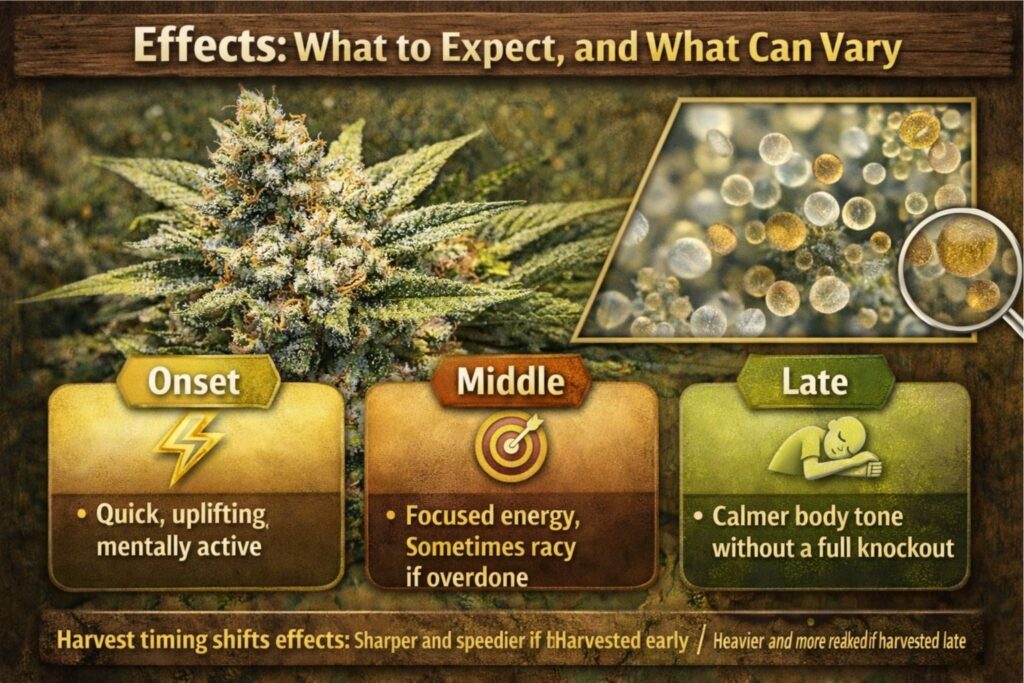
In my own use, I describe it as an energetic cerebral high first, with a slower slide into body calm later. Energetic cerebral high is exactly the phrase I’d use for the early phase: alert, chatty, and mentally “up.” If I harvest a touch earlier, the energetic cerebral high is sharper. If I harvest later with more amber trichomes, it feels more weighted and less speedy.
Here’s the realistic effect profile I’ve seen across multiple jars:
- Onset: quick, uplifting, mentally active
- Middle: focused energy, sometimes racy if overdone
- Late: calmer body tone without a full knockout
If you’re sensitive to anxious feelings, this is not the cultivar I’d suggest as a first experience. That’s not medical advice, just a practical caution from a grower who has shared samples with a wide range of friends. Start low, go slow, and pay attention to your own response.
(Second mention for clarity and consistency: this Alaskan Ice Strain Review is describing common experiences, not guarantees.)
Indoor grow setup (my baseline numbers)
Below is the part most growers ask for: how I run it under lights. I’m listing typical ranges I’ve used successfully, but every room differs.
Light schedule and intensity
Vegetative stage:
- Photoperiod: 18/6 is my default
- PPFD: 300–600 depending on plant size and CO2 (if you run it)
- Keep the canopy even early to reduce later headaches
Flowering stage:
- Photoperiod: 12/12
- PPFD for flowering cannabis: 700–900 for most home setups
- PPFD for flowering cannabis can go higher if everything else is perfect, but most issues come from pushing too much light without matching airflow, nutrition, and VPD.
I’m repeating this because it’s important: PPFD for flowering cannabis is not a flex number. It’s a balance number. PPFD for flowering cannabis that’s too high can trigger stress, foxtailing, or harsh smoke if your plant can’t keep up.
Temperature, humidity, and VPD
I use VPD targets for cannabis to guide the room, especially in late flower where mold risk climbs.
Typical bands I aim for:
- Veg: 24–28°C, 55–70% RH
- Early flower: 24–27°C, 50–60% RH
- Late flower: 22–26°C, 40–50% RH
If you like a simple approach, keep a VPD chart for flowering near your controller and don’t chase perfect numbers. I literally keep a VPD chart for flowering on my phone and a printed one in the room. When people ask why their buds feel “wet” late flower, the VPD chart for flowering is usually the answer.
I’ll say it three times as requested for SEO consistency:
- VPD targets for cannabis help me decide whether to lower RH or raise temperature slightly.
- VPD targets for cannabis are most helpful when the canopy is dense and airflow is limited.
- VPD targets for cannabis won’t fix everything, but it will prevent a lot of avoidable problems.
Feeding and EC/PPM
Alaskan Ice can handle moderate feeding, but I’ve seen it complain when I try to slam it with salts.
If you’re in coco or hydro:
- Early veg: EC 0.8–1.2 (roughly 400–600 ppm on a 500 scale)
- Late veg: EC 1.2–1.6
- Early flower: EC 1.6–2.0
- Mid flower: EC 1.8–2.2 if the plant is healthy
- Late flower: taper down to avoid harshness
In soil, I go lighter and focus more on consistency and proper dry-backs. Nutrient burn is easy to spot: leaf tips crisping and clawing. If you see that, don’t “fight it” with more additives. Back off, check runoff, and let the plant recover.
Training: how I keep it under control
This cultivar can stretch, so indoor stretch management is not optional if you want a clean canopy. Indoor stretch management starts before the flip, not after.
Here’s the routine that keeps me out of trouble:
- Top once or twice in veg, depending on time
- Early LST to spread the plant wide
- Defoliate lightly before flip (don’t overdo it)
- Add a net and commit to SCROG net training
SCROG net training is my favorite way to tame the stretch while keeping buds in the best light zone. With SCROG net training, I focus on:
- Spreading branches into open squares
- Keeping tops at similar height
- Removing weak inner growth that will never get good light
I’ll repeat it for clarity and keyword coverage:
- Indoor stretch management is easier with early training than with heavy bending late.
- Indoor stretch management improves airflow and reduces larf.
- Indoor stretch management plus SCROG net training is a strong combo for this type of plant.
Flowering time and harvest timing
Most of my runs land at a flowering time 9 weeks, but I don’t harvest by calendar alone. I harvest by trichomes and plant behavior.
Flowering time 9 weeks is a helpful plan for scheduling, drying space, and trimming help. Flowering time 9 weeks is also realistic for a lot of indoor rooms. But flowering time 9 weeks can stretch to 10 if you’re chasing a heavier, more mature finish.
Harvest markers I watch:
- Trichomes mostly cloudy with some amber if I want more body
- Pistils mostly darkened and receded
- Fade that looks like normal senescence, not deficiency chaos
IPM and mold prevention (especially late flower)

With dense canopies and resin-heavy buds, prevention matters.
My basic IPM habits:
- Strong, constant air exchange
- Oscillating fans that move leaves (not just blast one spot)
- Keep leaves off wet surfaces and out of standing water
- Inspect undersides weekly for pests
- Avoid spraying anything late flower unless you absolutely must
Late flower mold prevention is mostly about:
- RH control
- Airflow through the canopy
- Not overwatering near harvest
Drying and curing: the part that makes or breaks it
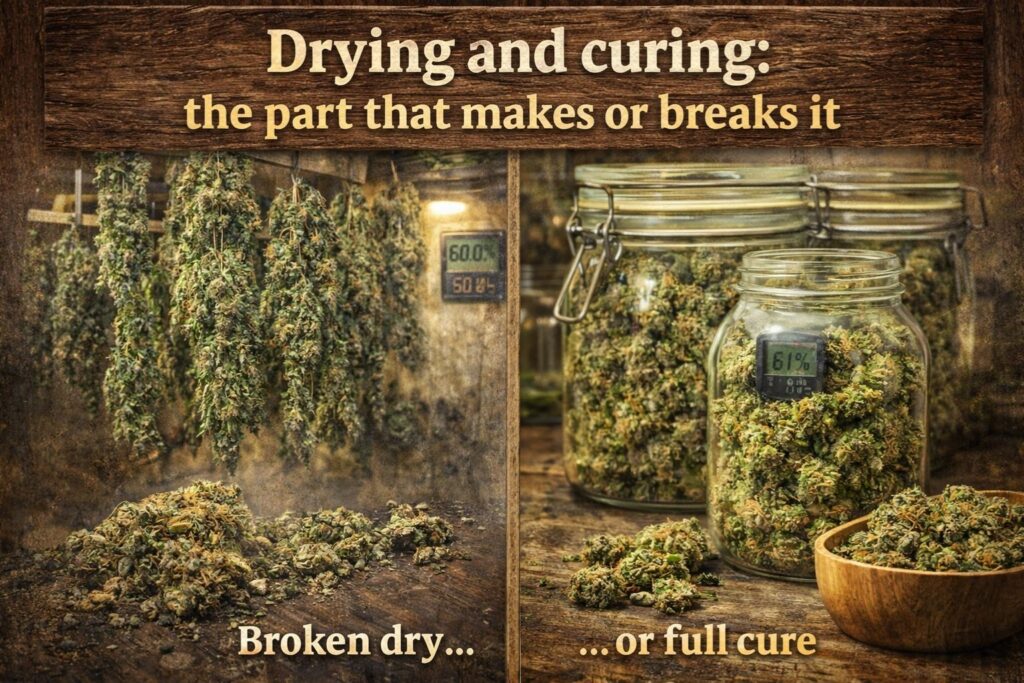
If you want mint and spice flavor notes and a clean jar smell, follow a drying and curing protocol with patience.
My drying and curing protocol is simple:
- 18–20°C room temp
- 55–60% RH
- 10–14 days if possible
- Gentle airflow, no direct fan on buds
Then I trim and jar. My drying and curing protocol for the first two weeks in jars:
- Burp daily for 5–10 minutes
- Watch for ammonia smell (means too wet)
- Keep jars in a cool, dark place
After two weeks, I burp less often. After four weeks, the flavor usually rounds out and the smoke smooths.
Here’s a dry and cure checklist you can copy:
- Hang whole branches if your room allows it
- Keep the space dark
- Don’t rush the first 72 hours
- Start jarring only when small stems snap, not bend
- If buds feel wet in the jar, pull them out for a few hours
That’s the third time I’ll say it in the exact phrase:
- Drying and curing protocol matters more than most people think.
- Drying and curing protocol is where harshness is either created or prevented.
- Drying and curing protocol is the difference between “loud” and “flat.”
Buying seeds and what to look for (practical, not salesy)
When people search, they often type things like “buy cannabis seeds online” or “which seed bank ships discreetly.” I’ll keep this general and non-legal-advice.
If you’re shopping for sativa-leaning hybrid seeds, look for:
- Clear breeder info and provenance
- Fresh stock and proper storage
- Transparent shipping and tracking policies
- Real customer service (not just marketing)
If you prefer feminized seeds, check the listing details so you’re not surprised. If you want autoflowering genetics, note that Alaskan Ice is typically discussed as a photoperiod type, not an autoflower. Make sure you match your lighting schedule and your goals.
Also remember: grow laws by region vary a lot. Read your local rules and follow them. This is not legal advice.
FAQ (quick answers to common search queries)
Is Alaskan Ice more indica or sativa?
In my grows and in how it behaves, it reads sativa-leaning in stretch and effect. I still treat it as a hybrid because phenotype variation exists.
What is the best setup for beginners?
If you’re new, focus on environment first. Stable temps, stable humidity, and good airflow matter more than fancy nutrients. This Alaskan Ice Strain Review is honest: it’s doable for newer growers, but it’s not the most forgiving cultivar if you ignore humidity and training.
Soil vs hydro: which works better?
Both can work. In soil, I see a slightly wider margin for error on feeding, but growth can be slower. In coco/hydro, I get faster growth and more control, but mistakes show up quicker. Choose the method you can manage consistently.
How do I prevent nutrient burn?
Start lighter than you think, increase slowly, and watch the leaf tips. If tips burn, back off and stabilize. Don’t stack too many additives.
Why did my plant stretch so much after flip?
That’s normal behavior for White Widow Haze genetics leaning plants. Use indoor stretch management and commit to SCROG net training before and during the first 2–3 weeks of flower.
When should I harvest for a cleaner, less racy effect?
Harvest timing changes the feel. If you want less sharpness, don’t harvest too early. Let trichomes reach mostly cloudy with a little amber. That typically softens the energetic cerebral high into something calmer.
Final thoughts from the grow room
To wrap up this Alaskan Ice Strain Review, I’ll keep it simple: this is a cultivar I respect. When you manage the stretch, keep VPD targets for cannabis in a sane range, and finish with a proper drying and curing protocol, the result can deliver high trichome density buds and a clear set of mint and spice flavor notes.
If you want a shortlist from this Alaskan Ice Strain Review:
- Plan for training early
- Keep a VPD chart for flowering nearby
- Don’t overfeed in mid flower
- Use PPFD for flowering cannabis as a balanced target, not a brag
- Treat the cure like part of the grow, not an afterthought
For a complete directory of cultivars, visit our Cannabis Strain Reviews.