Table of Contents
Why I keep a spot for the $100 OG strain in my room
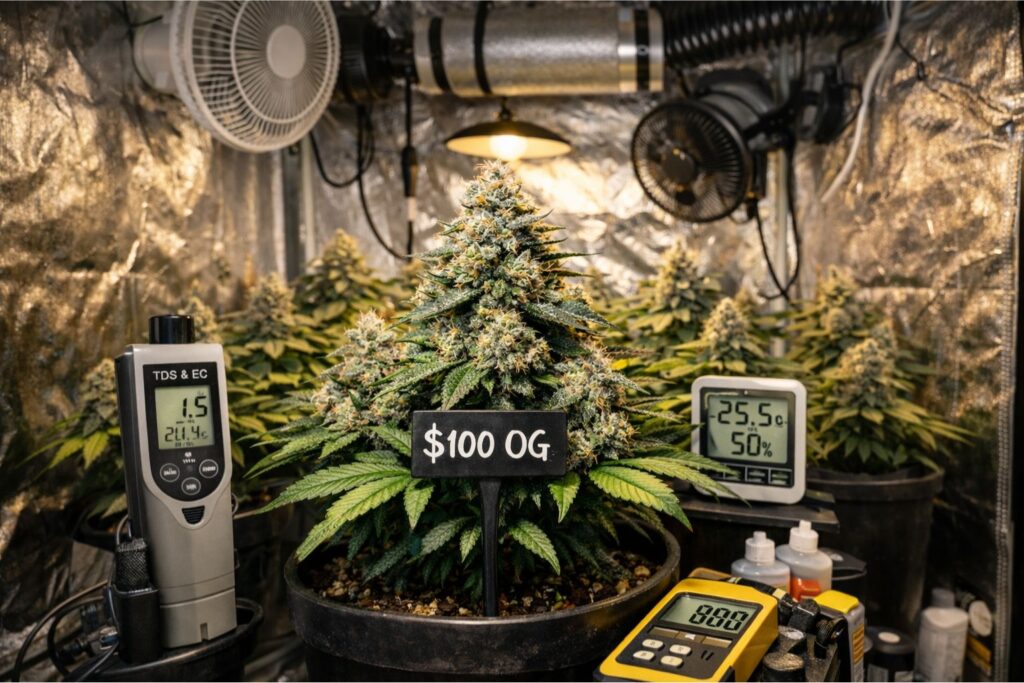
I’ve run the $100 OG strain from seed in both soil and coco, and I keep coming back to it because it behaves like a classic OG-leaning hybrid: it responds well to training, stacks dense flowers, and rewards patient drying and curing. This $100 OG strain grow guide is written from the grower’s side of the table, including what I measure (PPFD, VPD, EC) and what I watch for (stretch, leaf posture, aroma shifts, and finish timing).
I’ll be honest about trade-offs. The $100 OG strain can be forgiving in veg, but once buds tighten up you need airflow and humidity control. If your room runs damp, you’ll want to take the $100 OG strain humidity management section seriously.
Genetics in plain grower terms
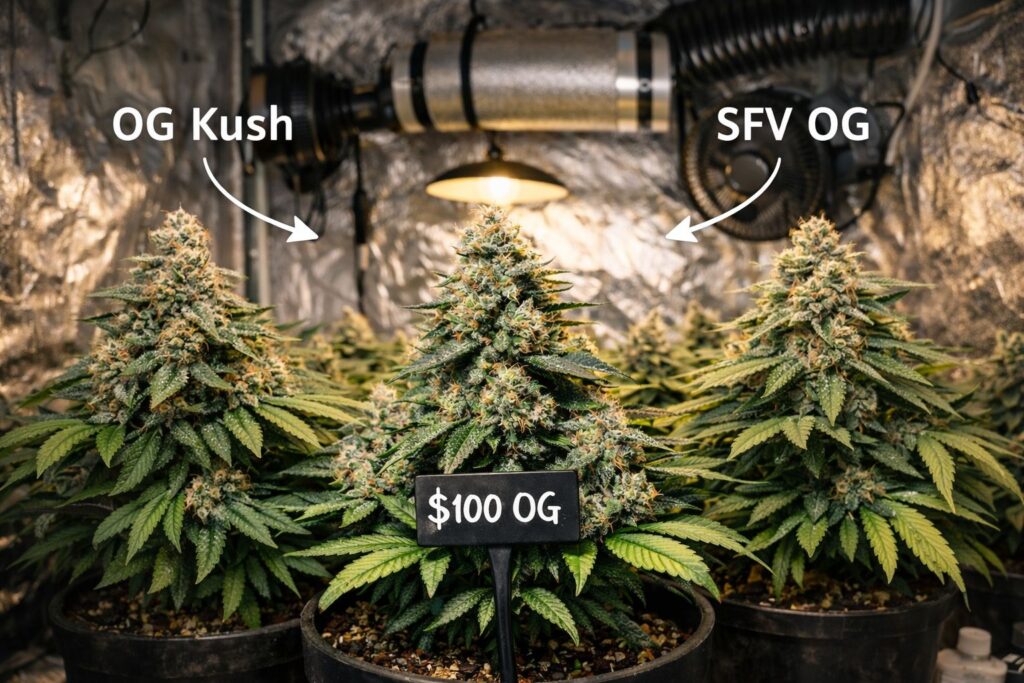
Most talk around this cultivar ties it to OG-family roots and SFV-style heritage. I don’t treat strain lore as gospel, but I do see OG traits in structure and resin production: strong apical dominance early and chunky calyx formation later.
If you pop more than one seed, plan a small phenotype hunt. In my tents, one plant finished earlier with lighter, brighter aroma, while another went longer with heavier fuel and tighter buds. That’s why I recommend labeling plants and keeping notes if you ever plan a $100 OG strain clone selection. During veg I take a small, healthy cutting from each candidate so $100 OG strain clone selection doesn’t depend on memory later.
Effects: what I notice, and what can go sideways
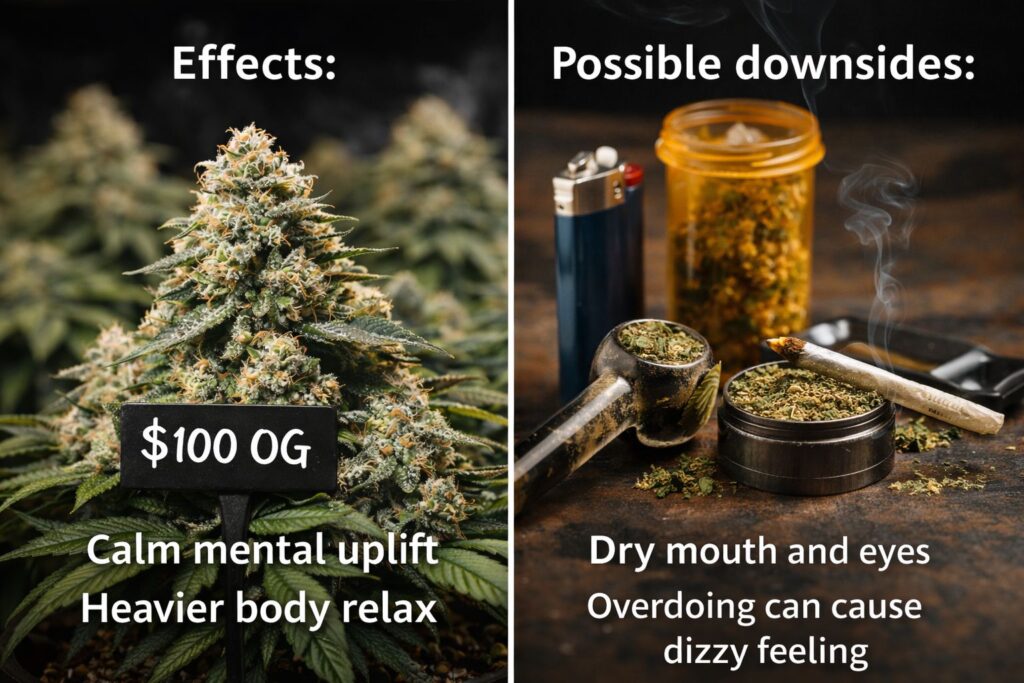
Effects really depend on dose, setting, and your personal tolerance. For me, the $100 OG strain usually starts as a calm mental lift—clearer mood, less mental noise—and then gradually slides into a heavier “settle-in” feeling in the body that makes lounging feel extra comfortable. I’ve also noticed it can boost appetite, especially later in the session, and it sometimes makes music or a movie feel a bit more immersive.
If you overdo strong weed, the downsides can show up fast: dry mouth, dry eyes, a little lightheadedness, or that “too high” moment where you just need to slow down and hydrate. If you’re new to marijuana (or haven’t tried this potency before), start small, give it time to fully kick in, and only then decide whether you want more. I’m not making medical claims here—just describing common user experiences and what I’ve observed from the grow side and from people who’ve tried it.
Flavor and aroma: my $100 OG strain aroma notes
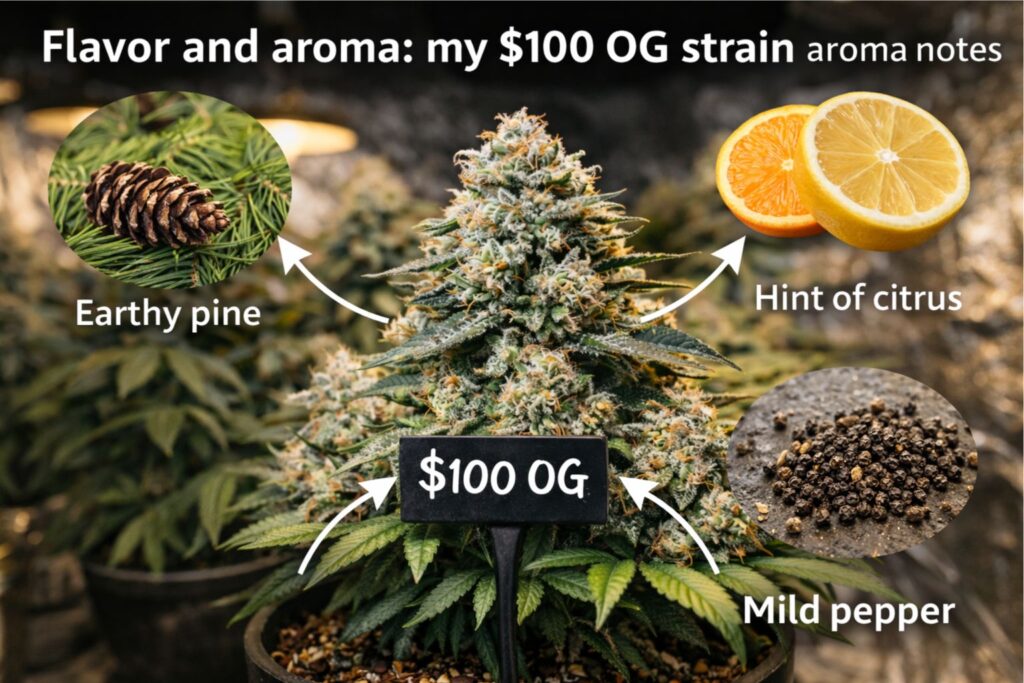
When the plant is grown clean and cured slowly, I usually get earthy pine right up front, backed by that classic resinous “OG” funk that hangs in the nose and sticks to the grinder. Depending on the cut, some phenotypes lean brighter and add a citrus-peel pop, while others bring a mild peppery finish that comes through more on the exhale. Those $100 OG strain aroma notes start to matter most after about week 5 of flower—by then the plant is showing what it really is, and that’s when I begin judging which one has the structure, resin, and nose worth keeping around as a keeper.
To protect terpenes, I avoid high heat late in flower, keep airflow steady, and I don’t push heavy nitrogen after mid-bloom because it can muddy the flavor and delay ripening. I focus more on balance and a smooth fade so the plant can stack and ripen without that “green” edge. A rushed dry will flatten everything and turn a loud plant into something forgettable, so I take my time and let it dry slow before moving into a proper jar cure. If you’re following along, don’t skip the $100 OG strain jar-cure section later—those extra weeks of patience are often the difference between “pretty good” and “wow.”
My indoor setup: light, air, and the $100 OG strain indoor canopy
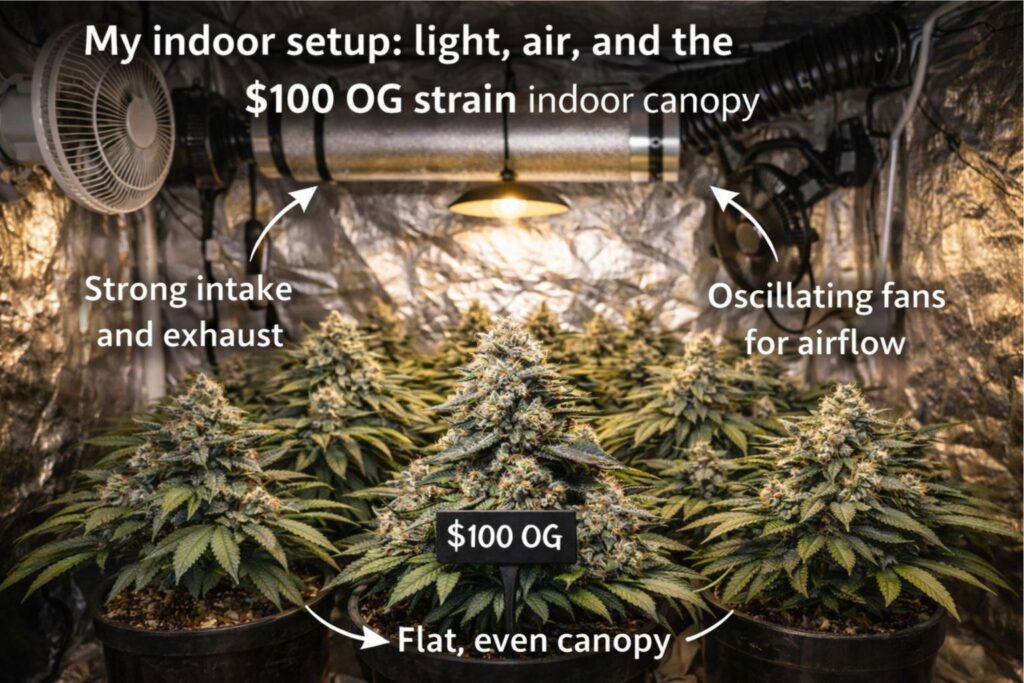
My best results came from a flat canopy and consistent air exchange. A tidy $100 OG strain indoor canopy is the difference between top colas that finish together and a mixed canopy that forces compromises at harvest.
Gear aside, the fundamentals are:
- Strong intake and exhaust
- Oscillating fans moving air through and under the canopy
- A way to lower humidity during late flower (dehumidifier or dry lung room)
- A PAR meter or reliable PPFD map if you want repeatability
When I’m dialing a $100 OG strain indoor canopy, I’d rather lower plants and spread branches than raise the light too high and chase intensity. Keeping the fixture in a more effective zone lets me maintain better uniformity and penetration, while training and spacing the tops helps every site get a similar share instead of turning into a “hot center / dim edges” situation.
I’ll open the plant up with gentle branch work, widen the footprint, and keep the canopy flat so the best light hits a broad, even surface—then the lowers actually have a chance instead of living in shade. It’s also easier to manage heat and leaf temperature when the light isn’t miles away at max power, and I’d rather win with structure and balance than brute-force PPFD that only the tallest tops can handle.
$100 OG strain feeding EC and basic nutrient targets
I’m conservative with salts. In coco, I feed to runoff and watch trends in runoff EC and plant color. My $100 OG strain feeding EC approach is steady, not aggressive.
Typical targets I’ve used as starting points:
- Seedling: EC 0.6–0.8 (300–400 ppm on 500 scale)
- Veg: EC 1.2–1.6 (600–800 ppm)
- Early flower: EC 1.6–1.9 (800–950 ppm)
- Late flower: EC 1.4–1.8 (700–900 ppm)
In soil, I aim for the same outcomes with slower inputs: avoid waterlogging, keep calcium and magnesium available, and don’t overdo nitrogen late.
If you see burnt tips and dark, clawing leaves, back off. If you see pale new growth, check pH first, then adjust feeding.
$100 OG strain light intensity: PPFD ranges I actually run

I ramp intensity instead of jumping. My $100 OG strain light intensity targets for indoor LED grows without added CO2:
- Seedlings: 150–250 PPFD
- Veg: 350–650 PPFD
- Flower: 700–900 PPFD
Leaf temperature matters a lot. If you crank the light but your VPD is off, the plant can’t transpire enough to keep up, so it either runs too warm, closes stomata, or just stalls out even though the PPFD looks “perfect” on paper. That’s why I treat $100 OG strain light intensity and VPD as a pair: more light usually means more demand for water movement and cooling, so the air’s temperature and humidity have to be in the right zone to support that. When those two are balanced, the plant stays more responsive—leaves stay “praying,” uptake stays steady, and you can push growth without riding the edge of stress.
$100 OG strain humidity management with real numbers: VPD, temp, and RH
Dense flowers hate stagnant, wet air. My $100 OG strain humidity management targets keep me out of trouble:
- Veg VPD: 0.8–1.2 kPa
- Early flower VPD: 1.1–1.3 kPa
- Late flower VPD: 1.3–1.5 kPa
Temperature and humidity bands that work for me:
- Lights on: 24–28°C
- Lights off: 18–22°C
- RH veg: 60–70%
- RH late flower: 45–55%
If you’re chasing quality cannabis, late-flower humidity control is non-negotiable. $100 OG strain humidity management is also where small rooms get exposed, because there’s nowhere for moisture to hide—if your exhaust is weak or your dehu can’t keep pace, RH will creep up right when buds are at their densest and most vulnerable. That’s when you start seeing the real consequences: slower dry-down inside the flowers, a higher risk of funk or botrytis, and a “soft” finish that robs the nose and burn quality.
I treat late flower like a tightening window: steady airflow through the canopy, consistent extraction of humid air, and a setpoint that doesn’t swing wildly at lights-off. When the room holds the line, the buds finish harder, terps stay sharper, and you’re not gambling your best colas in the last two weeks.
Soil vs coco: what changed in my results
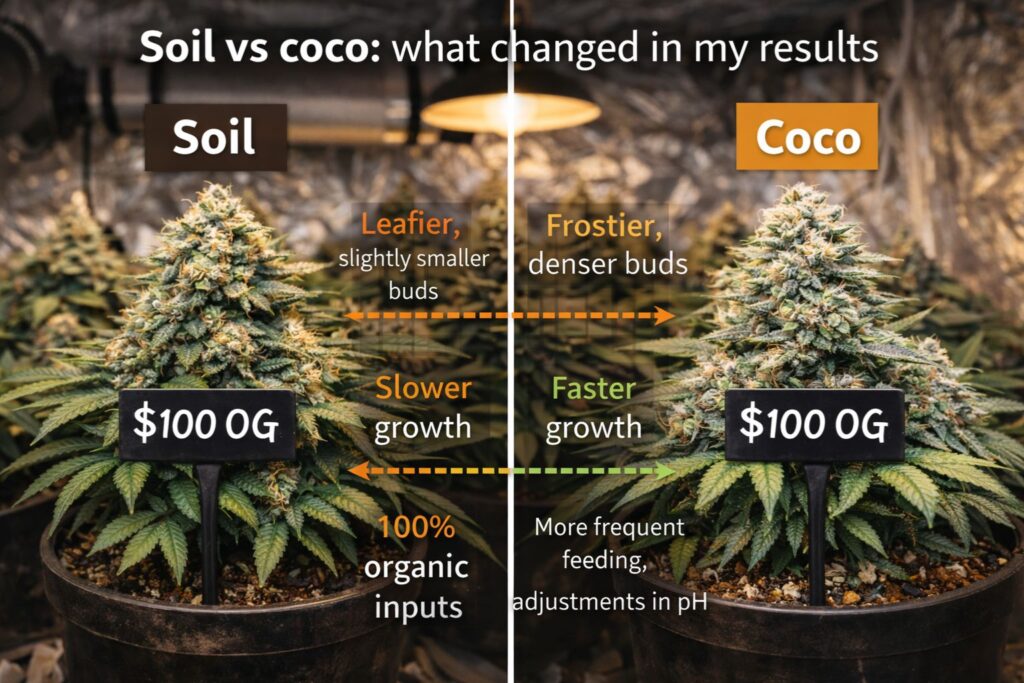
In soil, the $100 OG strain felt more forgiving when I missed an irrigation window—the buffer is real. The root zone stays stable longer, so the plants didn’t punish me for small timing slips, and they bounced back cleanly from minor mistakes like a slightly off dryback or a light underfeed. Soil also seemed to smooth out day-to-day swings, which made the overall run feel less “on a knife edge,” especially in early flower when I’m still shaping the canopy.
In coco, everything moved faster and I had way more control, but it only paid off when I stayed consistent with feed frequency and runoff. When I hit my cadence, growth was noticeably more aggressive, EC/uptake felt predictable, and I could steer the plant harder—stacking and pushback were easier to read. But coco also exposed any laziness: miss a feed, let runoff drift, or allow salts to build, and the plant let me know quickly. For me, soil is the safer, more forgiving lane; coco is the higher-performance lane—as long as I’m disciplined.
If you’re deciding between soil vs coco, match it to your schedule:
- Soil suits fewer feedings and more buffering.
- Coco suits frequent, smaller irrigations and tighter control.
Either way, good roots come from oxygen and rhythm, not from more bottles.
Training: my $100 OG strain stretch control routine
The first three weeks after flip decide your canopy. My $100 OG strain stretch control routine is simple:
- Top once in veg after strong growth shows.
- Use low-stress training to spread branches and level tops.
- Clean the bottom third so energy goes to productive sites.
- Defoliate lightly around day 21 of flower to improve airflow.
This is also where you’ll really see phenotype differences show themselves. Some $100 OG strain plants will stretch hard and stay “hungry” longer, while others stack tighter, finish quicker, and get cranky if you push them the same way. If you’re struggling, revisit the $100 OG strain stretch-control steps and consider reducing nitrogen going into the flip—too much N at transition can keep the plant in a pushy, leafy mode and make the stretch harder to manage.
For a consistent $100 OG strain indoor canopy, I keep tying branches outward and re-leveling tops until stretch fully stops. The goal is to keep every main tip in the same light zone, spread the plant into a wider, flatter profile, and prevent a few dominant leaders from running away with the room. Once the stretch ends, I let the plant “lock in,” clean up anything that’s shaded or unproductive, and shift my focus to steady environmental control so the buds can harden without fighting the structure.
Flowering time and the $100 OG strain harvest window
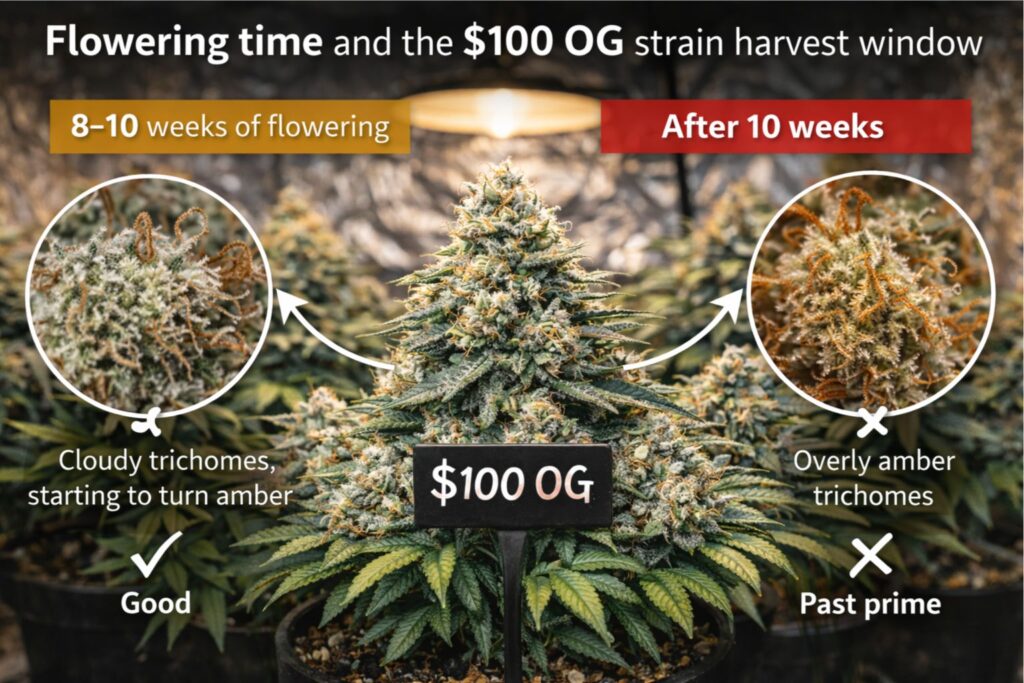
In my room, most plants finished around 8–9 weeks after flip, but I’ve had phenotypes that wanted extra days for full ripeness. The $100 OG strain harvest window is something I define by trichomes on calyxes, not by the calendar.
My harvest checklist:
- Trichomes mostly cloudy with some amber, depending on the effect you prefer
- Aroma peaks and stops changing daily
- Water uptake slows near the end
- Buds feel dense and “set,” not still swelling
When people ask for a hard schedule, I point them to this: the $100 OG strain harvest window is earned by observation. I also keep the $100 OG strain harvest window in mind when planning drying space, because crowding a dry room ruins quality.
$100 OG strain jar cure: drying and curing the way I do it
A lot of harsh weed is simply rushed post-harvest. My $100 OG strain jar cure process:
- Dry at 18–20°C and 55–60% RH for 10–14 days
- Jar when small stems snap, not bend
- Burp daily for the first week, then taper as moisture stabilizes
- Cure 3–6 weeks for smoother smoke and clearer flavor
If you want the $100 OG strain aroma notes to actually hold, don’t dry too hot or too fast. When the dry is rushed, the loud top notes fade first and what’s left can feel flat or “hay-like,” even if the buds look great. I aim for a slow, steady dry with stable conditions so moisture leaves the flower evenly instead of getting yanked out of the outer layers while the inside is still wet.
A patient $100 OG strain jar cure is the easiest “upgrade” you can make without buying new gear. Once the flower is dried properly, a controlled cure lets the moisture equalize, smooths out the burn, and gives terpenes a better chance to present clean and consistent. Even a good run can become noticeably better with a little extra time in jars, and a mediocre dry can’t be fully rescued no matter how nice the genetics are—so curing is where I’d always spend my patience first.
Seeds, shopping, and realistic expectations

If you’re comparing feminized seeds vs regular seeds, feminized usually makes planning easier for small rooms. Autoflowering lines can be great for speed, but they’re a different rhythm and can be less forgiving when you miss feed timing.
When I buy cannabis seeds online, I look for:
- Clear genetics info (photoperiod vs auto, feminized vs regular)
- Storage and handling guidance
- Straightforward shipping and customer support
Grow laws vary by region. Always check local rules and follow them; this isn’t legal advice.
FAQ: quick answers growers search for
How do I start this cultivar from seed without issues?
Use a simple germination method, keep temps stable around 24–26°C, and avoid waterlogged media. Once seedlings are established, give gentle light and don’t overfeed.
What’s the best photoperiod schedule?
For veg, I use 18/6. For flower, I switch to 12/12 and keep the dark period truly dark. Consistency matters more than tweaks.
How do I avoid nutrient burn?
Follow the $100 OG strain feeding EC idea: increase EC slowly, watch leaf tips, and use runoff readings in coco. Most problems come from pushing too hard too early.
Why is my tent humid in late flower?
Late flower is when transpiration and bud mass peak. Treat $100 OG strain humidity management as a system: dehumidify, increase airflow, and thin crowded growth.
How do I choose a keeper in a phenotype hunt?
Keep notes on stretch, finish timing, yield, and the $100 OG strain aroma notes. If you want to preserve a winner, plan a clean $100 OG strain clone selection and keep mothers pest-free. The earlier you start $100 OG strain clone selection, the easier it is to keep the keeper genetics.
Final notes from my notebook
If you only take one thing from this $100 OG strain grow guide, make it consistency. I wrote this $100 OG strain grow guide so you can copy my targets and then adjust to your room. Stable environment, measured inputs, and patient curing are what turn a decent harvest into memorable cannabis. When I apply that approach, the $100 OG strain is a reliable performer with a classic profile and plenty of room for a grower to dial it in.
For a complete directory of cultivars, visit our Cannabis Strain Reviews.